Lexmark X342N Service Manual - Page 23
Diagnostic information, Start, Power-On Reset (POR) sequence
 |
UPC - 734646256292
View all Lexmark X342N manuals
Add to My Manuals
Save this manual to your list of manuals |
Page 23 highlights
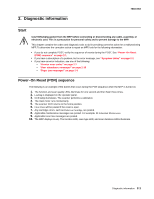
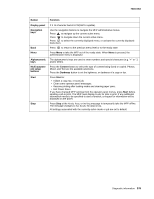
2. Diagnostic information 7003-XXX Start CAUTIONUnplug power from the MFP before connecting or disconnecting any cable, assembly, or electronic card. This is a precaution for personal safety and to prevent damage to the MFP. This chapter contains the codes and diagnostic tools to aid in providing corrective action for a malfunctioning MFP. To determine the corrective action to repair an MFP, look for the following information: • If you do not complete POST, verify the sequence of events during the POST. See "Power-On Reset (POR) sequence" on page 2-1. • If you have a description of a problem, but no error message, see "Symptom tables" on page 2-2. • If you have an error indication, see one of the following: - "Service error codes" on page 2-7 - "User attendance messages" on page 2-10 - "Paper jam messages" on page 2-9 Power-On Reset (POR) sequence The following is an example of the events that occur during the POR sequence when the MFP is turned on. 1. The function and scan quality LEDs illuminate for one second and then flash three times. 2. Loading is displayed on the operator panel. 3. CCD lamp illuminates. The scanner performs a calibration. 4. The main motor runs momentarily. 5. The scanner CCD returns to the home position. 6. Close Door will be posted if the cover is open. 7. Any cartridge errors, such as Defective Cartridge, are posted. 8. Applicable maintenance messages are posted. For example, 80 Scheduled Maintenance. 9. Applicable toner low messages are posted. 10. The MFP displays Ready. The function LED, scan type LED, and scan darkness LEDs illuminate. Diagnostic information 2-1
-
 1
1 -
2
-
3
-
4
-
5
-
6
-
7
-
8
-
9
-
10
-
11
-
12
-
13
-
14
-
15
-
16
-
17
-
 18
18 -
 19
19 -
 20
20 -
 21
21 -
 22
22 -
 23
23 -
 24
24 -
 25
25 -
 26
26 -
 27
27 -
 28
28 -
29
-
30
-
31
-
32
-
33
-
34
-
35
-
36
-
37
-
38
-
39
-
40
-
41
-
42
-
43
-
44
-
45
-
46
-
47
-
48
-
49
-
50
-
51
-
52
-
53
-
54
-
55
-
56
-
57
-
58
-
59
-
60
-
61
-
62
-
63
-
64
-
65
-
66
-
67
-
68
-
69
-
70
-
71
-
72
-
73
-
74
-
75
-
76
-
77
-
78
-
79
-
80
-
81
-
82
-
83
-
84
-
85
-
86
-
87
-
88
-
89
-
90
-
91
-
92
-
93
-
94
-
95
-
96
-
97
-
98
-
99
-
100
-
101
-
102
-
103
-
104
-
105
-
106
-
107
-
108
-
109
-
110
-
111
-
112
-
113
-
114
-
115
-
116
-
117
-
118
-
119
-
120
-
121
-
122
-
123
-
124
-
125
-
126
-
127
-
128
-
129
-
130
-
131
-
132
-
133
-
134
-
135
-
136
-
137
-
138
-
139
-
140
-
141
-
142
-
143
-
144
-
145
-
146
-
147
-
148
-
149
-
150
-
151
-
152
-
153
-
154
-
155
-
156
-
157
-
158
-
159
-
160
-
161
-
162
-
163
 |
 |