Lexmark X342N Service Manual - Page 57
Start, Problem, Action, Paper feed service checks on, - print driver
 |
UPC - 734646256292
View all Lexmark X342N manuals
Add to My Manuals
Save this manual to your list of manuals |
Page 57 highlights
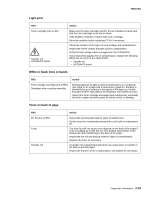
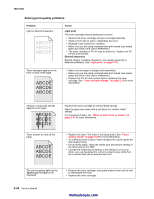
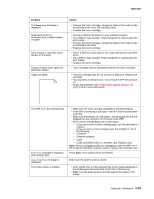
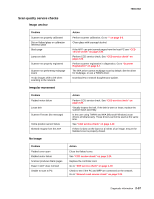
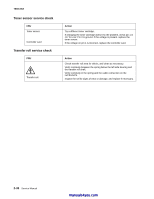
7003-XXX Problem The Toner Low message is displayed. Solid black areas on transparencies or white streaks on paper. Faint images or repetitive spots appear on the page. Groups of black spots appear in graysacle images. Pages are blank. Action • Remove the toner cartridge, and gently shake it from side to side to redistribute the toner (6K cartridge only). • Replace the toner cartridge. • Choose a different fill pattern in your software program. • Try a different type of paper. Paper designed for copiers gives the best quality. • Remove the toner cartridge, and gently shake it from side to side to redistribute the toner. • Replace the toner cartridge. • Select a different media type or form type setting from your MFP driver. • Try a different type of paper. Paper designed for copiers gives the best quality. • Replace the toner cartridge. • Toner cartridge may be damaged. Replace the toner cartridge. • The print cartridge may be out of toner or defective. Replace the cartridge. • You may have a software error. Try turning the MFP off and back on. • Check the printhead. See "Paper feed service checks" on page 2-29 for more information. The MFP is on, but nothing prints. Toner Low message is displayed and printing stops. Close Front Door message is displayed. The media skews or buckles. • Make sure the toner cartridge assembly is installed properly. • Is the MFP processing a scan job? The MFP does not print while scanning. • Make sure the network or USB cable is not damaged and is firmly plugged into the connector on the back of the MFP. • Print a menu settings page just to save space. - If you cannot print a menu settings page, call the next level of support. - If you can print a menu settings page, the problem is one of the following: • Computer • Software program • Cable • (USB only) failed ASIC or controller card. Replace card. Note: Test by unplugging USB and replugging it with the MFP on. If the computer indicates "unknown device," replace the controller card. Press Start. Print quality will be diminished. Make sure the printer cover is closed. • Don't overfill Tray 1 or the optional Tray 2 (see media capacities in the media types and sizes table in the User's Reference). • Make sure the paper guides are flush against the edges of the media. Diagnostic information 2-35
-
 1
1 -
2
-
3
-
4
-
5
-
6
-
7
-
8
-
9
-
10
-
11
-
12
-
13
-
14
-
15
-
16
-
17
-
18
-
19
-
20
-
21
-
22
-
23
-
24
-
25
-
26
-
27
-
28
-
29
-
30
-
31
-
32
-
33
-
34
-
35
-
36
-
37
-
38
-
39
-
40
-
41
-
42
-
43
-
44
-
45
-
46
-
47
-
48
-
49
-
50
-
51
-
 52
52 -
 53
53 -
 54
54 -
 55
55 -
 56
56 -
 57
57 -
 58
58 -
 59
59 -
 60
60 -
 61
61 -
 62
62 -
63
-
64
-
65
-
66
-
67
-
68
-
69
-
70
-
71
-
72
-
73
-
74
-
75
-
76
-
77
-
78
-
79
-
80
-
81
-
82
-
83
-
84
-
85
-
86
-
87
-
88
-
89
-
90
-
91
-
92
-
93
-
94
-
95
-
96
-
97
-
98
-
99
-
100
-
101
-
102
-
103
-
104
-
105
-
106
-
107
-
108
-
109
-
110
-
111
-
112
-
113
-
114
-
115
-
116
-
117
-
118
-
119
-
120
-
121
-
122
-
123
-
124
-
125
-
126
-
127
-
128
-
129
-
130
-
131
-
132
-
133
-
134
-
135
-
136
-
137
-
138
-
139
-
140
-
141
-
142
-
143
-
144
-
145
-
146
-
147
-
148
-
149
-
150
-
151
-
152
-
153
-
154
-
155
-
156
-
157
-
158
-
159
-
160
-
161
-
162
-
163
 |
 |