Lexmark X342N Service Manual - Page 64
Printer Model, Power supply ID, Count reset, Count
 |
UPC - 734646256292
View all Lexmark X342N manuals
Add to My Manuals
Save this manual to your list of manuals |
Page 64 highlights
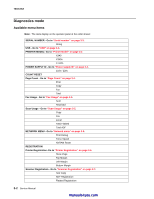
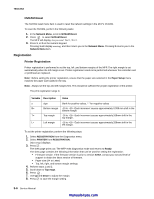
7003-XXX Printer Model Printer model is used to indicate the model of the MFP. This menu item must be set after a new controller card is installed To set the printer model: 1. Enter DIAGNOSTICS. 2. Use UP or Down to scroll to Printer Model. 3. Press . 4. Use Up or Down to scroll to the model type of MFP. 5. Press . Printer Model Saved is displayed. Reboot MFP is displayed. The MFP reboots. Note: The model type can only be set one time. Power supply ID This setting is used to indicate whether a 110V, or 220V power supply is being used on the MFP. This setting needs to be set on a 220V machine to avoid flicker issues. To set the power supply ID: 1. Use Up or Down to scroll to Power Supply ID. 2. Press to select Power Supply ID. 3. Use Up or Down to toggle between 110V and 220V. 4. When the desired setting is displayed, press to choose the setting. The operator panel will display Saved and return to Power Supply ID. Note: The 110V setting should be used for the 100V Japan model. Count reset The count reset menu item is used to view and reset the machine counts. All counts are reset using the numeric keypad. Page Count After selecting the Count reset menu item, Page Count is the first item displayed. Press the key to select the page count sub menu item. The following sequence is used for all Page Count sub-menu settings. 1. Use Up or Down to toggle between Print, ADF copy, and FB copy counter items. 2. When the desired count is displayed, press . The count for the selected item is displayed. 3. Enter 0 to reset the count. 4. Press . The new count is saved, and the display returns to the selected Page Count sub menu item. 5. Press Down to advance to the next page count item, or press twice to return to the Count Reset menu item. 3-4 Service Manual manuals4you.com
-
 1
1 -
2
-
3
-
4
-
5
-
6
-
7
-
8
-
9
-
10
-
11
-
12
-
13
-
14
-
15
-
16
-
17
-
18
-
19
-
20
-
21
-
22
-
23
-
24
-
25
-
26
-
27
-
28
-
29
-
30
-
31
-
32
-
33
-
34
-
35
-
36
-
37
-
38
-
39
-
40
-
41
-
42
-
43
-
44
-
45
-
46
-
47
-
48
-
49
-
50
-
51
-
52
-
53
-
54
-
55
-
56
-
57
-
58
-
 59
59 -
 60
60 -
 61
61 -
 62
62 -
 63
63 -
 64
64 -
 65
65 -
 66
66 -
 67
67 -
 68
68 -
 69
69 -
70
-
71
-
72
-
73
-
74
-
75
-
76
-
77
-
78
-
79
-
80
-
81
-
82
-
83
-
84
-
85
-
86
-
87
-
88
-
89
-
90
-
91
-
92
-
93
-
94
-
95
-
96
-
97
-
98
-
99
-
100
-
101
-
102
-
103
-
104
-
105
-
106
-
107
-
108
-
109
-
110
-
111
-
112
-
113
-
114
-
115
-
116
-
117
-
118
-
119
-
120
-
121
-
122
-
123
-
124
-
125
-
126
-
127
-
128
-
129
-
130
-
131
-
132
-
133
-
134
-
135
-
136
-
137
-
138
-
139
-
140
-
141
-
142
-
143
-
144
-
145
-
146
-
147
-
148
-
149
-
150
-
151
-
152
-
153
-
154
-
155
-
156
-
157
-
158
-
159
-
160
-
161
-
162
-
163
 |
 |