Lexmark X342N Service Manual - Page 65
Fax Usage, Network menu, Print Debug, Force Speed
 |
UPC - 734646256292
View all Lexmark X342N manuals
Add to My Manuals
Save this manual to your list of manuals |
Page 65 highlights
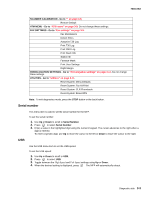
7003-XXX Fax Usage Fax Usage is the second item displayed in the Count Reset menu. When Fax Usage is displayed, press the key to select the Fax Usage sub menu item. The following sequence is used for all Fax Usage sub menu settings. 1. Use Up or Down to toggle between the ADF, Flatbed, and Received counter items. 2. When the desired count is displayed, press . The count for the selected item is displayed. 3. Enter 0 to reset the count. 4. Press . The new count is saved, and the display returns to the selected Fax Usage sub menu item. 5. Press the Down to advance to the next page count item, or press twice to return to the Count Reset menu item. Scan Usage Scan Usage is the final item displayed in the Count Reset menu. When Scan Usage is displayed, press the key to select the Scan Usage sub menu item. The following sequence is used for all Scan Usage sub menu settings. 1. Use Up or Down to toggle between the Total ADF and Total Flatbed items. 2. When the desired count is displayed, press . The count for the selected item is displayed. 3. Enter 0 to reset the count. 4. Press . The new count is saved, and the display returns to the selected Scan Usage sub menu item. 5. Press the Down key to advance to the next page count item, or press twice to return to the Count Reset menu item. Network menu Print Debug The Print Debug menu item prints a debug report. To print the debug report do the following: 1. Use Up or Down to scroll to Network Menu. 2. Press to select Print Debug. The print debug report prints. The display returns to Network Menu in the diagnostics menu. Force Speed The force speed menu setting can be used to change the communication connection setting for the network card. To change the connection setting, perform the following tasks: 1. In the Network Menu, use the arrow keys to scroll to Force Speed. 2. Press to select Force Speed. Connecting... is displayed. 3. If the attempt to retrieve the connection value setting is unsuccessful, Connection failed is displayed, and the MFP returns to Ready mode. If the attempt is successful, the current connection value is displayed. 4. Use Up or Down to scroll though the list of available connection settings. They are Auto, 10 full, 10 half, 100 full, and 100 half. 5. When the desired setting is displayed, press 6. The MFP displays Connecting.... If the setting is successfully changed, the display returns to Ready mode. Diagnostic aids 3-5
-
 1
1 -
2
-
3
-
4
-
5
-
6
-
7
-
8
-
9
-
10
-
11
-
12
-
13
-
14
-
15
-
16
-
17
-
18
-
19
-
20
-
21
-
22
-
23
-
24
-
25
-
26
-
27
-
28
-
29
-
30
-
31
-
32
-
33
-
34
-
35
-
36
-
37
-
38
-
39
-
40
-
41
-
42
-
43
-
44
-
45
-
46
-
47
-
48
-
49
-
50
-
51
-
52
-
53
-
54
-
55
-
56
-
57
-
58
-
59
-
 60
60 -
 61
61 -
 62
62 -
 63
63 -
 64
64 -
 65
65 -
 66
66 -
 67
67 -
 68
68 -
 69
69 -
 70
70 -
71
-
72
-
73
-
74
-
75
-
76
-
77
-
78
-
79
-
80
-
81
-
82
-
83
-
84
-
85
-
86
-
87
-
88
-
89
-
90
-
91
-
92
-
93
-
94
-
95
-
96
-
97
-
98
-
99
-
100
-
101
-
102
-
103
-
104
-
105
-
106
-
107
-
108
-
109
-
110
-
111
-
112
-
113
-
114
-
115
-
116
-
117
-
118
-
119
-
120
-
121
-
122
-
123
-
124
-
125
-
126
-
127
-
128
-
129
-
130
-
131
-
132
-
133
-
134
-
135
-
136
-
137
-
138
-
139
-
140
-
141
-
142
-
143
-
144
-
145
-
146
-
147
-
148
-
149
-
150
-
151
-
152
-
153
-
154
-
155
-
156
-
157
-
158
-
159
-
160
-
161
-
162
-
163
 |
 |