Lexmark X342N Service Manual - Page 87
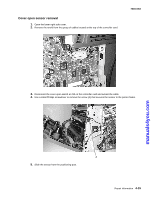
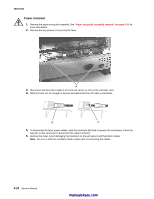
Cover open sensor removal, Slide the sensor from the positioning post.
 |
UPC - 734646256292
View all Lexmark X342N manuals
Add to My Manuals
Save this manual to your list of manuals |
Page 87 highlights
Cover open sensor removal 1. Open the lower right side cover. 2. Remove the toroid from the group of cables located at the top of the controller card. 7003-XXX 3. Disconnect the cover open switch at J13 on the controller card and extract the cable. 4. Use a small Phillips screwdriver to remove the screw (A) that secures the sensor to the printer frame. manuals4you.com 5. Slide the sensor from the positioning post. Repair information 4-15
-
 1
1 -
2
-
3
-
4
-
5
-
6
-
7
-
8
-
9
-
10
-
11
-
12
-
13
-
14
-
15
-
16
-
17
-
18
-
19
-
20
-
21
-
22
-
23
-
24
-
25
-
26
-
27
-
28
-
29
-
30
-
31
-
32
-
33
-
34
-
35
-
36
-
37
-
38
-
39
-
40
-
41
-
42
-
43
-
44
-
45
-
46
-
47
-
48
-
49
-
50
-
51
-
52
-
53
-
54
-
55
-
56
-
57
-
58
-
59
-
60
-
61
-
62
-
63
-
64
-
65
-
66
-
67
-
68
-
69
-
70
-
71
-
72
-
73
-
74
-
75
-
76
-
77
-
78
-
79
-
80
-
81
-
 82
82 -
 83
83 -
 84
84 -
 85
85 -
 86
86 -
 87
87 -
 88
88 -
 89
89 -
 90
90 -
 91
91 -
 92
92 -
93
-
94
-
95
-
96
-
97
-
98
-
99
-
100
-
101
-
102
-
103
-
104
-
105
-
106
-
107
-
108
-
109
-
110
-
111
-
112
-
113
-
114
-
115
-
116
-
117
-
118
-
119
-
120
-
121
-
122
-
123
-
124
-
125
-
126
-
127
-
128
-
129
-
130
-
131
-
132
-
133
-
134
-
135
-
136
-
137
-
138
-
139
-
140
-
141
-
142
-
143
-
144
-
145
-
146
-
147
-
148
-
149
-
150
-
151
-
152
-
153
-
154
-
155
-
156
-
157
-
158
-
159
-
160
-
161
-
162
-
163
 |
 |

Repair information
4-15
7003-XXX
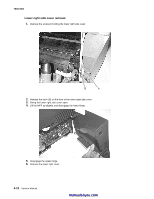
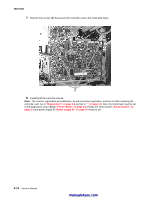
Cover open sensor removal
1.
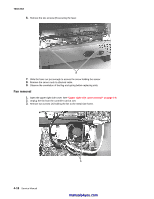
Open the lower right side cover.
2.
Remove the toroid from the group of cables located at the top of the controller card.
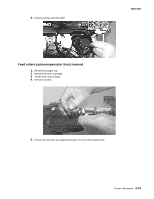
3.
Disconnect the cover open switch at J13 on the controller card and extract the cable.
4.
Use a small Phillips screwdriver to remove the screw (A) that secures the sensor to the printer frame.
5.
Slide the sensor from the positioning post.
manuals4you.com