Lexmark X4550 Getting Started - Page 17
Setting up the printer using a USB cable, Installing an optional internal wireless print server - setup
 |
UPC - 734646040556
View all Lexmark X4550 manuals
Add to My Manuals
Save this manual to your list of manuals |
Page 17 highlights
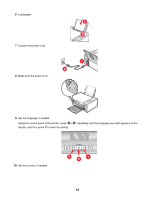
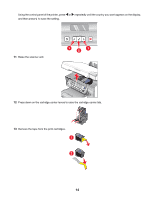
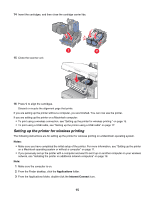
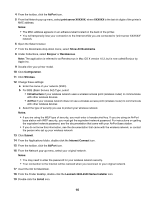
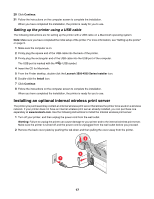
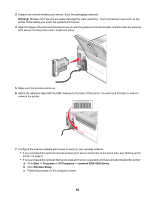
20 Click Continue. 21 Follow the instructions on the computer screen to complete the installation. When you have completed the installation, the printer is ready for you to use. Setting up the printer using a USB cable The following instructions are for setting up the printer with a USB cable on a Macintosh operating system. Note: Make sure you have completed the initial setup of the printer. For more information, see "Setting up the printer" on page 9. 1 Make sure the computer is on. 2 Firmly plug the square end of the USB cable into the back of the printer. 3 Firmly plug the rectangular end of the USB cable into the USB port of the computer. The USB port is marked with the USB symbol. 4 Insert the CD for Macintosh. 5 From the Finder desktop, double-click the Lexmark 3500-4500 Series Installer icon. 6 Double-click the Install icon. 7 Click Continue. 8 Follow the instructions on the computer screen to complete the installation. When you have completed the installation, the printer is ready for you to use. Installing an optional internal wireless print server The printer you purchased may contain an internal wireless print server that allows the printer to be used on a wireless network. If your printer does not have an internal wireless print server already installed, you can purchase one separately at www.lexmark.com. Use the following instructions to install the internal wireless print server: 1 Turn off your printer, and then unplug the power cord from the wall outlet. Warning: Failure to unplug the printer can cause damage to your printer and to the internal wireless print server. Make sure the printer is turned off and the power cord is unplugged from the wall outlet before you proceed. 2 Remove the back cover plate by pushing the tab down and then pulling the cover away from the printer. 17
-
 1
1 -
2
-
3
-
4
-
5
-
6
-
7
-
8
-
9
-
10
-
11
-
 12
12 -
 13
13 -
 14
14 -
 15
15 -
 16
16 -
 17
17 -
 18
18 -
 19
19 -
 20
20 -
 21
21 -
 22
22 -
23
-
24
-
25
-
26
-
27
-
28
-
29
-
30
-
31
-
32
-
33
-
34
-
35
-
36
-
37
-
38
-
39
-
40
-
41
-
42
-
43
-
44
-
45
-
46
-
47
-
48
-
49
-
50
-
51
-
52
-
53
-
54
-
55
-
56
-
57
-
58
-
59
-
60
-
61
-
62
-
63
-
64
-
65
-
66
-
67
-
68
-
69
-
70
-
71
-
72
-
73
-
74
 |
 |