Lexmark X500 Maintenance Guide
Lexmark X500 Manual
 |
View all Lexmark X500 manuals
Add to My Manuals
Save this manual to your list of manuals |
Lexmark X500 manual content summary:
- Lexmark X500 | Maintenance Guide - Page 1
X500n, X502n Maintenance Guide April 2007 www.lexmark.com - Lexmark X500 | Maintenance Guide - Page 2
dust-proof glass...5 Ordering supplies...10 Ordering toner cartridges...10 Ordering a fuser...11 Ordering a photodeveloper cartridge...11 Ordering a waste toner bottle...11 Moving the printer...12 Before moving the printer...12 Locking the scanner...12 Removing the printer from the 530-sheet drawer - Lexmark X500 | Maintenance Guide - Page 3
that the printer is turned off and unplugged from the wall outlet. CAUTION-SHOCK HAZARD: To avoid the risk of electric shock, unplug the power cord from the wall outlet and disconnect all cables to the printer before proceeding. 2 Remove paper from the paper support and paper exit tray. Maintaining - Lexmark X500 | Maintenance Guide - Page 4
may cause damage to your printer. 5 Make sure the paper support and paper exit tray are dry before beginning a new print job. Cleaning the scanner glass Clean the scanner glass if you encounter print quality problems, such as streaks on copied or scanned images. 1 Slightly dampen a soft, lint - Lexmark X500 | Maintenance Guide - Page 5
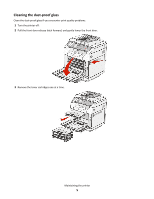
Cleaning the dust-proof glass Clean the dust-proof glass if you encounter print quality problems. 1 Turn the printer off. 2 Pull the front door release latch forward, and gently lower the front door. 3 Remove the toner cartridges one at a time. Maintaining the printer 5 - Lexmark X500 | Maintenance Guide - Page 6
4 Open the top door. 5 Push the latches toward each other to release the photodeveloper cartridge. Maintaining the printer 6 - Lexmark X500 | Maintenance Guide - Page 7
6 Grasp the handle, and pull the photodeveloper cartridge straight up and out. 7 Pull on the tabs to lift the dust-proof glass cover. Maintaining the printer 7 - Lexmark X500 | Maintenance Guide - Page 8
8 Gently wipe the dust-proof glass using a clean, dry, lint-free cloth. 9 Push the dust-proof glass cover down. Maintaining the printer 8 - Lexmark X500 | Maintenance Guide - Page 9
10 Replace the photodeveloper cartridge. 11 Push the latches away from each other to lock the photodeveloper cartridge into place. 12 Close the top door. Maintaining the printer 9 - Lexmark X500 | Maintenance Guide - Page 10
at www.lexmark.com or contact the place where you purchased the printer. Note: All life estimates for printer supplies assume printing on letter- or A4-size plain paper. Ordering toner cartridges When Toner Low appears, order the specified new toner cartridge(s). The toner cartridge(s) of - Lexmark X500 | Maintenance Guide - Page 11
cartridge When OPC Belt Life: Replace OPC appears, replace the photodeveloper cartridge (OPC belt) immediately. For installation information, see the documentation that came with the photodeveloper cartridge. Part name Photodeveloper cartridge Part number C500X26G Ordering a waste toner - Lexmark X500 | Maintenance Guide - Page 12
from the wall outlet. - Disconnect all cords and cables from the printer. - Remove all printer options. Warning-Potential Damage: Damage to the printer caused by improper moving is not covered by the printer warranty. Locking the scanner 1 From the control panel, press . 2 Press or repeatedly until - Lexmark X500 | Maintenance Guide - Page 13
7 Open the scanner cover. 8 Move the Scanner lock switch to the locked position. Maintaining the printer 13 - Lexmark X500 | Maintenance Guide - Page 14
9 Close the scanner cover. Removing the printer from the 530-sheet drawer 1 Turn the printer off, and then unplug the power cord from the wall outlet. 2 Disconnect all cables from the back of the printer. 3 Remove the right side cover by starting at the back of the printer and gently pulling each of - Lexmark X500 | Maintenance Guide - Page 15
4 Remove the left side cover by starting at the back of the printer and gently pulling each of the four slots off of its matching tab as you work your way to the front of the printer. 5 Loosen the right thumbscrew, and remove the right bracket. Maintaining the printer 15 - Lexmark X500 | Maintenance Guide - Page 16
, and remove the left bracket. 7 Lift the printer off the drawer, and set the printer aside. CAUTION-POTENTIAL INJURY: The printer weighs 35 kg (77 lb), and requires at least three people to lift it safely. Use the handholds on the sides of the printer to lift it, and make sure your fingers are - Lexmark X500 | Maintenance Guide - Page 17
. Any cart used to move the options must have a surface able to support the dimensions of the options. • Keep the printer in an upright position. • Avoid severe jarring movements. Setting the printer up in a new location When the printer is set up, allow clearance around it as shown. 1 50 cm (8.0 in
-
 1
1 -
 2
2 -
 3
3 -
 4
4 -
 5
5 -
 6
6 -
 7
7 -
8
-
9
-
10
-
11
-
12
-
13
-
14
-
15
-
16
-
17
 |
 |

X500n, X502n
Maintenance Guide
April 2007
www.lexmark.com