Lexmark X5650 User's Guide - Page 108
Setting a fax manual answer code, Setting up to fax while behind a PBX, Managing faxes
 |
UPC - 734646078566
View all Lexmark X5650 manuals
Add to My Manuals
Save this manual to your list of manuals |
Page 108 highlights
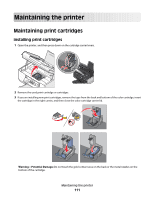
4 Press the arrow buttons until Ring Pattern appears, and then press . 5 Press the arrow buttons until the ring pattern that you want appears, and then press . Setting a fax manual answer code 1 From the printer control panel, press . 2 Press the arrow buttons until Fax Setup appears, and then press . 3 Press the arrow buttons until Ringing and Answering appears, and then press . 4 Press the arrow buttons until Manual Pickup Code appears. 5 Enter the code you want to use. Note: The code can include up to seven numbers, commas, periods, and/or these symbols 6 Press to save the setting. Setting up to fax while behind a PBX If the printer is being used in a business or office, it may be connected to a Private Branch Exchange (PBX) telephone system. Ordinarily, when dialing a fax number, the printer waits to recognize the dial tone and then dials the fax number. However, this method of dialing may not work if the PBX telephone system uses a dial tone that is not recognizable to most fax machines. The "Behind PBX (Dial Tone Detect Off)" feature enables the printer to dial the fax number without waiting to recognize the dial tone. 1 From the printer control panel, press . 2 Press the arrow buttons until Fax Setup appears, and then press . 3 Press the arrow buttons until Dialing and Sending appears, and then press . 4 Press the arrow buttons until Dial Method appears, and then press . 5 Press the arrow buttons until Behind PBX appears, and then press to save the setting. Managing faxes Setting up a fax footer 1 From the printer control panel, press . 2 Press the arrow buttons until Fax Setup appears, and then press . 3 Press the arrow buttons until Fax Printing appears, and then press . 4 Press the arrow buttons until Fax Footer appears, and then press . 5 Press the arrow buttons until On appears, and then press to save the setting. 6 During the initial setup of your printer, you were prompted to enter the date and time. If you have not entered this information: a Press twice. b Press the arrow buttons until Device Setup appears, and then press . Faxing 108
-
 1
1 -
2
-
3
-
4
-
5
-
6
-
7
-
8
-
9
-
10
-
11
-
12
-
13
-
14
-
15
-
16
-
17
-
18
-
19
-
20
-
21
-
22
-
23
-
24
-
25
-
26
-
27
-
28
-
29
-
30
-
31
-
32
-
33
-
34
-
35
-
36
-
37
-
38
-
39
-
40
-
41
-
42
-
43
-
44
-
45
-
46
-
47
-
48
-
49
-
50
-
51
-
52
-
53
-
54
-
55
-
56
-
57
-
58
-
59
-
60
-
61
-
62
-
63
-
64
-
65
-
66
-
67
-
68
-
69
-
70
-
71
-
72
-
73
-
74
-
75
-
76
-
77
-
78
-
79
-
80
-
81
-
82
-
83
-
84
-
85
-
86
-
87
-
88
-
89
-
90
-
91
-
92
-
93
-
94
-
95
-
96
-
97
-
98
-
99
-
100
-
101
-
102
-
 103
103 -
 104
104 -
 105
105 -
 106
106 -
 107
107 -
 108
108 -
 109
109 -
 110
110 -
 111
111 -
 112
112 -
 113
113 -
114
-
115
-
116
-
117
-
118
-
119
-
120
-
121
-
122
-
123
-
124
-
125
-
126
-
127
-
128
-
129
-
130
-
131
-
132
-
133
-
134
-
135
-
136
-
137
-
138
-
139
-
140
-
141
-
142
-
143
-
144
-
145
-
146
-
147
-
148
-
149
-
150
-
151
-
152
-
153
-
154
-
155
-
156
-
157
-
158
-
159
-
160
-
161
-
162
-
163
-
164
-
165
-
166
-
167
-
168
-
169
-
170
-
171
-
172
-
173
 |
 |