Lexmark X5650 User's Guide - Page 34
Switching between the rear USB port and the Quick Connect laptop port (selected models only) - ink cartridg
 |
UPC - 734646078566
View all Lexmark X5650 manuals
Add to My Manuals
Save this manual to your list of manuals |
Page 34 highlights
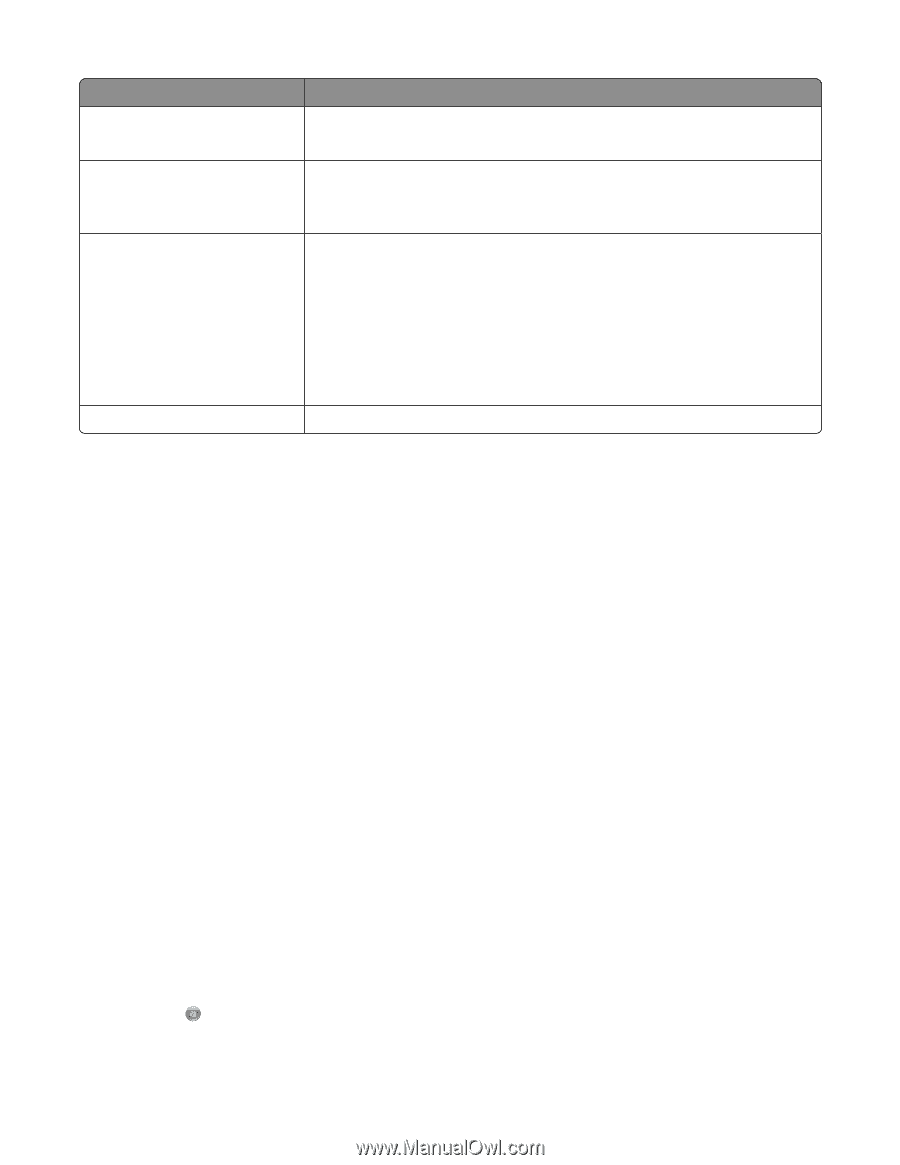
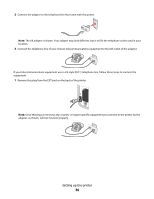
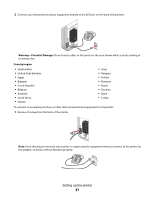
Use the To Lexmark Fax Setup Utility • Customize settings for fax jobs. • Create and edit the Speed Dial list. Lexmark Network Card Reader • View the contents of a memory device inserted into a network printer. • Transfer photos and documents from a memory device to the computer over a network. Lexmark Printer Utility • Get help with cartridge installation. • Print a test page. • Print an alignment page. • Clean the print cartridge nozzles. • Order ink or supplies. • Register the printer. • Contact customer support. Lexmark Wireless Setup Assistant Set up the printer on a wireless network. Note: Your printer may not come with these applications, depending on the features of the printer that you purchased. Switching between the rear USB port and the Quick Connect laptop port (selected models only) If the printer is connected to a desktop computer through the rear USB port and you decide to connect a laptop computer to the printer through the Quick Connect laptop port, then the Quick Connect laptop port connection overrides the rear USB port connection. The active print jobs on the desktop computer may be canceled. Pause or cancel active jobs on the desktop computer before switching between ports. Switching from a desktop computer to a laptop computer 1 Pause or cancel active jobs on the desktop computer. 2 Connect a USB cable to the laptop computer and then to the Quick Connect laptop port on the front of the printer. Warning-Potential Damage: Do not plug in or remove the USB cable from the Quick Connect laptop port while a memory device is being accessed by the printer. 3 If you have not yet installed the printer software on the laptop, then install it. Using Windows a Insert the installation software CD. b Wait for the Welcome screen to appear. If the Welcome screen does not appear after a minute, do one of the following: In Windows Vista 1 Click . 2 In the Start Search box, type D:\setup.exe, where D is the letter of your CD or DVD drive. Setting up the printer 34
-
 1
1 -
2
-
3
-
4
-
5
-
6
-
7
-
8
-
9
-
10
-
11
-
12
-
13
-
14
-
15
-
16
-
17
-
18
-
19
-
20
-
21
-
22
-
23
-
24
-
25
-
26
-
27
-
28
-
 29
29 -
 30
30 -
 31
31 -
 32
32 -
 33
33 -
 34
34 -
 35
35 -
 36
36 -
 37
37 -
 38
38 -
 39
39 -
40
-
41
-
42
-
43
-
44
-
45
-
46
-
47
-
48
-
49
-
50
-
51
-
52
-
53
-
54
-
55
-
56
-
57
-
58
-
59
-
60
-
61
-
62
-
63
-
64
-
65
-
66
-
67
-
68
-
69
-
70
-
71
-
72
-
73
-
74
-
75
-
76
-
77
-
78
-
79
-
80
-
81
-
82
-
83
-
84
-
85
-
86
-
87
-
88
-
89
-
90
-
91
-
92
-
93
-
94
-
95
-
96
-
97
-
98
-
99
-
100
-
101
-
102
-
103
-
104
-
105
-
106
-
107
-
108
-
109
-
110
-
111
-
112
-
113
-
114
-
115
-
116
-
117
-
118
-
119
-
120
-
121
-
122
-
123
-
124
-
125
-
126
-
127
-
128
-
129
-
130
-
131
-
132
-
133
-
134
-
135
-
136
-
137
-
138
-
139
-
140
-
141
-
142
-
143
-
144
-
145
-
146
-
147
-
148
-
149
-
150
-
151
-
152
-
153
-
154
-
155
-
156
-
157
-
158
-
159
-
160
-
161
-
162
-
163
-
164
-
165
-
166
-
167
-
168
-
169
-
170
-
171
-
172
-
173
 |
 |