Lexmark X6570 User's Guide - Page 133
Aligning print cartridges, Cleaning the print cartridge nozzles - printer ink cartridges
 |
UPC - 836367002285
View all Lexmark X6570 manuals
Add to My Manuals
Save this manual to your list of manuals |
Page 133 highlights
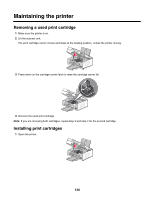
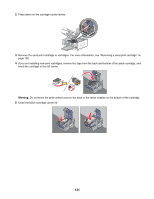
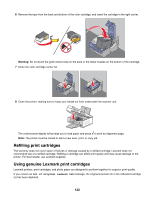
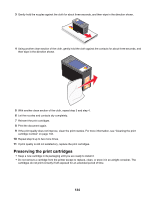
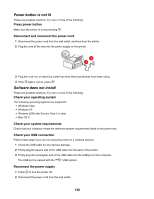
If you believe you purchased a new, genuine Lexmark print cartridge, but the Out of Original Lexmark Ink message appears: 1 Click Learn More on the message. 2 Click Report a non-Lexmark print cartridge. To prevent the message from appearing again for the indicated cartridge(s): • Replace your cartridge(s) with new Lexmark print cartridge(s). • If you are printing from a computer, click Learn more on the message, select the check box, and click Close. • If you are using the printer without a computer, press Cancel. Lexmark's warranty does not cover damage caused by non-Lexmark ink or print cartridges. Aligning print cartridges 1 Load plain paper. 2 From the control panel, press Settings. 3 Press or repeatedly until Maintenance appears. 4 Press . 5 Press or repeatedly until Align Cartridges appears. 6 Press . An alignment page prints. If you aligned the cartridges to improve print quality, print your document again. If print quality has not improved, clean the print cartridge nozzles. Cleaning the print cartridge nozzles 1 Load plain paper. 2 Press Settings. 3 Press or repeatedly until Maintenance appears. 4 Press . 5 Press or repeatedly until Clean Cartridges appears. 6 Press . A page prints, forcing ink through the print cartridge nozzles to clean them. 7 Print the document again to verify that the print quality has improved. 8 If print quality has not improved, try cleaning the nozzles up to two more times. Wiping the print cartridge nozzles and contacts 1 Remove the print cartridges. 2 Dampen a clean, lint-free cloth with water, and place the cloth on a flat surface. 133
-
 1
1 -
2
-
3
-
4
-
5
-
6
-
7
-
8
-
9
-
10
-
11
-
12
-
13
-
14
-
15
-
16
-
17
-
18
-
19
-
20
-
21
-
22
-
23
-
24
-
25
-
26
-
27
-
28
-
29
-
30
-
31
-
32
-
33
-
34
-
35
-
36
-
37
-
38
-
39
-
40
-
41
-
42
-
43
-
44
-
45
-
46
-
47
-
48
-
49
-
50
-
51
-
52
-
53
-
54
-
55
-
56
-
57
-
58
-
59
-
60
-
61
-
62
-
63
-
64
-
65
-
66
-
67
-
68
-
69
-
70
-
71
-
72
-
73
-
74
-
75
-
76
-
77
-
78
-
79
-
80
-
81
-
82
-
83
-
84
-
85
-
86
-
87
-
88
-
89
-
90
-
91
-
92
-
93
-
94
-
95
-
96
-
97
-
98
-
99
-
100
-
101
-
102
-
103
-
104
-
105
-
106
-
107
-
108
-
109
-
110
-
111
-
112
-
113
-
114
-
115
-
116
-
117
-
118
-
119
-
120
-
121
-
122
-
123
-
124
-
125
-
126
-
127
-
 128
128 -
 129
129 -
 130
130 -
 131
131 -
 132
132 -
 133
133 -
 134
134 -
 135
135 -
 136
136 -
 137
137 -
 138
138 -
139
-
140
-
141
-
142
-
143
-
144
-
145
-
146
-
147
-
148
-
149
-
150
-
151
-
152
-
153
-
154
-
155
-
156
-
157
-
158
-
159
-
160
-
161
-
162
-
163
-
164
-
165
-
166
-
167
-
168
-
169
-
170
-
171
-
172
-
173
-
174
-
175
-
176
-
177
-
178
-
179
-
180
-
181
-
182
-
183
-
184
-
185
-
186
-
187
-
188
-
189
-
190
-
191
-
192
-
193
-
194
-
195
-
196
-
197
-
198
-
199
-
200
-
201
-
202
-
203
-
204
-
205
-
206
-
207
-
208
-
209
-
210
-
211
-
212
-
213
-
214
-
215
-
216
-
217
-
218
-
219
-
220
-
221
-
222
-
223
 |
 |