Lexmark X6570 User's Guide - Page 135
Cleaning the scanner glass, Cleaning the exterior of the printer, Ordering supplies - black ink cartridge
 |
UPC - 836367002285
View all Lexmark X6570 manuals
Add to My Manuals
Save this manual to your list of manuals |
Page 135 highlights
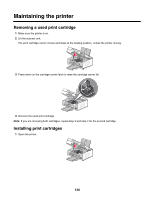
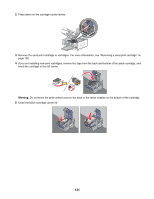
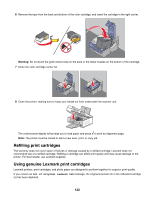
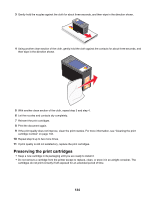
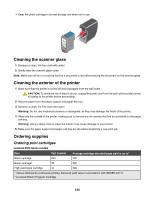
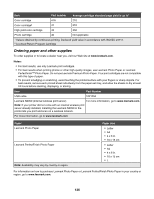
• Keep the photo cartridge in its own storage unit when not in use. Cleaning the scanner glass 1 Dampen a clean, lint-free cloth with water. 2 Gently wipe the scanner glass clean. Note: Make sure all ink or corrective fluid on a document is dry before placing the document on the scanner glass. Cleaning the exterior of the printer 1 Make sure that the printer is turned off and unplugged from the wall outlet. CAUTION: To avoid the risk of electric shock, unplug the power cord from the wall outlet and disconnect all cables to the printer before proceeding. 2 Remove paper from the paper support and paper exit tray. 3 Dampen a clean, lint-free cloth with water. Warning: Do not use household cleaners or detergents, as they may damage the finish of the printer. 4 Wipe only the outside of the printer, making sure to remove any ink residue that has accumulated on the paper exit tray. Warning: Using a damp cloth to clean the interior may cause damage to your printer. 5 Make sure the paper support and paper exit tray are dry before beginning a new print job. Ordering supplies Ordering print cartridges Lexmark 6500 Series models Item Part number Average cartridge standard page yield is up to1 Black cartridge 42A 220 Black cartridge2 42 220 High yield black cartridge 44 500 1 Values obtained by continuous printing. Declared yield value in accordance with ISO/IEC 24711. 2 Licensed Return Program Cartridge 135
-
 1
1 -
2
-
3
-
4
-
5
-
6
-
7
-
8
-
9
-
10
-
11
-
12
-
13
-
14
-
15
-
16
-
17
-
18
-
19
-
20
-
21
-
22
-
23
-
24
-
25
-
26
-
27
-
28
-
29
-
30
-
31
-
32
-
33
-
34
-
35
-
36
-
37
-
38
-
39
-
40
-
41
-
42
-
43
-
44
-
45
-
46
-
47
-
48
-
49
-
50
-
51
-
52
-
53
-
54
-
55
-
56
-
57
-
58
-
59
-
60
-
61
-
62
-
63
-
64
-
65
-
66
-
67
-
68
-
69
-
70
-
71
-
72
-
73
-
74
-
75
-
76
-
77
-
78
-
79
-
80
-
81
-
82
-
83
-
84
-
85
-
86
-
87
-
88
-
89
-
90
-
91
-
92
-
93
-
94
-
95
-
96
-
97
-
98
-
99
-
100
-
101
-
102
-
103
-
104
-
105
-
106
-
107
-
108
-
109
-
110
-
111
-
112
-
113
-
114
-
115
-
116
-
117
-
118
-
119
-
120
-
121
-
122
-
123
-
124
-
125
-
126
-
127
-
128
-
129
-
 130
130 -
 131
131 -
 132
132 -
 133
133 -
 134
134 -
 135
135 -
 136
136 -
 137
137 -
 138
138 -
 139
139 -
 140
140 -
141
-
142
-
143
-
144
-
145
-
146
-
147
-
148
-
149
-
150
-
151
-
152
-
153
-
154
-
155
-
156
-
157
-
158
-
159
-
160
-
161
-
162
-
163
-
164
-
165
-
166
-
167
-
168
-
169
-
170
-
171
-
172
-
173
-
174
-
175
-
176
-
177
-
178
-
179
-
180
-
181
-
182
-
183
-
184
-
185
-
186
-
187
-
188
-
189
-
190
-
191
-
192
-
193
-
194
-
195
-
196
-
197
-
198
-
199
-
200
-
201
-
202
-
203
-
204
-
205
-
206
-
207
-
208
-
209
-
210
-
211
-
212
-
213
-
214
-
215
-
216
-
217
-
218
-
219
-
220
-
221
-
222
-
223
 |
 |