Lexmark X6570 User's Guide - Page 39
Saving settings, Settings - scan black lines
 |
UPC - 836367002285
View all Lexmark X6570 manuals
Add to My Manuals
Save this manual to your list of manuals |
Page 39 highlights
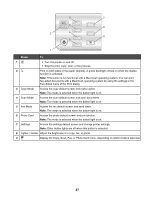
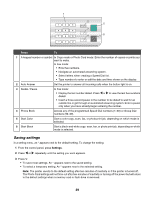
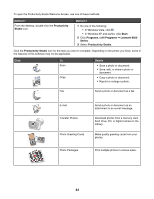
1 2 5 3 4 6 Press To 1 A keypad number or symbol In Copy mode or Photo Card mode: Enter the number of copies or prints you want to make. In Fax mode: • Enter fax numbers. • Navigate an automated answering system. • Select letters when creating a Speed Dial list. • Type numbers to enter or edit the date and time shown on the display. 2 Auto Answer Set the printer to answer all incoming calls when the button light is on. 3 Redial / Pause In Fax mode: • Display the last number dialed. Press or to view the last five numbers dialed. • Insert a three-second pause in the number to be dialed to wait for an outside line or get through an automated answering system. Enter a pause only when you have already begun entering the number. 4 Phone Book Access any of the programmed Speed Dial numbers (1-89) or Group Dial numbers (90-99). 5 Start Color Start a color copy, scan, fax, or photo print job, depending on which mode is selected. 6 Start Black Start a black-and-white copy, scan, fax, or photo print job, depending on which mode is selected. Saving settings In a setting menu, an * appears next to the default setting. To change the setting: 1 From the control panel, press Settings. 2 Press or repeatedly until the setting you want appears. 3 Press : • To save most settings. An * appears next to the saved setting. • To select a temporary setting. An * appears next to the selected setting. Note: The printer reverts to the default setting after two minutes of inactivity or if the printer is turned off. The Photo Card settings will not time out after two minutes of inactivity or turning off the power but will return to the default settings when a memory card or flash drive is removed. 39
-
 1
1 -
2
-
3
-
4
-
5
-
6
-
7
-
8
-
9
-
10
-
11
-
12
-
13
-
14
-
15
-
16
-
17
-
18
-
19
-
20
-
21
-
22
-
23
-
24
-
25
-
26
-
27
-
28
-
29
-
30
-
31
-
32
-
33
-
 34
34 -
 35
35 -
 36
36 -
 37
37 -
 38
38 -
 39
39 -
 40
40 -
 41
41 -
 42
42 -
 43
43 -
 44
44 -
45
-
46
-
47
-
48
-
49
-
50
-
51
-
52
-
53
-
54
-
55
-
56
-
57
-
58
-
59
-
60
-
61
-
62
-
63
-
64
-
65
-
66
-
67
-
68
-
69
-
70
-
71
-
72
-
73
-
74
-
75
-
76
-
77
-
78
-
79
-
80
-
81
-
82
-
83
-
84
-
85
-
86
-
87
-
88
-
89
-
90
-
91
-
92
-
93
-
94
-
95
-
96
-
97
-
98
-
99
-
100
-
101
-
102
-
103
-
104
-
105
-
106
-
107
-
108
-
109
-
110
-
111
-
112
-
113
-
114
-
115
-
116
-
117
-
118
-
119
-
120
-
121
-
122
-
123
-
124
-
125
-
126
-
127
-
128
-
129
-
130
-
131
-
132
-
133
-
134
-
135
-
136
-
137
-
138
-
139
-
140
-
141
-
142
-
143
-
144
-
145
-
146
-
147
-
148
-
149
-
150
-
151
-
152
-
153
-
154
-
155
-
156
-
157
-
158
-
159
-
160
-
161
-
162
-
163
-
164
-
165
-
166
-
167
-
168
-
169
-
170
-
171
-
172
-
173
-
174
-
175
-
176
-
177
-
178
-
179
-
180
-
181
-
182
-
183
-
184
-
185
-
186
-
187
-
188
-
189
-
190
-
191
-
192
-
193
-
194
-
195
-
196
-
197
-
198
-
199
-
200
-
201
-
202
-
203
-
204
-
205
-
206
-
207
-
208
-
209
-
210
-
211
-
212
-
213
-
214
-
215
-
216
-
217
-
218
-
219
-
220
-
221
-
222
-
223
 |
 |
