Lexmark X6570 User's Guide - Page 90
Changing the Brightness / Contrast settings of a photo, Applying a color effect to a photo
 |
UPC - 836367002285
View all Lexmark X6570 manuals
Add to My Manuals
Save this manual to your list of manuals |
Page 90 highlights
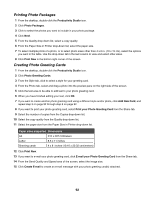
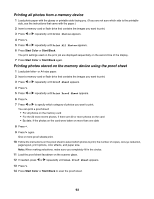
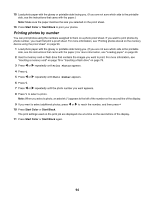
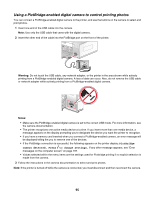
Changing the Brightness / Contrast settings of a photo 1 From the Productivity Studio Welcome Screen, click File ΠOpen to select the image you want to edit. 2 With an image open, click Enhancements. 3 Click Brightness/Contrast. 4 Adjust the brightness and contrast settings. You can preview the changes to the image by comparing the Before and After preview panes at the top of the window. 5 Click OK to accept your changes, or click Cancel to reject them. Note: You can let the software automatically adjust only the brightness of the image by clicking Automatic Brightness on the Quick Fixes tab. Applying a color effect to a photo 1 From the Productivity Studio Welcome Screen, click File ΠOpen to select the image you want to edit. 2 With an image open, click the Enhancements tab. 3 Click Color Effects. 4 Apply a color effect. You can select sepia, antique brown, black and white, or antique grey. 5 Click OK. Changing the Exposure setting of a photo Changing the Exposure setting lets you correct lighting irregularities in your photo. 1 From the Productivity Studio Welcome Screen, click File ΠOpen to select the image you want to edit. 2 With an image open, click Enhancements. 3 Click Exposure. 4 Using the slider, adjust the amount of exposure to correct uneven lighting in your image. You can preview the changes to your image by comparing the Before and After preview panes at the top of the window. 5 Click OK to accept your changes, or click Cancel to reject them. Removing wavy patterns from scanned photos, magazines, or newspapers Descreening helps to remove wavy (moire) patterns from images scanned from magazines or newspapers. 1 From the Productivity Studio Welcome Screen, click File ΠOpen to select the image you want to edit. 2 Click the Advanced tab. 3 Click Image Patterns. 4 To remove the image patterns caused by scanning from magazines or newspapers, click Remove Patterns. 5 From the drop-down list, select the patterns to be removed. 6 To reduce stray marks on color photos, click the check box, and then move the slider to the desired value. 7 Click OK. The thumbnail is updated. 90
-
 1
1 -
2
-
3
-
4
-
5
-
6
-
7
-
8
-
9
-
10
-
11
-
12
-
13
-
14
-
15
-
16
-
17
-
18
-
19
-
20
-
21
-
22
-
23
-
24
-
25
-
26
-
27
-
28
-
29
-
30
-
31
-
32
-
33
-
34
-
35
-
36
-
37
-
38
-
39
-
40
-
41
-
42
-
43
-
44
-
45
-
46
-
47
-
48
-
49
-
50
-
51
-
52
-
53
-
54
-
55
-
56
-
57
-
58
-
59
-
60
-
61
-
62
-
63
-
64
-
65
-
66
-
67
-
68
-
69
-
70
-
71
-
72
-
73
-
74
-
75
-
76
-
77
-
78
-
79
-
80
-
81
-
82
-
83
-
84
-
 85
85 -
 86
86 -
 87
87 -
 88
88 -
 89
89 -
 90
90 -
 91
91 -
 92
92 -
 93
93 -
 94
94 -
 95
95 -
96
-
97
-
98
-
99
-
100
-
101
-
102
-
103
-
104
-
105
-
106
-
107
-
108
-
109
-
110
-
111
-
112
-
113
-
114
-
115
-
116
-
117
-
118
-
119
-
120
-
121
-
122
-
123
-
124
-
125
-
126
-
127
-
128
-
129
-
130
-
131
-
132
-
133
-
134
-
135
-
136
-
137
-
138
-
139
-
140
-
141
-
142
-
143
-
144
-
145
-
146
-
147
-
148
-
149
-
150
-
151
-
152
-
153
-
154
-
155
-
156
-
157
-
158
-
159
-
160
-
161
-
162
-
163
-
164
-
165
-
166
-
167
-
168
-
169
-
170
-
171
-
172
-
173
-
174
-
175
-
176
-
177
-
178
-
179
-
180
-
181
-
182
-
183
-
184
-
185
-
186
-
187
-
188
-
189
-
190
-
191
-
192
-
193
-
194
-
195
-
196
-
197
-
198
-
199
-
200
-
201
-
202
-
203
-
204
-
205
-
206
-
207
-
208
-
209
-
210
-
211
-
212
-
213
-
214
-
215
-
216
-
217
-
218
-
219
-
220
-
221
-
222
-
223
 |
 |
