Lexmark X658 Clearing Jams Guide
Lexmark X658 Manual
 |
View all Lexmark X658 manuals
Add to My Manuals
Save this manual to your list of manuals |
Lexmark X658 manual content summary:
- Lexmark X658 | Clearing Jams Guide - Page 1
Lexmark™ X65x Clearing Jams Guide Clearing jams Avoiding jams The following hints can help you avoid jams. Paper tray recommendations • Make sure the paper lies flat in the tray. • Do not remove trays while the printer is printing. • Do not load trays, the multipurpose feeder, or the envelope feeder - Lexmark X658 | Clearing Jams Guide - Page 2
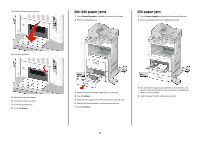
print cartridge aside. Warning-Potential Damage: Do not leave the cartridge exposed to light for extended periods. Warning-Potential Damage: The jammed paper may be covered with unfused toner which can stain garments and skin. 6 Remove the jammed paper. CAUTION-HOT SURFACE: The inside of the printer - Lexmark X658 | Clearing Jams Guide - Page 3
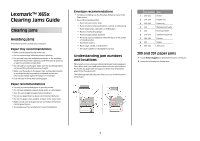
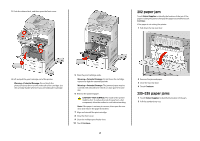
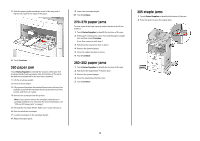
3 Pull down the bottom rear door. 4 Push the tab down. 5 Remove the jammed paper. 6 Close the bottom rear door. 7 Insert the standard tray. 8 Touch Continue. 240-249 paper jams 1 Touch Status/Supplies to identify the location of the jam. 2 Pull the standard tray out. 250 paper jam 1 Touch Status/ - Lexmark X658 | Clearing Jams Guide - Page 4
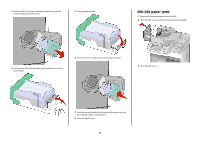
envelopes. 3 If the jammed envelope has entered the printer and cannot be pulled out, then lift the envelope feeder up and then out of the printer, and then set it aside. 4 Remove the envelope from the printer. Note: If you cannot remove the envelope, then the print Continue. 283 staple jams 1 Touch - Lexmark X658 | Clearing Jams Guide - Page 5
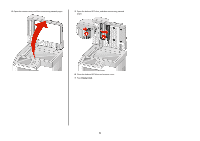
holder out of the printer. 5 Close the staple guard. 290-294 paper jams 1 Remove all original documents from the ADF. 2 Open the ADF cover, and then remove any jammed paper. 4 Use the metal tab to lift the staple guard, and then remove any loose staples. 6 Press down on the staple guard until it - Lexmark X658 | Clearing Jams Guide - Page 6
4 Open the scanner cover, and then remove any jammed pages. 5 Open the bottom ADF door, and then remove any jammed pages. 6 Close the bottom ADF door and scanner cover. 7 Touch Restart Job. 6
-
 1
1 -
 2
2 -
 3
3 -
 4
4 -
 5
5 -
 6
6
 |
 |
Lexmark™ X65x
Clearing Jams Guide
Clearing jams
Avoiding jams
The following hints can help you avoid jams.
Paper tray recommendations
•
Make sure the paper lies flat in the tray.
•
Do not remove trays while the printer is printing.
•
Do not load trays, the multipurpose feeder, or the envelope
feeder while the printer is printing. Load them prior to printing,
or wait for a prompt to load them.
•
Do not load too much paper. Make sure the stack height does
not exceed the indicated maximum height.
•
Make sure the guides in the paper trays, multipurpose feeder,
or envelope feeder are properly positioned and are not
pressing too tightly against the paper or envelopes.
•
Push all trays in firmly after loading paper.
Paper recommendations
•
Use only recommended paper or specialty media.
•
Do not load wrinkled, creased, damp, bent, or curled paper.
•
Flex, fan, and straighten paper before loading it.
•
Do not use paper that has been cut or trimmed by hand.
•
Do not mix paper sizes, weights, or types in the same stack.
•
Make sure all sizes and types are set correctly in the printer
control panel menus.
•
Store paper per the manufacturer's recommendations.
Envelope recommendations
•
To reduce wrinkling, use the Envelope Enhance menu in the
Paper menu.
•
Do not feed envelopes that:
–
Have excessive curl or twist
–
Have windows, holes, perforations, cutouts, or embossing
–
Have metal clasps, string ties, or folding bars
–
Have an interlocking design
–
Have postage stamps attached
–
Have any exposed adhesive when the flap is in the sealed
or closed position
–
Have bent corners
–
Have rough, cockle, or laid finishes
–
Are stuck together or damaged in any way
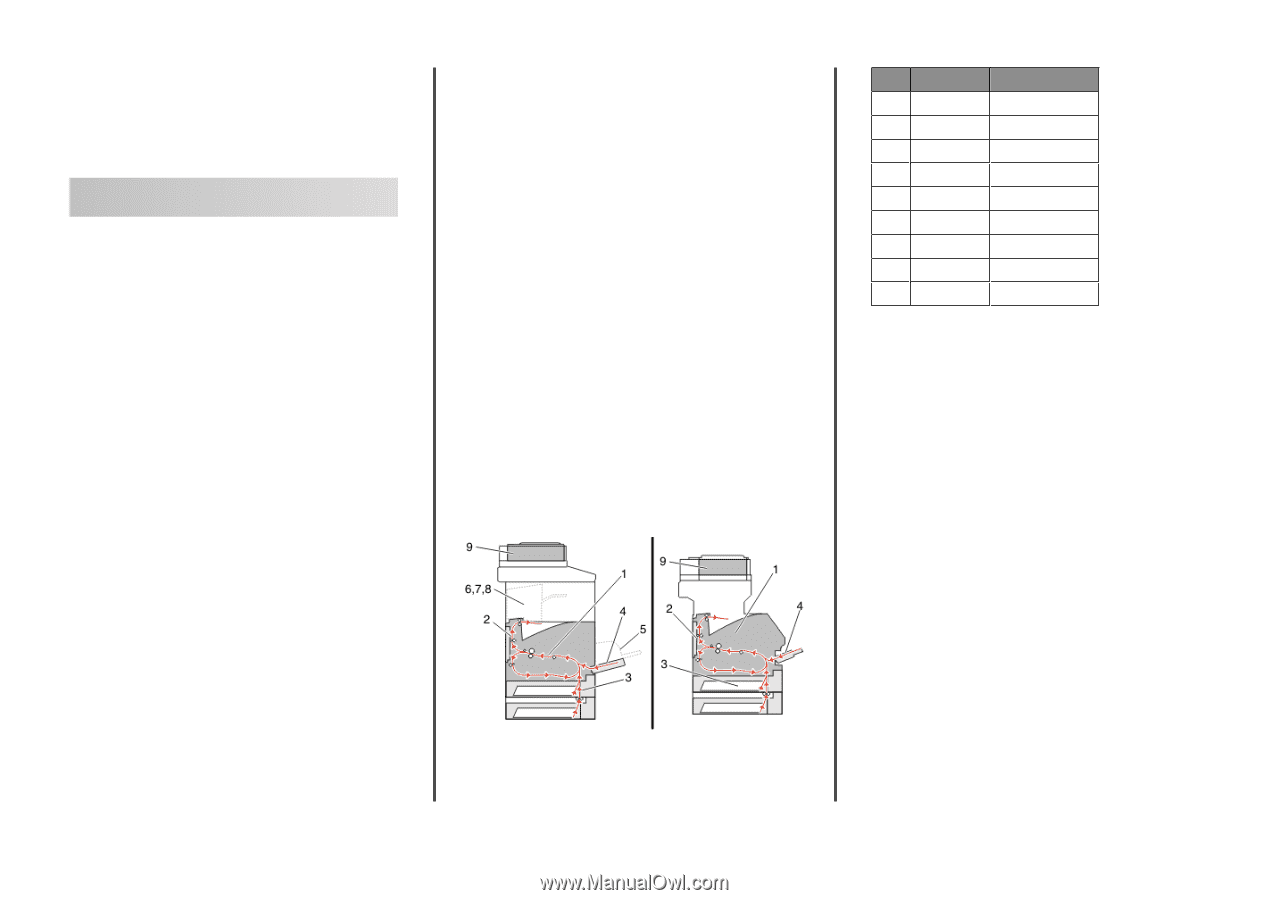
Understanding jam numbers
and locations
When a jam occurs, a message indicating the jam location appears.
Open doors and covers and remove trays to access jam locations.
To resolve any paper jam message, you must clear all jammed
paper from the paper path.
The following table lists the jams that can occur and the location
of each jam:
Jam numbers
Area
1
200–202
Printer
2
230–239
Duplex unit
3
240–249
Paper tray
4
250
Multipurpose feeder
5
260
Envelope feeder
6
270–279
Optional output bin
7
280–282
Finisher
8
283
Stapler
9
290–294
ADF cover
200 and 201 paper jams
1
Touch
Status/Supplies
to identify the location of the jam.
2
Lower the multipurpose feeder door.
1