Lexmark X6650 User's Guide - Page 48
Assigning a static IP address, Changing wireless settings after installation - windows 8
 |
UPC - 836367006047
View all Lexmark X6650 manuals
Add to My Manuals
Save this manual to your list of manuals |
Page 48 highlights
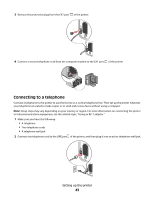
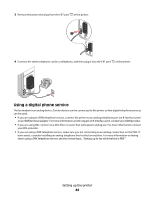
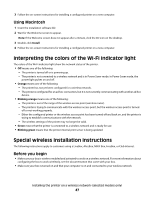
Adding the printer to your wireless network 1 Set up your printer using the setup instructions provided. 2 If there is an associate/registration button on the back of your box, press it when you are prompted to select a network. Note: After pressing the associate/register button, you have five minutes to complete the printer installation. 3 Return to the computer screen, and select the network you want to connect to. If you want to use the network shown, select Connect to , and then click Continue. If you do not want to use the network shown: a Select Connect to another network, and then click Continue. b Select the network you want to use from the list of available networks, and then click Continue. 4 Type the Network key, and then click Continue. Note: Your WEP, WPA, or WPA2 key may be obtained from the bottom of the box, the user's guide that came with the box, or from the box Web page. If you have already changed the key for your wireless network, use the key you created. 5 Follow the instructions on your screen to complete installation. Assigning a static IP address The printer will be assigned an IP address automatically through DHCP on most wireless networks. If the printer is not automatically assigned an IP address, the installation software will prompt you to manually assign an IP address to the printer. This will occur if there is no server or router capable of automatically assigning DHCP addresses on your network. For more information, contact your system support person. Changing wireless settings after installation To change wireless settings on the printer, such as the configured network, the security key, or other settings: Using Windows 1 Do one of the following: • In Windows Vista, click . • In Windows XP and earlier, click Start. 2 Click All Programs or Programs, and then select the printer program folder from the list. 3 Click Tools Œ Lexmark Wireless Setup Utility. Note: If the cable is not already connected, you may be prompted to connect the printer to the computer again using the installation cable as part of the setup process. 4 Follow the prompts on the computer screen to reinstall the software, and then make the changes that you want. Installing the printer on a wireless network (selected models only) 48
-
 1
1 -
2
-
3
-
4
-
5
-
6
-
7
-
8
-
9
-
10
-
11
-
12
-
13
-
14
-
15
-
16
-
17
-
18
-
19
-
20
-
21
-
22
-
23
-
24
-
25
-
26
-
27
-
28
-
29
-
30
-
31
-
32
-
33
-
34
-
35
-
36
-
37
-
38
-
39
-
40
-
41
-
42
-
 43
43 -
 44
44 -
 45
45 -
 46
46 -
 47
47 -
 48
48 -
 49
49 -
 50
50 -
 51
51 -
 52
52 -
 53
53 -
54
-
55
-
56
-
57
-
58
-
59
-
60
-
61
-
62
-
63
-
64
-
65
-
66
-
67
-
68
-
69
-
70
-
71
-
72
-
73
-
74
-
75
-
76
-
77
-
78
-
79
-
80
-
81
-
82
-
83
-
84
-
85
-
86
-
87
-
88
-
89
-
90
-
91
-
92
-
93
-
94
-
95
-
96
-
97
-
98
-
99
-
100
-
101
-
102
-
103
-
104
-
105
-
106
-
107
-
108
-
109
-
110
-
111
-
112
-
113
-
114
-
115
-
116
-
117
-
118
-
119
-
120
-
121
-
122
-
123
-
124
-
125
-
126
-
127
-
128
-
129
-
130
-
131
-
132
-
133
-
134
-
135
-
136
-
137
-
138
-
139
-
140
-
141
-
142
-
143
-
144
-
145
-
146
-
147
-
148
-
149
-
150
-
151
-
152
-
153
-
154
-
155
-
156
-
157
-
158
-
159
-
160
-
161
-
162
-
163
-
164
-
165
-
166
-
167
-
168
-
169
-
170
-
171
-
172
-
173
 |
 |