Lexmark X6650 User's Guide - Page 91
Printing photos stored on a memory device using the proof sheet, Proof Sheet, Scan Proof Sheet
 |
UPC - 836367006047
View all Lexmark X6650 manuals
Add to My Manuals
Save this manual to your list of manuals |
Page 91 highlights
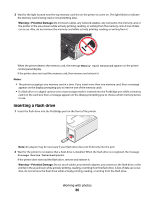
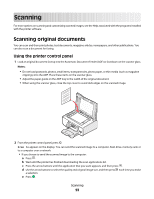
Notes: • If you insert the camera while the printer is performing another job, wait for the job to finish before printing from the camera. • To use the camera to control printing photos, see the instructions in the camera documentation. Printing photos stored on a memory device using the proof sheet 1 Load letter- or A4-size plain paper. 2 From the printer control panel, press . 3 Insert a memory card or flash drive. 4 Press the arrow buttons until Proof Sheet appears, and then press . 5 Press the arrow buttons to select an option to print a proof sheet. You can print a proof sheet: • For all photos on the memory device. • For the 20 most recent photos, if there are 20 or more photos on the memory device. • By date, if the photos on the card were taken on different dates. If you choose this option, use the arrow buttons on the printer control panel to choose the date range, and then press to save your selections. 6 Press . The proof sheets prints. 7 Follow the instructions on the proof sheet to select which photos to print, the number of copies per photo, red-eye reduction, page layout, print options, and paper size. Note: When making selections, make sure to fill in the circles completely. 8 Load the proof sheet facedown on the scanner glass. Scan Proof Sheet appears on the display. Note: If this option does not appear on the display, then press the arrow buttons until it appears on the display. 9 Press . The printer scans the proof sheet. 10 Load photo paper vertically in the center of the paper support, with the glossy or printable side facing you. (If you are not sure which side is the printable side, then see the instructions that came with the paper.) Note: Make sure that the paper matches the size that you selected on the proof sheet. 11 Press to print the photos. Note: To prevent smudging or scratching, avoid touching the printed surface with your fingers or sharp objects. For best results, remove each printed sheet individually from the paper exit tray, and then allow the prints to dry at least 24 hours before stacking, displaying, or storing. Working with photos 91
-
 1
1 -
2
-
3
-
4
-
5
-
6
-
7
-
8
-
9
-
10
-
11
-
12
-
13
-
14
-
15
-
16
-
17
-
18
-
19
-
20
-
21
-
22
-
23
-
24
-
25
-
26
-
27
-
28
-
29
-
30
-
31
-
32
-
33
-
34
-
35
-
36
-
37
-
38
-
39
-
40
-
41
-
42
-
43
-
44
-
45
-
46
-
47
-
48
-
49
-
50
-
51
-
52
-
53
-
54
-
55
-
56
-
57
-
58
-
59
-
60
-
61
-
62
-
63
-
64
-
65
-
66
-
67
-
68
-
69
-
70
-
71
-
72
-
73
-
74
-
75
-
76
-
77
-
78
-
79
-
80
-
81
-
82
-
83
-
84
-
85
-
 86
86 -
 87
87 -
 88
88 -
 89
89 -
 90
90 -
 91
91 -
 92
92 -
 93
93 -
 94
94 -
 95
95 -
 96
96 -
97
-
98
-
99
-
100
-
101
-
102
-
103
-
104
-
105
-
106
-
107
-
108
-
109
-
110
-
111
-
112
-
113
-
114
-
115
-
116
-
117
-
118
-
119
-
120
-
121
-
122
-
123
-
124
-
125
-
126
-
127
-
128
-
129
-
130
-
131
-
132
-
133
-
134
-
135
-
136
-
137
-
138
-
139
-
140
-
141
-
142
-
143
-
144
-
145
-
146
-
147
-
148
-
149
-
150
-
151
-
152
-
153
-
154
-
155
-
156
-
157
-
158
-
159
-
160
-
161
-
162
-
163
-
164
-
165
-
166
-
167
-
168
-
169
-
170
-
171
-
172
-
173
 |
 |