Lexmark X864 Quick Reference
Lexmark X864 Manual
 |
View all Lexmark X864 manuals
Add to My Manuals
Save this manual to your list of manuals |
Lexmark X864 manual content summary:
- Lexmark X864 | Quick Reference - Page 1
scanner glass. 2 If you are loading a document into the ADF, then adjust the paper guides. 3 From the printer control panel, press . 4 If you placed the document on the scanner copy settings as needed. 4 Touch Copy It. 5 If you have more pages to scan, then place the next document on the scanner - Lexmark X864 | Quick Reference - Page 2
the PostScript printer driver for your printer. 1 From your software program, click File ª Print. 2 From the Print window, select your printer, and then the ADF. Place these items on the scanner glass. 2 If you are loading a document into the ADF, adjust the paper guides. 3 On the home screen, touch - Lexmark X864 | Quick Reference - Page 3
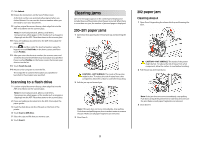
scanner glass. 2 If you are loading a document into the ADF, then adjust the paper guides. 3 Insert the flash drive into the USB port on the front of the printer. 4 Touch Scan to USB drive. 5 Select the size and file that you want to scan. 6 Touch Scan It. Clearing jams Jam error messages appear - Lexmark X864 | Quick Reference - Page 4
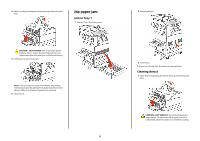
paper jam 1 Open Door A by pushing the release latch up and lowering the door. 3 Pull the jam up. CAUTION-HOT SURFACE: The inside of the printer might be hot. To reduce the risk of injury from a hot component, allow the surface to cool before touching. 2 Open Door E by pushing the release - Lexmark X864 | Quick Reference - Page 5
pushing the release latch up and lowering the door. 6 Pull the jam up. 7 Close Door E. 8 Close Door A. CAUTION-HOT SURFACE: The inside of the printer might be hot. To reduce the risk of injury from a hot component, allow the surface to cool before touching. 5 2 Remove the jam. 3 Close Door D. - Lexmark X864 | Quick Reference - Page 6
to remove the jam. Make sure all paper fragments are removed. 6 Close Door A. 6 2 Remove the jam. 3 Insert Tray 1. If all jams are cleared, then the printer resumes printing. Clearing Area A 1 Open Door A by pushing the release latch up and lowering the door. CAUTION-HOT SURFACE: The inside of the - Lexmark X864 | Quick Reference - Page 7
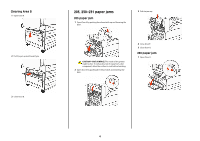
fan them. Do not fold or crease the paper. Straighten the edges on a level surface. 3 Load the paper into the multipurpose feeder. 4 Adjust the paper guide to rest lightly against the edge of the paper. 7 - Lexmark X864 | Quick Reference - Page 8
280-281 paper jams 1 Open Door A by pushing the release latch up and lowering the door. 4 Open Door F. CAUTION-HOT SURFACE: The inside of the printer might be hot. To reduce the risk of injury from a hot component, allow the surface to cool before touching. 2 Pull the jam up and toward - Lexmark X864 | Quick Reference - Page 9
jam 1 Lift Door H. 289 staple error 1 Open Door G. 3 Firmly pull the colored tab to remove the staple cartridge. 2 Remove the jam. 3 Close Door H. 2 Hold the lever on the staple cartridge holder, and move the holder to the right. 4 Use the metal tab to lift the staple guard, and then pull out - Lexmark X864 | Quick Reference - Page 10
6 Press down on the staple guard until it snaps securely into place. 28x paper jam 284 paper jam 1 Open Door F. 7 Push the cartridge holder firmly into the stapler until the - Lexmark X864 | Quick Reference - Page 11
8 Remove the jam. 9 Close Door H. 285-286 paper jams 1 Lift Door H. 2 Remove the jam. 3 Close Door H. 287-288 paper jams 1 Open Door F. 2 Remove the jam. 3 Close Door F. 4 Open Door G. 5 Remove the jam. 6 Close Door G. 290-294 paper jams 1 Remove all original documents from the ADF. 2 Lift the ADF - Lexmark X864 | Quick Reference - Page 12
6 Close the ADF cover. 7 Open the scanner cover, and remove any jammed pages. 293 paper jam The printer was sent a scan job, but found no message appears. This clears the message. • Touch Cancel Job if a scan job is processing when the message appears. This cancels the job and clears the message
-
 1
1 -
 2
2 -
 3
3 -
 4
4 -
 5
5 -
 6
6 -
 7
7 -
8
-
9
-
10
-
11
-
12
 |
 |
Laser MFP
Quick Reference
Copying
Making a quick copy
1
Load an original document faceup, short edge first into the
ADF or facedown on the scanner glass.
Note:
Do not load postcards, photos, small items,
transparencies, photo paper, or thin media (such as magazine
clippings) into the ADF. Place these items on the scanner glass.
2
If you are loading a document into the ADF, then adjust the
paper guides.
3
From the printer control panel, press
.
4
If you placed the document on the scanner glass, then touch
Finish the Job
to return to the home screen.
Copying using the ADF
1
Load an original document faceup, short edge first into the
ADF.
Note:
Do not load postcards, photos, small items,
transparencies, photo paper, or thin media (such as magazine
clippings) into the ADF. Place these items on the scanner glass.
2
Adjust the paper guides.
3
On the home screen, touch
Copy
, or use the keypad to enter
the number of copies.
The copy screen appears.
4
Change the copy settings as needed.
5
Touch
Copy It
.
Copying using the scanner
glass
1
Place an original document facedown on the scanner glass in
the upper left corner.
2
On the home screen, touch
Copy
, or use the keypad to enter
the number of copies.
The copy screen appears.
3
Change the copy settings as needed.
4
Touch
Copy It
.
5
If you have more pages to scan, then place the next document
on the scanner glass, and then touch
Scan the Next Page
.
6
Touch
Finish the Job
to return to the home screen.
E-mailing
Sending an e-mail using the
touch screen
1
Load an original document faceup, short edge first into the
ADF or facedown on the scanner glass.
Note:
Do not load postcards, photos, small items,
transparencies, photo paper, or thin media (such as magazine
clippings) into the ADF. Place these items on the scanner glass.
2
If you are loading a document into the ADF, then adjust the
paper guides.
3
On the home screen, touch
E-mail
.
4
Enter the e-mail address or shortcut number.
To enter additional recipients, touch
Next Address
, and then
enter the address or shortcut number you want to add.
5
Touch
E-mail It
.
Sending an e-mail using a
shortcut number
1
Load an original document faceup, short edge first into the
ADF or facedown on the scanner glass.
Note:
Do not load postcards, photos, small items,
transparencies, photo paper, or thin media (such as magazine
clippings) into the ADF. Place these items on the scanner glass.
2
If you are loading a document into the ADF, then adjust the
paper guides.
3
Press
, and then enter the shortcut number using the
keypad.
To enter additional recipients, press
Next address
, and then
enter the address or shortcut number you want to add.
4
Touch
E-mail It
.
Sending an e-mail using the
address book
1
Load an original document faceup, short edge first into the
ADF or facedown on the scanner glass.
Note:
Do not load postcards, photos, small items,
transparencies, photo paper, or thin media (such as magazine
clippings) into the ADF. Place these items on the scanner glass.
2
If you are loading a document into the ADF, adjust the paper
guides.
3
On the home screen, touch
E-mail
.
4
Touch
Search Address Book
.
5
Enter the name or part of the name you are searching for, and
then touch
Search
.
6
Touch the name that you want to add to the To: box.
To enter additional recipients, press
Next address
, and then
enter the address or shortcut number you want to add; or
search the address book.
7
Touch
E-mail It
.
1