Lexmark Xs463de User Guide - Page 151
Color, Original Size, Orientation, Duplex, JPEG Quality, Darkness, Resolution, Advanced Imaging, Photo
 |
UPC - 734646309271
View all Lexmark Xs463de manuals
Add to My Manuals
Save this manual to your list of manuals |
Page 151 highlights
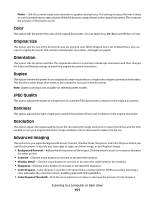
Photo-Tells the scanner to pay extra attention to graphics and pictures. This setting increases the time it takes to scan, but emphasizes a reproduction of the full dynamic range of tones in the original document. This increases the amount of information saved. Color This option tells the printer the color of the original documents. You can select Gray, BW (Black and White), or Color. Original Size This option sets the size of the documents you are going to scan. When Original Size is set to Mixed Sizes, you can scan an original document that contains mixed paper sizes (letter- and legal-size pages). Orientation This option tells the printer whether the original document is in portrait or landscape orientation and then changes the Sides and Binding settings to match the original document orientation. Duplex This option informs the printer if your original document is printed on a single side or duplex (printed on both sides). This lets the scanner know what needs to be scanned for inclusion in the document. Note: Duplex scanning is not available on selected printer models. JPEG Quality This option adjusts the degree of compression for scanned JPEG documents in relation to the original document. Darkness This option adjusts how light or dark your scanned documents will turn out in relation to the original document. Resolution This option adjusts the output quality of your file. Increasing the image resolution increases the file size and the time needed to scan your original document. Image resolution can be decreased to reduce the file size. Advanced Imaging This option lets you adjust Background Removal, Contrast, Shadow Detail, Sharpness, and Color Dropout before you scan the document. It also lets you Scan edge to edge, as a Mirror Image, or as a Negative Image. • Background Removal-Adjusts the white portion of the output. Click the arrow buttons to increase or decrease the white portion. • Contrast-Click the arrow buttons to increase or decrease the contrast. • Shadow Detail-Click the arrow buttons to increase or decrease the visible detail in the shadows. • Sharpness-Click the arrow buttons to increase or decrease the sharpness. • Color Dropout-Color dropout is used for form Optical Character Recognition (OCR) processing. Selecting a color eliminates the color from a form, enabling improved OCR capabilities. • Color Dropout Threshold-Click the arrow buttons to increase or decrease the amount of color dropout. Scanning to a computer or flash drive 151
-
 1
1 -
2
-
3
-
4
-
5
-
6
-
7
-
8
-
9
-
10
-
11
-
12
-
13
-
14
-
15
-
16
-
17
-
18
-
19
-
20
-
21
-
22
-
23
-
24
-
25
-
26
-
27
-
28
-
29
-
30
-
31
-
32
-
33
-
34
-
35
-
36
-
37
-
38
-
39
-
40
-
41
-
42
-
43
-
44
-
45
-
46
-
47
-
48
-
49
-
50
-
51
-
52
-
53
-
54
-
55
-
56
-
57
-
58
-
59
-
60
-
61
-
62
-
63
-
64
-
65
-
66
-
67
-
68
-
69
-
70
-
71
-
72
-
73
-
74
-
75
-
76
-
77
-
78
-
79
-
80
-
81
-
82
-
83
-
84
-
85
-
86
-
87
-
88
-
89
-
90
-
91
-
92
-
93
-
94
-
95
-
96
-
97
-
98
-
99
-
100
-
101
-
102
-
103
-
104
-
105
-
106
-
107
-
108
-
109
-
110
-
111
-
112
-
113
-
114
-
115
-
116
-
117
-
118
-
119
-
120
-
121
-
122
-
123
-
124
-
125
-
126
-
127
-
128
-
129
-
130
-
131
-
132
-
133
-
134
-
135
-
136
-
137
-
138
-
139
-
140
-
141
-
142
-
143
-
144
-
145
-
 146
146 -
 147
147 -
 148
148 -
 149
149 -
 150
150 -
 151
151 -
 152
152 -
 153
153 -
 154
154 -
 155
155 -
 156
156 -
157
-
158
-
159
-
160
-
161
-
162
-
163
-
164
-
165
-
166
-
167
-
168
-
169
-
170
-
171
-
172
-
173
-
174
-
175
-
176
-
177
-
178
-
179
-
180
-
181
-
182
-
183
-
184
-
185
-
186
-
187
-
188
-
189
-
190
-
191
-
192
-
193
-
194
-
195
-
196
-
197
-
198
-
199
-
200
-
201
-
202
-
203
-
204
-
205
-
206
-
207
-
208
-
209
-
210
-
211
-
212
-
213
-
214
-
215
-
216
-
217
-
218
-
219
-
220
-
221
-
222
-
223
-
224
-
225
-
226
-
227
-
228
-
229
-
230
-
231
-
232
-
233
-
234
-
235
-
236
-
237
-
238
-
239
-
240
-
241
-
242
-
243
-
244
-
245
-
246
-
247
-
248
-
249
-
250
-
251
-
252
-
253
-
254
-
255
-
256
-
257
-
258
-
259
-
260
-
261
-
262
-
263
-
264
-
265
-
266
-
267
-
268
-
269
-
270
-
271
-
272
-
273
-
274
-
275
-
276
-
277
-
278
-
279
-
280
-
281
-
282
-
283
-
284
-
285
-
286
-
287
-
288
-
289
-
290
-
291
-
292
-
293
-
294
-
295
-
296
-
297
-
298
-
299
-
300
-
301
-
302
-
303
-
304
-
305
-
306
-
307
-
308
-
309
-
310
-
311
-
312
-
313
-
314
-
315
-
316
-
317
 |
 |