Lexmark Z1480 Getting Started
Lexmark Z1480 Manual
 |
View all Lexmark Z1480 manuals
Add to My Manuals
Save this manual to your list of manuals |
Lexmark Z1480 manual content summary:
- Lexmark Z1480 | Getting Started - Page 1
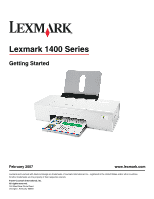
Started February 2007 www.lexmark.com Lexmark and Lexmark with diamond design are trademarks of Lexmark International, Inc., registered in the United States and/or other countries. All other trademarks are the property of their respective owners. © 2007 Lexmark International, Inc. All rights - Lexmark Z1480 | Getting Started - Page 2
a lightning storm. SAVE THESE INSTRUCTIONS. Operating system notice All features and functions are operating system-dependent. For complete descriptions: • Windows users-See the User's Guide. • Macintosh users-If your product supports Macintosh, see the Mac Help installed with the printer software. - Lexmark Z1480 | Getting Started - Page 3
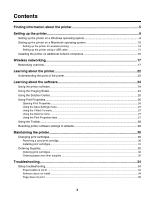
defaults 29 Maintaining the printer 30 Changing print cartridges...30 Removing a used print cartridge...30 Installing print cartridges...31 Ordering Supplies...32 Ordering print cartridges...32 Ordering paper and other supplies ...32 Troubleshooting...34 Setup troubleshooting...34 Power button is - Lexmark Z1480 | Getting Started - Page 4
Wireless troubleshooting...36 Printing a network setup page ...36 WiFi Indicator is not lit ...36 Network printer does not show up in the printer selection list during installation 37 Check your security keys...38 Wireless Setup Utility cannot communicate with the printer during installation ( - Lexmark Z1480 | Getting Started - Page 5
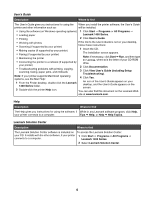
up hardware and software (on Windows operating systems) and some basic instructions for using the printer. You can find this document in the printer box or on the Lexmark Web site at www.lexmark.com. Note: If your printer supports Macintosh operating systems, see the Mac Help: 1 From the Finder - Lexmark Z1480 | Getting Started - Page 6
Troubleshooting problems with printing, copying, scanning, faxing, paper jams, and misfeeds 3 Click View User's Guide (including Setup Troubleshooting). Note: If your printer supports Macintosh operating systems, see the Mac Help: 4 Click Yes. 1 From the Finder desktop, double-click the Lexmark - Lexmark Z1480 | Getting Started - Page 7
free of defects in printer, or set forth at printer. materials and workmanship for a www.lexmark.com. period of 12 months after the 1 Click CUSTOMER SUPPORT. original date of purchase. 2 Click Warranty Information. 3 From the Statement of Limited Warranty section, click Inkjet & All-In-One - Lexmark Z1480 | Getting Started - Page 8
Record the following information (located on the store receipt and the back of the printer), and have it ready when you contact us so that we may serve you faster: • Machine Type number • Serial number • Date purchased • Store where purchased 8 - Lexmark Z1480 | Getting Started - Page 9
write down the information you need to know. Item SSID (name of your network) Security key (password) Description 4 Follow the instructions in the following sections to set up the printer: • For printing on a Windows operating system using a wireless connection or USB cable, see "Setting up the - Lexmark Z1480 | Getting Started - Page 10
then type D:\setup.exe, where D is the letter of your CD-ROM drive. 3 Follow the instructions on the computer screen to set up the printer. Your security software may notify you that Lexmark software is trying to communicate with your computer system. Always allow these programs to communicate. This - Lexmark Z1480 | Getting Started - Page 11
and paper exit tray to be sure that all tape and packing material is completely removed from the printer. 3 Raise the paper support, and extend the paper exit tray. 4 Load paper, and adjust the paper guide. 5 Raise the antenna of the wireless print server. Note: Make sure you remove any tape on the - Lexmark Z1480 | Getting Started - Page 12
6 Insert the power supply. 7 Connect the power cord. 8 Make sure the power is on. 2 1 9 Open the access cover. 12 - Lexmark Z1480 | Getting Started - Page 13
lids. 11 Remove the tape from the print cartridges. 1 2 12 Insert the cartridges, and then close the cartridge carrier lids. Note: The number of cartridges may vary by model. 13 Close the access cover. 1 2 14 To set up the printer on a Macintosh computer: • For printing using a wireless - Lexmark Z1480 | Getting Started - Page 14
instructions are for setting up the printer for wireless printing on a Macintosh operating system. Notes: • Make sure you have completed the initial setup of the printer. For more information, see "Setting up the printer network (SSID). b For BSS (Basic Service Set) Type, select • Infrastructure if - Lexmark Z1480 | Getting Started - Page 15
From the Finder desktop, double-click the Lexmark 1400 Series Installer icon 19 Double-click the Install icon. 20 Click Continue. 21 Follow the instructions on the computer screen to complete the installation. When you have completed the installation, the printer is ready for you to use. Setting - Lexmark Z1480 | Getting Started - Page 16
each additional computer, and follow the instructions on the computer screen. • You do not need to repeat the connection steps for each computer you want to print to the printer. • The printer should appear as a highlighted printer in the installation. If multiple printers appear in the list, make - Lexmark Z1480 | Getting Started - Page 17
be wired and/or have wireless network adapters built in or installed in them so that they can communicate over a network. The printers in the following diagrams represent Lexmark printers with Lexmark internal print servers built in or installed in them so that they can communicate over a network - Lexmark Z1480 | Getting Started - Page 18
The network is connected to the Internet through a DSL or a cable modem. Scenario 3: Ethernet-connected devices with Internet • A computer, a laptop, and a printer are connected by Ethernet cables to a hub, router, or switch. • The network is connected to the Internet through a DSL or a cable modem - Lexmark Z1480 | Getting Started - Page 19
without Internet • A laptop is directly connected wirelessly to a printer without going through a wireless router. • The network has no connection to the Internet. SSID SSID (Service Set identifier) is a setting on a wireless device that allows devices to join the same wireless network. It is - Lexmark Z1480 | Getting Started - Page 20
page. b Check that the printer has an IP address. c Under Network Card, check that the Status is listed as Connected. d Check that the computer has an IP address. e For additional information, refer to the "Wireless troubleshooting" section of the "Troubleshooting" chapter. Macintosh users only - Lexmark Z1480 | Getting Started - Page 21
to the "Wireless troubleshooting" section of the "Troubleshooting" chapter. Types of wireless networks Networks can operate in one of two modes: infrastructure or ad hoc. Lexmark recommends setting up a network in infrastructure mode using the installation CD that came with the printer. A wireless - Lexmark Z1480 | Getting Started - Page 22
. - Press and hold the button for two seconds to turn the printer off. • Cancel a print job. Press in the middle of a print job. • Load or eject paper. • Troubleshoot. 3 Access cover • Install or change the print cartridges. • Clear paper jams. 4 Wi-Fi indicator Check wireless status: • Off - Lexmark Z1480 | Getting Started - Page 23
Use the 8 Paper support To Load paper. 1 Use the 1 USB port 2 Power supply 2 3 To Connect the printer to a computer using a USB cable. Connect the printer to a power source using the power cord. 1 Plug the power cord all the way into the power supply on the printer. 2 Plug the power cord into an - Lexmark Z1480 | Getting Started - Page 24
, double-click the Lexmark 1400 Series folder. 2 Double-click the printer Help icon. Using the printer software Use this software Imaging Studio Solution Center Print Properties Toolbar To Print documents or photos. Find troubleshooting, maintenance, and cartridge-ordering information. Select - Lexmark Z1480 | Getting Started - Page 25
Welcome screen: Click To Setup and diagnose printer • Check ink levels. • Order print cartridges. • Find maintenance information. • Select other Solution Center tabs for more information, including how to change printer settings and troubleshooting. Using the Solution Center The Solution Center - Lexmark Z1480 | Getting Started - Page 26
's Guide for more information. • Learn tips about the current status. • Solve printer problems. • Install a new print cartridge. • View shopping options for new cartridges. • Print a test page. • Clean to fix horizontal streaks. • Align to fix blurry edges. • Troubleshoot other ink problems. Learn - Lexmark Z1480 | Getting Started - Page 27
, and Print Layout. Tab Quality/Copies Paper Setup Print Layout Options • Select a Quality/Speed setting. • Select a Paper Type. • Customize how the printer prints several copies of a single print job: collated or normal. • Choose Automatic Image Sharpening. • Choose to have the last page printed - Lexmark Z1480 | Getting Started - Page 28
Using the Toolbar The Toolbar lets you create printer-friendly versions of Web pages. Note: The Toolbar the toolbar appearance or select a different setting for printing photos. • Access links to the Lexmark Web site. • Access Help for additional information. • Uninstall the Toolbar. Print an entire - Lexmark Z1480 | Getting Started - Page 29
software settings to defaults Windows 2000, Windows XP, or Windows Vista users: 1 Click Start ΠSettings ΠPrinters or Printers and Faxes. 2 Right-click the Lexmark 1400 Series icon. 3 Click Printing Preferences. 4 Click the Save Settings menu. 5 From the Restore section, select Factory Settings - Lexmark Z1480 | Getting Started - Page 30
3 Press down on the cartridge carrier lever to raise the cartridge carrier lid. 4 Remove the used print cartridge. If the cartridge you removed is not empty and you want to use it later, see "Preserving the print cartridges" in the "Maintaining the printer" chapter of the User's Guide on the CD. 30 - Lexmark Z1480 | Getting Started - Page 31
back or the metal nozzles on the bottom of the cartridges. 2 Press down on the cartridge carrier levers to raise the cartridge carrier lids. 3 Insert the black cartridge or the photo cartridge in the left carrier. Insert the color cartridge in the right carrier. 4 Snap the lids closed. 5 Close the - Lexmark Z1480 | Getting Started - Page 32
by continuous printing. Declared yield value in accordance with ISO/IEC 24711 (FDIS). 2 Licensed Return Program Cartridge Lexmark 1480 models Item Color cartridge Black cartridge Photo cartridge Part number 2 3 31 Ordering paper and other supplies To order supplies or to locate a dealer near - Lexmark Z1480 | Getting Started - Page 33
vary by country or region. Paper size • Letter • A4 • 4 x 6 in. • 10 x 15 cm • Letter • A4 • 4 x 6 in. • 10 x 15 cm •L For information on how to purchase Lexmark Premium Photo Paper, Lexmark Photo Paper, or Lexmark PerfectFinish Photo Paper in your country or region, go to www - Lexmark Z1480 | Getting Started - Page 34
These are possible solutions. Try one or more of the following: Check your operating system The following operating systems are supported: • Windows 2000 with Service Pack 3 or later • Windows XP • Windows Vista • Mac OS X Check your system requirements Check that your computer meets the minimum - Lexmark Z1480 | Getting Started - Page 35
of the User's Guide on the CD. Check power If the light is not on, see "Power button is not lit" on page 34. Reload paper Remove and then load paper. Check ink Check the ink levels, and install new print cartridges if necessary. Check print cartridges 1 Remove the print cartridges. 2 Make sure - Lexmark Z1480 | Getting Started - Page 36
software, and then reinstall it. For more information, see "Uninstalling and reinstalling the software" on page 50. Wireless troubleshooting Printing a network setup page 1 Make sure the printer is off. 2 Press and hold for five seconds, and then release the button. A test page and a network setup - Lexmark Z1480 | Getting Started - Page 37
letters. 2 Click Start ΠPrograms or All Programs ΠLexmark 1400 Series. 3 Click Wireless Setup. Note: You may be prompted to connect the printer to the computer again using the installation cable as part of the setup process. 4 Follow the instructions on the computer screen, including typing in the - Lexmark Z1480 | Getting Started - Page 38
double-click the Lexmark 1400 Series Installer icon 5 Double-click the Install icon. 6 Click Continue. 7 Follow the instructions on the computer port on the back of the printer. 4 Cancel the software installation. 5 Click Start ΠPrograms or All Programs ΠLexmark 1400 Series. 6 Click Wireless - Lexmark Z1480 | Getting Started - Page 39
network name, see the documentation that came with your computer. • To reset the printer name: 1 Click Start Œ Programs or All Programs Œ Lexmark 1400 Series. 2 Click Wireless Setup Utility. 3 Follow the instructions on the computer screen, and enter the new network name when prompted. Check - Lexmark Z1480 | Getting Started - Page 40
information, see "Check your security keys" on page 38. Check MAC address If your network uses MAC address filtering, provide the MAC address for the printer to your network. If you need help finding the MAC address, see "Finding your MAC address" on page 50. Ping the wireless access point (wireless - Lexmark Z1480 | Getting Started - Page 41
router) responds, you will see several lines appear that start with "Reply from". Turn off and restart the printer. 4 If the wireless access point (wireless router) does not respond, it will take several seconds and then information, or you can use Network Diagnostics to help resolve the problem. 41 - Lexmark Z1480 | Getting Started - Page 42
Lexmark 1400 Series. 2 Click Wireless Setup. Note: You may be prompted to connect the printer to the computer again using the installation cable as part of the setup process. 3 Follow the instructions your printer model. Note: If your printer is not shown, manually type the IP address of the printer - Lexmark Z1480 | Getting Started - Page 43
" section of the "Troubleshooting" chapter. Check that printer driver is installed Make sure the printer driver is installed on the computer from which you are sending the print job. 1 Click Start ΠPrograms or All Programs ΠLexmark 1400 Series. If printer programs are listed, then your - Lexmark Z1480 | Getting Started - Page 44
work best if they are pointing straight up. You may find, however, that reception improves if you experiment with different angles for your printer and/or wireless access point (wireless router) antennas. Check network name Make sure your network does not have the same name as another network - Lexmark Z1480 | Getting Started - Page 45
network name, see the documentation that came with your computer. • To reset the printer name: 1 Click Start Œ Programs or All Programs Œ Lexmark 1400 Series. 2 Click Wireless Setup Utility. 3 Follow the instructions on the computer screen, and enter the new network name when prompted. Reboot the - Lexmark Z1480 | Getting Started - Page 46
router) does not respond, nothing is displayed. See the Mac Help for additional AirPort tips and information, or use Network Diagnostics to help resolve the problem. 46 - Lexmark Z1480 | Getting Started - Page 47
might not be connected to the network. See the Mac Help for additional AirPort tips and information, or use Network Diagnostics to help resolve the problem. • You may need to change the wireless settings for your printer. For more information, see "Run the wireless setup again" on page 48. 47 - Lexmark Z1480 | Getting Started - Page 48
Lexmark 1400 Series. 2 Click Wireless Setup Utility. Note: You may be prompted to connect the printer to the computer again using the installation cable as part of the setup process. 3 Follow the instructions your printer model. Note: If your printer is not shown, manually type the printer IP - Lexmark Z1480 | Getting Started - Page 49
or All Programs ΠLexmark 1400 Series. 2 Click Wireless Setup Utility. Note: You may be prompted to connect the printer to the computer again by Apple Inc. 4 Double-click your printer model. Note: If your printer is not shown, manually type the printer's IP address in the browser address field. - Lexmark Z1480 | Getting Started - Page 50
anti-virus program. 2 Click Start ΠPrograms or All Programs ΠLexmark 1400 Series. 3 Select Uninstall. 4 Follow the instructions on the computer screen to remove the printer software. 5 Restart the computer before reinstalling the printer software. 6 Insert the CD for Windows, and then follow the - Lexmark Z1480 | Getting Started - Page 51
. 2 From the Finder desktop, double-click the Lexmark 1400 Series folder. 3 Double-click the Uninstaller icon. 4 Follow the instructions on the computer screen to remove the printer software. 5 Restart the computer before reinstalling the printer software. 6 Insert the CD for Macintosh. 7 From - Lexmark Z1480 | Getting Started - Page 52
printer to an existing ad hoc wireless network Windows users only 1 Click Start ΠPrograms or All Programs ΠLexmark 1400 Series. 2 Click Wireless Setup. 3 Follow the instructions 9 Double-click your printer model. Note: If your printer is not shown, manually type the printer IP address in the - Lexmark Z1480 | Getting Started - Page 53
network security. • Your connection to the Internet will be restored when you reconnect to your original network. Creating an ad hoc wireless network Lexmark recommends that you set up your wireless network using a wireless access point (wireless router). A network set up this way is called an - Lexmark Z1480 | Getting Started - Page 54
see "Check your security keys" in the "Wireless troubleshooting" section of the "Troubleshooting" chapter. 17 Type the same security code in Programs or All Programs ΠLexmark 1400 Series. 22 Click Wireless Setup Utility. Note: You may be prompted to connect the printer to the computer again using - Lexmark Z1480 | Getting Started - Page 55
label located on the back of your printer. 6 Insert the CD for Macintosh to run the wireless setup. 7 From the Finder desktop, double-click the Lexmark 1400 Series Installer icon 8 Double-click the Install icon. 9 Click Continue. 10 Follow the instructions on the computer screen. 11 Store your - Lexmark Z1480 | Getting Started - Page 56
in conjunction with other products, programs, or services, except those expressly designated by the manufacturer, are the user's responsibility. For Lexmark technical support, visit support.lexmark.com. For information on supplies and downloads, visit www.lexmark.com. If you don't have access to - Lexmark Z1480 | Getting Started - Page 57
after delivering a fixed amount of ink. A variable amount of ink will remain in the cartridge when replacement is required. After this single use, the license to use the print cartridge terminates, and the used cartridge must be returned only to Lexmark for remanufacturing, refilling or recycling - Lexmark Z1480 | Getting Started - Page 58
received The name of a wireless network. When you connect a printer to a wireless network, the printer needs to use the same SSID as the network. Also referred to as network name or BSS (Basic Service Set). An IP address assigned manually by you A device similar to a network hub that can connect - Lexmark Z1480 | Getting Started - Page 59
Fi WPA (Wi-Fi Protected Access) WPA2 An address assigned to a network printer or print server by the manufacturer. To find the UAA, print a network helps prevent unauthorized access to a wireless network. WPA is not supported on ad hoc wireless networks. Other possible security settings are WEP
-
 1
1 -
 2
2 -
 3
3 -
 4
4 -
 5
5 -
 6
6 -
 7
7 -
8
-
9
-
10
-
11
-
12
-
13
-
14
-
15
-
16
-
17
-
18
-
19
-
20
-
21
-
22
-
23
-
24
-
25
-
26
-
27
-
28
-
29
-
30
-
31
-
32
-
33
-
34
-
35
-
36
-
37
-
38
-
39
-
40
-
41
-
42
-
43
-
44
-
45
-
46
-
47
-
48
-
49
-
50
-
51
-
52
-
53
-
54
-
55
-
56
-
57
-
58
-
59
 |
 |
Lexmark 1400 Series
Getting Started
February 2007
www.lexmark.com
Lexmark and Lexmark with diamond design are trademarks of Lexmark International, Inc., registered in the United States and/or other countries.
All other trademarks are the property of their respective owners.
© 2007 Lexmark International, Inc.
All rights reserved.
740 West New Circle Road
Lexington, Kentucky 40550