LiftMaster 8155W Owners Manual
LiftMaster 8155W Manual
 |
View all LiftMaster 8155W manuals
Add to My Manuals
Save this manual to your list of manuals |
LiftMaster 8155W manual content summary:
- LiftMaster 8155W | Owners Manual - Page 1
Drive Models 8160W, 8160WB, 8164W, and 8165W Contractor Series Belt Drive Model 8155W FOR RESIDENTIAL USE ONLY • Please read this manual and the . Register your garage door opener to receive updates and offers from LiftMaster Take a photo of the camera icon including the points ( ). Send it in - LiftMaster 8155W | Owners Manual - Page 2
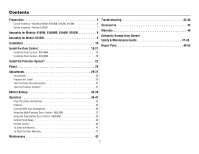
: 8160W, 8160WB, 8164W, 8165W 8 Assembly for Model: 8155W 9 Installation 10 Install the Door Control 19-21 Install the Door Control - 882LMW 19 Install the Door Control - 883LMW 20 Troubleshooting 43-44 Accessories 45 Warranty 46 Automatic Garage Door Opener Safety & Maintenance Guide 47 - LiftMaster 8155W | Owners Manual - Page 3
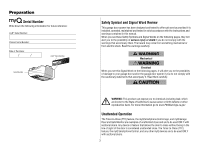
Serial Number Safety Symbol and Signal Word Review This garage door opener has been designed and tested to offer safe service provided it is installed, operated, maintained and tested in strict accordance with the instructions and warnings contained in this manual. When you see these Safety Symbols - LiftMaster 8155W | Owners Manual - Page 4
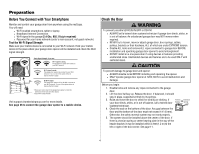
locks and remove any ropes connected to the garage door. 2. Lift the door halfway up. Release the door. If balanced, it should stay in place, supported entirely by its springs. 3. Raise and lower the door to check for binding or sticking. If Torsion Extension your door binds, sticks, or is out - LiftMaster 8155W | Owners Manual - Page 5
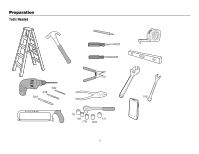
Preparation Tools Needed 5/32 3/16 5/16 7/16 1/2 5/8 1/4 7/16 9/16 5 - LiftMaster 8155W | Owners Manual - Page 6
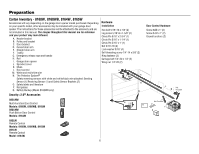
Preparation Carton Inventory - 8160W, 8160WB, 8164W, 8165W Accessories will vary depending on the garage door opener model purchased. Depending on your specific model, other accessories may be included with your garage door opener. The instructions for these accessories will be attached to the - LiftMaster 8155W | Owners Manual - Page 7
instructions for these accessories will be attached to the accessory and are not included in this manual. The images throughout this manual CF G DE Security+ 2.0® Accessories N 882LMW Multi-Function Door Control 893LM Remote Control Lock washer 5/16" (4) Self-threading screw 1/4"-14 x 5/8" (2) - LiftMaster 8155W | Owners Manual - Page 8
and styrofoam. 3. Fasten the rail with the previously removed bolts. 4. Position the chain around the garage door opener sprocket. 5. a) For models 8160W and 8160WB, attach the sprocket cover over the garage door opener sprocket and attach with hex screws. b) For models 8164W and 8165W, install the - LiftMaster 8155W | Owners Manual - Page 9
Assembly for Model: 8155W 1 Attach the Rail to the Garage Door Opener To avoid possible SERIOUS INJURY to finger from moving garage door opener: l ALWAYS keep hand clear of sprocket while operating opener. l Securely attach sprocket cover BEFORE operating. To avoid SERIOUS damage to garage door - LiftMaster 8155W | Owners Manual - Page 10
NEVER connect garage door opener to power source until instructed to do so. 8. NEVER wear watches, rings or loose clothing while installing or servicing opener. They could be caught in garage door the garage door opener on a one-piece door, visit LiftMaster.com for installation instructions. 10 - LiftMaster 8155W | Owners Manual - Page 11
you need to install the header bracket on a 2x4 (on wall or ceiling), use lag screws (not provided) to securely fasten the 2x4 to structural supports. Open your door to the highest point of travel as shown. Draw an intersecting horizontal line on the header wall 2" (5 cm) above the high point - LiftMaster 8155W | Owners Manual - Page 12
the wall above the garage door, or to the ceiling. Follow the instructions which will work best for your particular requirements. Do not install the . Drill 3/16" pilot holes and fasten bracket securely to a structural support with the hardware provided. Lag Screw 5/16"-9x1-5/8" OPTION A - WALL - LiftMaster 8155W | Owners Manual - Page 13
release arm down to disconnect the inner and outer trolley. Slide the outer trolley toward the garage door opener. The trolley can remain disconnected until instructed. Clevis Pin 5/16" X 2-3/4" Connected Disconnected 13 - LiftMaster 8155W | Owners Manual - Page 14
from a falling garage door opener, fasten it SECURELY to structural supports of the garage. Concrete anchors MUST be used if installing ANY the bracket is not centered above the door). 7. Remove the 2x4. Operate the door manually. If the door hits the rail, raise the header bracket. NOTE: DO NOT - LiftMaster 8155W | Owners Manual - Page 15
the Light Bulbs for Models 8160W, 8160WB Install the Light Bulbs for Models 8155W, 8164W and 8165W To prevent possible OVERHEATING of the end panel or light socket: l Use ONLY A19 incandescent (100W maximum) or compact fluorescent (26W maximum) light bulbs. l DO NOT use incandescent bulbs larger - LiftMaster 8155W | Owners Manual - Page 16
Installation 7 Attach the Emergency Release Rope and Handle To prevent possible SERIOUS INJURY or DEATH from a falling garage door: l If possible, use emergency release handle to disengage trolley ONLY when garage door is CLOSED. Weak or broken springs or unbalanced door could result in an open door - LiftMaster 8155W | Owners Manual - Page 17
or installing dealer for opener reinforcement instructions or reinforcement kit. Failure to door's construction: Metal or light weight doors using a vertical angle iron brace between the door panel support and the door bracket: l Door or Reinforcement Board UP Vertical Centerline of Garage Door 17 - LiftMaster 8155W | Owners Manual - Page 18
Installation 9 Connect the Door Arm to the Trolley IMPORTANT: The groove on the straight door arm MUST face away from the curved door arm. 1. Close the door. Disconnect the trolley by pulling the emergency release handle. Slide the outer trolley back (away from the door) about 2" (5 cm). 2. Attach - LiftMaster 8155W | Owners Manual - Page 19
permit children to operate or play with door control push buttons or remote control transmitters. l Activate door ONLY when it can be seen clearly or 4 of any other Security+ 2.0® door controls. NOTE: Older LiftMaster door controls and third party products are not compatible. Install door control - LiftMaster 8155W | Owners Manual - Page 20
permit children to operate or play with door control push buttons or remote control transmitters. l Activate door ONLY when it can be seen clearly or 4 of any other Security+ 2.0® door controls. NOTE: Older LiftMaster door controls and third party products are not compatible. Install door control - LiftMaster 8155W | Owners Manual - Page 21
in the tab with screwdriver tip. 1. Attach the entrapment warning label on the wall near the door control with tacks or staples. 2. Attach the manual release/safety reverse test label in a visible location on the inside of the garage door. 1 2 7/16" (11 mm) Staple 3 RED WHITE WHITE GREY 21 - LiftMaster 8155W | Owners Manual - Page 22
while the door is closing, the door will stop and reverse to the full open position, and the garage door opener lights will flash 10 times. NOTE: For energy efficiency the garage door opener will enter sleep mode when the door is fully closed. The sleep mode - LiftMaster 8155W | Owners Manual - Page 23
1/4"-20 The safety reversing sensors can be attached to the door track, the wall, or the floor. If the door track will not support the sensor bracket a wall installation is recommended. Choose one of the following installations. OPTION A - DOOR TRACK INSTALLATION 1. Slide the curved arms of the - LiftMaster 8155W | Owners Manual - Page 24
Install the Protector System® OPTION C - FLOOR INSTALLATION Use an extension bracket (not provided) or wood block to raise the sensor bracket if needed. 1. Carefully measure the position of both sensor brackets so they will be the same distance from the wall and unobstructed. 2. Attach the - LiftMaster 8155W | Owners Manual - Page 25
Install the Protector System® OPTION B - PRE-WIRED INSTALLATION 1. Cut the end of the safety reversing sensor wire, making sure there is enough wire to reach the pre-installed wires from the wall. 2. Separate the safety reversing sensor wires and strip 7/16 inch (11 mm) of insulation from each end. - LiftMaster 8155W | Owners Manual - Page 26
Power 1 Connect Power To prevent possible SERIOUS INJURY or DEATH from electrocution or fire: l Be sure power is NOT connected to the opener, and disconnect power to circuit BEFORE removing cover to establish permanent wiring connection. l Garage door installation and wiring MUST be in compliance - LiftMaster 8155W | Owners Manual - Page 27
is obstructed or misaligned while the door is closing, the door will reverse and the garage door opener lights will flash ten times. If the door is already open, it will not close. The sensors can be aligned by loosening the wing nuts, aligning - LiftMaster 8155W | Owners Manual - Page 28
RED WHITE WHITE GREY Power 3 Ensure the Door Control is Wired Correctly Models: 8155W, 8160W, 8160WB, 8165W If the door control has been installed and wired correctly, the command LED behind the push bar will blink. Push bar COMMAND LED Models: - LiftMaster 8155W | Owners Manual - Page 29
Adjustments Introduction Without a properly installed safety reversal system, persons (particularly small children) could be SERIOUSLY INJURED or KILLED by a closing garage door. l Incorrect adjustment of garage door travel limits will interfere with proper operation of safety reversal system. l - LiftMaster 8155W | Owners Manual - Page 30
DOWN position press and release the Adjustment Button. The garage door opener lights will flash twice and the UP Button will begin to flash. 6. unobstructed, cycle the door through a complete up and down cycle using the remote control or the UP and DOWN buttons. Programming is complete. If you - LiftMaster 8155W | Owners Manual - Page 31
remote control push button to close the door. The door MUST reverse when it makes contact with the board. If the door stops but does not reverse: 1. Review the installation instructions garage door opener lights will flash 10 times. The garage door opener will not close from a remote control if the - LiftMaster 8155W | Owners Manual - Page 32
service or maintenance. l Use ONLY LiftMaster part # 485LM for replacement battery. l DO NOT dispose of battery in fire. Battery may explode. Check with local codes for disposal instructions and close the door using the remote control or door control. NOTE: . 2. Open the light lens of the garage - LiftMaster 8155W | Owners Manual - Page 33
will last approximately 1 to 2 years with normal usage. Instructions for replacement are provided with the battery. To obtain maximum battery is in battery backup mode the garage door opener lights, Timer-to-Close, and Remote Close features are unavailable. * If applicable. GREEN LED: All systems - LiftMaster 8155W | Owners Manual - Page 34
INSTRUCTIONS. 2. ALWAYS keep remote controls out of reach of children. NEVER permit children to operate or play with garage door control push buttons or remote controls disconnect ALL electric and battery power BEFORE performing ANY service or maintenance. 14. This operator system is equipped with - LiftMaster 8155W | Owners Manual - Page 35
NOTE: Older LiftMaster remote controls, door controls, and third party products are not compatible. Security+ 2.0® Accessories Remote Controls Door garage door opener has completed 5 cycles upon power up. LIGHTS The garage door opener light bulbs will turn on when the opener is initially plugged in; - LiftMaster 8155W | Owners Manual - Page 36
Wi-Fi garage door openers, myQ light controls, myQ gate operators or myQ commercial door operators. A LiftMaster Internet Gateway (828LM) can be added For more information on connecting your garage door opener, visit LiftMaster.com/Customer-Support. Learn Button LED An LED on the garage door opener - LiftMaster 8155W | Owners Manual - Page 37
SERVICE LED LEARN Button LOCK Button COMMAND LED LIGHT Button PUSH BAR Press the push bar to open or close the door. LIGHT BUTTON Press the LIGHT button to turn the garage door opener lights on or off. When the lights the garage door opener from remote controls while still allowing activation from - LiftMaster 8155W | Owners Manual - Page 38
Button PUSH BUTTON Press the push button to open or close the door. LIGHT/LEARN BUTTON Press the LIGHT button to turn the garage door opener lights on or off. When the lights are turned on they will stay on until the LIGHT button is pressed again, or until the garage door opener is activated - LiftMaster 8155W | Owners Manual - Page 39
command LED will flash as long as the lock feature is activated and your handheld remote control will not operate your door at this time. Deactivate: Press and hold the and hold the LEARN button. Then press the LIGHT button. The service LED will flash the status; Active is 2 flashes and deactivated - LiftMaster 8155W | Owners Manual - Page 40
garage door opener. Older LiftMaster remote controls are NOT compatible, see page 45 for compatible accessories. Programming can be done through the door control or the learn button the garage door opener. To program additional accessories refer to the instructions provided with the accessory or - LiftMaster 8155W | Owners Manual - Page 41
Operation To Erase the Memory To Open the Door Manually ERASE ALL REMOTE CONTROLS AND KEYLESS ENTRIES 1. Press and hold the LEARN button on garage door opener until the learn LED goes out (approximately 6 seconds). All remote control and keyless entry codes are now erased. Reprogram any accessory - LiftMaster 8155W | Owners Manual - Page 42
Schedule EVERY MONTH l Manually operate door. If not installed and used in accordance with the instructions, may cause harmful interference to radio communications. dealer or an experienced radio/TV technician for help. The Remote Control Battery To prevent possible SERIOUS INJURY or DEATH: l - LiftMaster 8155W | Owners Manual - Page 43
Troubleshooting or reversed wire for the safety reversing sensors. Inspect safety sensor light bulbs flash. wire at all staple and connection points, replace wire lock, correct as needed. Replace logic board if necessary. Opener hums for 1-2 seconds no movement. Manually open and close the door. - LiftMaster 8155W | Owners Manual - Page 44
Troubleshooting DIAGNOSTIC CODE SYMPTOM Up Arrow Flash(es) Down Arrow Flash(es) SOLUTION 4 1-4 Door is moving stops or reverses. Manually open , see page 4 or visit WiFiHelp.LiftMaster.com for more information. My door will not close and the light bulbs blink on my motor unit: The safety - LiftMaster 8155W | Owners Manual - Page 45
to the garage using a 4-digit PIN. Works with ALL LiftMaster® openers from 1993-present. 374UT Remote Light Control: Automatically control your lights using your garage door opener, a Security+ 2.0® remote control or a LiftMaster® Internet Gateway. Plugs into any interior outlet. 975LM Laser - LiftMaster 8155W | Owners Manual - Page 46
FOR REINSTALLING A REPAIRED OR REPLACED UNIT, REPLACEMENT OF CONSUMABLE ITEMS (E.G., BATTERIES IN REMOTE CONTROL TRANSMITTERS AND LIGHT BULBS), OR UNITS INSTALLED FOR NON-RESIDENTIAL USE. THIS LIMITED WARRANTY DOES NOT COVER ANY PROBLEMS WITH, OR RELATING TO, THE GARAGE DOOR OR GARAGE DOOR HARDWARE - LiftMaster 8155W | Owners Manual - Page 47
potential harm. Please review the safety and maintenance tips in this guide carefully and keep it trouble-free manner. Be sure to read all Important Safety Information found in your garage door opener's manual as it provides more details and safety considerations than can be supplied with this guide - LiftMaster 8155W | Owners Manual - Page 48
your regular routine. Review your owner's manual for both the door and door opener. If you don't have the owner's manuals, contact the manufacturer(s) : l Reconnect the opener to the door using the manual disconnect and open the door. 2 l Place a 2x4 board flat in the path of the door (1) and try - LiftMaster 8155W | Owners Manual - Page 49
Repair Parts Models 8160W, 8160WB, 8164W and 8165W Rail Assembly Parts Description 1 Master link kit 2 Chain pulley 041D3485 K083A0011-1 1 4 2 3 5 Installation Parts Description Part Number 1 Remote control visor clip K029B0137 2 Emergency release rope and handle assembly 041A2828 3 - LiftMaster 8155W | Owners Manual - Page 50
1 Description Part Number 3 5 1 3V CR2032 Lithium battery K010A0020 2 Remote control visor clip K029B0137 2 4 3 Emergency release rope and handle assembly reversing sensor brackets (2) Not Shown 041A5266-3 4 1 Installation hardware bag 041A2770-17 User's Guide 114A5220 50 - LiftMaster 8155W | Owners Manual - Page 51
cover 2 Gear and sprocket 3 Drive and Worm Gear 4 Front end panel with all labels 5 Light socket 6 Light lens 7 Capacitor 8 Capacitor bracket 9 Universal motor 10 Travel module 11 Cover 12 Logic board 13 Logic board end panel 14 Line Cord Not Shown Wire Harness Terminal Block Part Number 041A4371 - LiftMaster 8155W | Owners Manual - Page 52
2a End panel with light socket (8160W) 2b End panel with light socket (8160WB) 3 Light lens 4 Light socket 5a Cover (8160W) 5b Cover (8160WB) 6 Motor with travel module 8 7 Travel module 8 Logic board end panel 9 Receiver logic board 10 Battery Backup (Model 8160WB only) Not Shown Wire - LiftMaster 8155W | Owners Manual - Page 53
2 Gear and sprocket 3 Drive and Worm Gear 4 Front end panel with all labels 5 Light socket 6 Light lens 7 Capacitor 8 Capacitor bracket 9 Universal motor 10 Travel module 11 Cover 12 Logic board 13 Logic board end panel Not Shown Line Cord Terminal Block Wire Harness Part Number 031D0380M 041C4220A
-
 1
1 -
 2
2 -
 3
3 -
 4
4 -
 5
5 -
 6
6 -
 7
7 -
8
-
9
-
10
-
11
-
12
-
13
-
14
-
15
-
16
-
17
-
18
-
19
-
20
-
21
-
22
-
23
-
24
-
25
-
26
-
27
-
28
-
29
-
30
-
31
-
32
-
33
-
34
-
35
-
36
-
37
-
38
-
39
-
40
-
41
-
42
-
43
-
44
-
45
-
46
-
47
-
48
-
49
-
50
-
51
-
52
-
53
 |
 |
Wi-Fi
®
Garage Door Opener
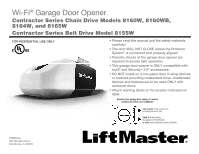
Contractor Series Chain Drive Models 8160W, 8160WB,
8164W, and 8165W
Contractor Series Belt Drive Model 8155W
•
Please read this manual and the safety materials
carefully!
•
The door WILL NOT CLOSE unless the Protector
System
®
is connected and properly aligned.
•
Periodic checks of the garage door opener are
required to ensure safe operation.
•
This garage door opener is ONLY compatible with
myQ
®
and Security+ 2.0
®
accessories.
•
DO NOT install on a one-piece door if using devices
or features providing unattended close. Unattended
devices and features are to be used ONLY with
sectional doors.
•
Attach warning labels to the location indicated on
label.
FOR RESIDENTIAL USE ONLY
LiftMaster
300 Windsor Drive
Oak Brook, IL 60523
Register your garage door opener to receive
updates and offers from LiftMaster
Send it in
by texting
the photo to 71403 (US)
or visit
www.liftmaster.photo (Global)
Take a photo
of the camera icon
including the points (
).