LiftMaster 850LM 850LM 3-Channel Universal Receiver Manual
LiftMaster 850LM Manual
 |
View all LiftMaster 850LM manuals
Add to My Manuals
Save this manual to your list of manuals |
LiftMaster 850LM manual content summary:
- LiftMaster 850LM | 850LM 3-Channel Universal Receiver Manual - Page 1
owner manual or wiring diagrams for specific wiring information. LEDs SINGLE CHANNEL Receiver Single Operator(s) CH1 CH3 CH2 INSTALLATION The receiver and antenna use TV Type F coaxial connectors. The antenna can be connected directly to the receiver or it can be installed remotely using - LiftMaster 850LM | 850LM 3-Channel Universal Receiver Manual - Page 2
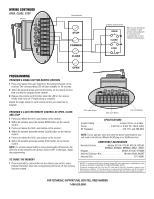
to your commercial door operator or gate operator wiring diagrams for instructions on connecting two or more 3-Button control devices. PROGRAMMING PROGRAM A SINGLE BUTTON REMOTE CONTROL 1 Press and release the Learn button for the selected channel on the receiver. The corresponding LED will glow - LiftMaster 850LM | 850LM 3-Channel Universal Receiver Manual - Page 3
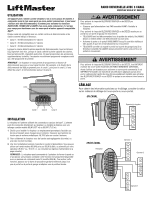
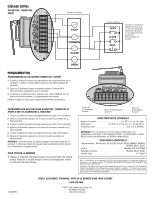
RAADVIOEURNIVTEIRSSESLLEE AMVEEC N3 CTANAL MODÈLES 850LM ET 850LMC ATTENTION UTILISATION Cet appareil peut avec les ouvre-porte et autres appareils compatibles • S'assurer que l'alimentation n'est PAS branchée AVANT d'installer le récepteur. MyQ™. Pour prévenir le risque de BLESSURES - LiftMaster 850LM | 850LM 3-Channel Universal Receiver Manual - Page 4
ouvre-portail pour obtenir des instructions sur la connexion de deux 9 à 34 V c.c., 50 mA, 60 Hz Fréquences radio 310, 315 et 390 MHz REMARQUE : Si l'ouvre-porte (à câblage direct). ACCESSOIRES COMPATIBLES Télécommandes. . Modèles glements de la FCC et d'Industrie Canada, il est interdit de modifier
-
 1
1 -
 2
2 -
 3
3 -
 4
4
 |
 |

INSTALLATION
The receiver and antenna use TV Type F coaxial connectors. The antenna
can be connected directly to the receiver or it can be installed remotely
using a coaxial cable extension kit (Model 86LM, 15 ft. or 86LMT, 25 ft.).
1
Select a location for the receiver which allows access to the terminals
and space for the antenna. Ensure antenna does not touch metal
surfaces. DO NOT bend or fold the antenna.
2
Fasten the receiver securely with the hook and loop fasteners
(provided) or screws (not provided).
3
After installation is complete, connect power. You may use 85LM
plug-in or 95LM wired-in transformer, or power provided from your
operator (9-30 V AC, 9-34 Vdc or see power ratings on next page).
NOTE:
The receiver can command the operator to close the
door or gate by constant pressure. This feature is only available with a
wireless control panel (Model 885LM). To enable this feature, press
and hold the push bar until the gate or garage door moves to the
closed position.
To prevent possible SERIOUS INJURY or DEATH from electrocution:
•
Be sure power is NOT connected BEFORE installing the receiver.
To prevent possible SERIOUS INJURY or DEATH from a moving gate
or garage door:
•
ALWAYS keep remote controls out of reach of children. NEVER
permit children to operate, or play with remote control transmitters.
•
Activate gate or door ONLY when it can be seen clearly, is properly
adjusted, and there are no obstructions to door travel.
•
ALWAYS keep gate or garage door in sight until completely closed.
NEVER permit anyone to cross path of moving gate or door.
To prevent possible SERIOUS INJURY or DEATH, the use of
CONSTANT OPERATION on residential openers is PROHIBITED.
When a receiver is used to activate a commercial door opener, a
reversing edge MUST be installed on the bottom of the door. Failure to
install a reversing edge under these circumstances may result in
SERIOUS INJURY or DEATH to persons trapped beneath the door.
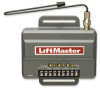
3-CHANNEL UNIVERSAL RECEIVER
MODELS 850LM AND 850LMC
APPLICATION
The receiver can be used as a single or three channel receiver to
control up to 3 gates or commercial door operators. The receiver can
also be used with a 3-button remote control to operate the OPEN,
CLOSE, and STOP feature on a commercial door operator. The receiver
is not for use with MyQ™ enabled garage door openers or devices.
Each channel is compatible with a certain number of remote controls and
keypads. Refer to the list below:
•
CH1: 50 remote controls and 2 keypads
•
CH2: 20 remote controls and 2 keypads
•
CH3: 20 remote controls and 2 keypads
When the channel has reached full capacity for remote controls, all LEDs
will blink 3 times. When the channel has reached full capacity for
keypads, all LEDs will blink 4 times. Additional accessories can be
programmed, however, the newly programmed accessory will replace the
first programmed accessory.
WIRING
Refer to your commercial door operator or gate operator owner manual
or wiring diagrams for specific wiring information.
SINGLE CHANNEL
THREE CHANNEL
Receiver
Single Operator(s)
Receiver
Operator 1
Operator 2
Operator 3
CH1
CH2
CH3
LEDs
NOTE:
The receiver will only allow you to program a button on the remote
control to one channel at a time. For example, if the button on the remote
control is already programmed to channel 1 and then is programmed to
channel 3, the button will be erased from channel 1 and will only work on
channel 3.