LiftMaster ATS ATS2113X Manual
LiftMaster ATS Manual
 |
View all LiftMaster ATS manuals
Add to My Manuals
Save this manual to your list of manuals |
LiftMaster ATS manual content summary:
- LiftMaster ATS | ATS2113X Manual - Page 1
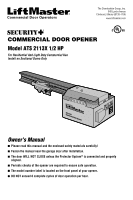
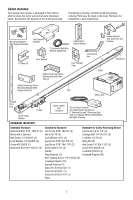
60126-1196 www.liftmaster.com ® COMMERCIAL DOOR OPENER Model ATS 2113X 1/2 HP For Residential And Light Duty Commercial Use Install on Sectional Doors Only L O W H I L G A H NO R M FOURPCE L O W H I L G A H NO R M FDOORWCNE Owner's Manual ■ Please read this manual and the - LiftMaster ATS | ATS2113X Manual - Page 2
Protector System 23 Operation 24-28 Operation safety instructions 24 Using your garage door opener 24 Using the wall-mounted door control 25 To open the door manually 25 Care of your garage door opener 26 Having a problem 27-28 Programming 29-31 3-Button remote controls (Optional 29 - LiftMaster ATS | ATS2113X Manual - Page 3
BEFORE installing and operating the opener. • ONLY operate garage door opener at 120V, 60 Hz to avoid malfunction and damage. Specifications Volts 120 Vac - 60 Hz, ONLY Current 5.6 Amp Rated Load 300 in. lb/sec. 8 Cycles per Hour Maximum door height 14 ft. Maximum door size 14 ft. x 12 ft. (Not - LiftMaster ATS | ATS2113X Manual - Page 4
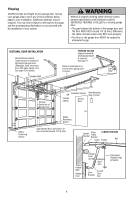
Access Door Wall-Mounted Door Control Safety Reversing Sensor Gap between floor and bottom of door must not exceed 1/4" (6 mm). Header Bracket Chain Pulley Bracket CLOSED POSITION Chain Trolley Rail Header Wall Garage Door Garage Door Spring Straight Door Arm Door Bracket Curved Door Arm - LiftMaster ATS | ATS2113X Manual - Page 5
will depend on the model purchased. If anything is missing, carefully check the packing material. Parts may be stuck in the foam. Hardware for installation is also listed below. Mounting Hardware (Rail Support Bracket) "C" Wrap (2) Rail Support Bracket Lighted Door Control Button 2-Conductor - LiftMaster ATS | ATS2113X Manual - Page 6
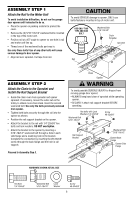
do not run the garage door opener until instructed to do so. • Place the opener on packing material to protect the cover. • Remove the (2) 5/16"-18x1/2" washered bolts mounted in the top of the motor unit. • Position rail at a 45° angle to opener so one hole in rail and motor unit line up. • Thread - LiftMaster ATS | ATS2113X Manual - Page 7
connect garage door opener to power source until instructed to do so. 8. NEVER wear watches, rings or loose clothing while installing or servicing opener. They could be caught in garage door or opener mechanisms. 9. Install wall-mounted garage door control: • within sight of the garage door. • out - LiftMaster ATS | ATS2113X Manual - Page 8
when required. Header Wall Unfinished Ceiling 2x4 Vertical Centerline of Garage Door 2x4 OPTIONAL CEILING MOUNT FOR HEADER BRACKET Structural Supports Level (Optional) 1. Close the door and mark the inside vertical centerline of the garage door. 2. Extend the line onto the header wall above the - LiftMaster ATS | ATS2113X Manual - Page 9
wall above the garage door, or to the ceiling. Follow the instructions which will work best for mounted flush against the ceiling when clearance is minimal. • Mark the side holes. Drill 3/16" pilot holes and fasten bracket securely to a structural support with the hardware provided. Ceiling Mounting - LiftMaster ATS | ATS2113X Manual - Page 10
Slide the outer trolley toward the motor unit. The trolley can remain disconnected until Installation Step 12 is completed. To prevent damage to garage door, rest garage door opener rail on 2x4 placed on top section of door. Rail Door 2x4 is used to determine the correct mounting height from - LiftMaster ATS | ATS2113X Manual - Page 11
bracket is not centered above the door). 7. Remove the 2x4. Operate the door manually. If the door hits the rail, raise the header bracket. To avoid possible SERIOUS INJURY from a falling garage door opener, fasten it SECURELY to structural supports of the garage. Concrete anchors MUST be used if - LiftMaster ATS | ATS2113X Manual - Page 12
warning label to the wall near the door control, and the manual release/safety reverse test in a prominent location on the inside of the garage door. NOTE: DO NOT connect the power and operate the opener at this time. The trolley will travel to the full open position, but will not return to the - LiftMaster ATS | ATS2113X Manual - Page 13
burns out prematurely due to vibration, replace with a "Garage Door Opener" bulb. NOTE: Use only standard light bulbs. The use of short neck or specialty light bulbs may overheat the endpanel or light socket. To prevent possible OVERHEATING of the endpanel or light socket, • DO NOT use short neck - LiftMaster ATS | ATS2113X Manual - Page 14
INSTALLATION STEP 9 Electrical Requirements To avoid installation difficulties, do not run the opener at this time. To reduce the risk of electric shock, your garage door opener has a grounding type plug with a third grounding pin. This plug will only fit into a grounding type outlet. If the plug - LiftMaster ATS | ATS2113X Manual - Page 15
light beam while the door is closing, the door will stop and reverse to full open position, and the opener lights will flash 10 times. The units must be installed inside the garage necessary. The invisible light beam path must be unobstructed. No part of the garage door (or door tracks, springs, - LiftMaster ATS | ATS2113X Manual - Page 16
shown on Figure 2. Note alignment of brackets for left and right sides of door. 3. Finger tighten the lock nuts. 4. Use bracket mounting holes as a template to locate and drill (2) 3/16" diameter pilot holes on both sides of the garage door, 4"-6" (10-15 cm) above the floor but not exceeding 6" (15 - LiftMaster ATS | ATS2113X Manual - Page 17
garage door opener. Attach the wire to the wall and ceiling with the staples (Figure 7). Option B - Pre-Wired Installation: If your garage already has wires installed for the safety reversing sensors, follow the instructions 10). Figure 6 "C" Wrap Indicator Light Hex Bolt 1/4"-20x1-1/2" Figure 7 - LiftMaster ATS | ATS2113X Manual - Page 18
is dim, realign either sensor. NOTE: When the invisible beam path is obstructed or misaligned while the door is closing, the door will reverse. If the door is already open, it will not close. The opener lights will blink 10 times. (If bulbs are not installed, 10 clicks can be heard.) See page 15 - LiftMaster ATS | ATS2113X Manual - Page 19
the vertical brace, 2 pieces of angle iron are used to create a "U"-shaped support. The best solution is to check with your garage door manufacturer for an opener installation door reinforcement kit. • Center the door bracket on the previously marked vertical guideline used for the header bracket - LiftMaster ATS | ATS2113X Manual - Page 20
and nuts. • Proceed to Adjustment Step 1, page 21. Trolley will re-engage automatically when opener is operated. Figure 1 Inner Trolley Outer Trolley Ring Fastener Clevis Pin 5/16"x1" Figure 2 Door Bracket Straight Door Arm Curved Clevis Pin Door Arm 5/16"x1-1/4" Lock Washers 5/16" Nuts 5/16 - LiftMaster ATS | ATS2113X Manual - Page 21
travel cycle: If the opener lights are flashing, the safety reversing sensors are either not installed, misaligned, or obstructed. See Troubleshooting, page 18. Test the door for binding: Pull the emergency release handle. Manually open and close the door. If the door is binding or unbalanced, call - LiftMaster ATS | ATS2113X Manual - Page 22
the Force Force adjustment controls are located on the back panel of the motor unit. Force adjustment settings regulate the amount of power required to open and close the door. If the forces are set too light, door travel may be interrupted by nuisance reversals in the down direction and stops - LiftMaster ATS | ATS2113X Manual - Page 23
System® • Press the remote control push button to open the door. • Place the opener carton in the path of the door. • Press the remote control push button to close the door. The door will not move more than an inch (2.5 cm), and the opener lights will flash. The garage door opener will not close from - LiftMaster ATS | ATS2113X Manual - Page 24
technician. 14. ALWAYS disconnect electric power to garage door opener BEFORE making ANY repairs or removing covers. 15. SAVE THESE INSTRUCTIONS. Using Your Garage Door Opener Your opener will operate with up to eight Security✚® remote controls and one Security✚® Keyless Entry System. Activate - LiftMaster ATS | ATS2113X Manual - Page 25
during the closing cycle or to stop the door while it's opening. To Open the Door Manually To prevent possible SERIOUS INJURY or DEATH from a falling garage door: • If possible, use emergency release handle to disengage trolley ONLY when garage door is CLOSED. Weak or broken springs or unbalanced - LiftMaster ATS | ATS2113X Manual - Page 26
the instructions carefully. Repeat the safety reverse test (Adjustment Step 3, page 23) after any adjustment of limits or force. MAINTENANCE SCHEDULE Every Month • Manually operate door. If it is unbalanced or binding, call a trained door systems technician. • Check to be sure door opens and - LiftMaster ATS | ATS2113X Manual - Page 27
12. 3. The door operates from the Door Control, but not from the remote control: • Is the door push bar flashing? If your model has the Lock feature, make sure it is off. • Program the opener to match the remote control code. (Refer to instructions on the motor unit panel.) Repeat with all remotes - LiftMaster ATS | ATS2113X Manual - Page 28
being supported entirely by its springs. If it does not, disconnect the opener and call a trained door systems technician. Do not increase the force to operate the opener. 15. The opener motor hums briefly, then won't work: • The garage door springs may be broken. See above. • If the problem occurs - LiftMaster ATS | ATS2113X Manual - Page 29
) The 300 Series remote control works only with door openers and light controls having a purple "Learn" button. Programming instructions are described and illustrated below. The additional push buttons can also activate other garage door openers and/or light controls. (Instructions for programming - LiftMaster ATS | ATS2113X Manual - Page 30
to operate your garage door opener. USING THE "LEARN" BUTTON 1. Press and release the "learn" button on motor unit. The learn indicator light will of times this temporary PIN will work, press the number of times (up to 255), then press #. The opener light will blink once when the temporary PIN - LiftMaster ATS | ATS2113X Manual - Page 31
connect the power and operate the opener Lock feature at this time. The trolley will travel to the full open position Designed to prevent operation of the door from hand-held but will not return to the close position until the sensor remote controls. However, the door will open and close beam is - LiftMaster ATS | ATS2113X Manual - Page 32
REPAIR PARTS Rail Assembly Parts 1 2 3 4 KEY PART NO. NO. DESCRIPTION 1 4A1008 Master link kit 2 41A2780 Chain pulley bracket 3 41A3489 Complete trolley assembly 4 CD1008 8 Foot (2.44 m) Rail Assembly 5 CD1010 10 Foot (3.05 m) Rail Assembly CD1012 12 Foot (3.66 m) Rail Assembly - LiftMaster ATS | ATS2113X Manual - Page 33
(2), drive 12 gear and worm gear, helical gear with retainer and grease,sprocket 13 shaft plate with screws 14 Drive/worm gear kit with grease Roll pins (2) 15 Front end panel 16 Light socket 17 Capacitor 18 Capacitor bracket Terminal block with screws 41D4509 Replacement motor & bracket - LiftMaster ATS | ATS2113X Manual - Page 34
garage door manually from outside by disengaging trolley. Outside Keylock: Opens the garage door automatically from outside when remote control is not handy. 371LM 372LM 180C139 NEMA 1 Push Button: Heavy Duty Door Control Push Button (one button). 373LM CD1008 8 Foot (2.44 m) Complete Rail - LiftMaster ATS | ATS2113X Manual - Page 35
NOTES 35 - LiftMaster ATS | ATS2113X Manual - Page 36
INFORMATION: • PART NUMBER • PART NAME • MODEL NUMBER ADDRESS ORDERS TO: THE CHAMBERLAIN GROUP, INC. Technical Support Group 6050 S. Country Club Road Tucson, Arizona 85706 SERVICE INFORMATION TOLL FREE NUMBER: 1-800-528-9131 LIFTMASTER® ONE YEAR LIMITED WARRANTY LIFETIME MOTOR LIMITED WARRANTY - LiftMaster ATS | ATS2113X Manual - Page 37
liftmaster.com ® OUVRE-PORTE COMMERCIAL Modéle ATS 2113X 1/2 HP Pour usage résidentiel et commercial de petit rendement á n'installer que sur des portes sectionnées L O W H I L G A H NO R M FOURPCE L O W H I L G A H NO R M FDOORWCNE Manuel d'instructions -porte de garage, le vé - LiftMaster ATS | ATS2113X Manual - Page 38
7 Pose 7-20 Instructions pour une pose en toute sécurit 7 Déterminer l'emplacement du support de linteau 8 Pose du support de linteau 9 Fixation du rail sur le support de linteau 10 Positionnement de l'ouvre-porte 10 Accrochage de l'ouvre-porte 11 Pose de la commande de porte 12 Pose de - LiftMaster ATS | ATS2113X Manual - Page 39
, déplacer ou régler la porte de garage ainsi que les ressorts, câbles, poulies, supports de porte ou leurs ferrures de montage, lesquels de l'ouvre-porte, les instructions feront appel aux outils à main illustrés ci-après. Niveau de menuisier (facultatif) Crayon 12 Ruban à mesurer Pince coupante - LiftMaster ATS | ATS2113X Manual - Page 40
de la porte ne doit pas être supérieur à 1/4 de po (6 mm). PORTE FERMÉE Support Support de poulie de linteau du câble Chaîne Chariot Rail Linteau Porte de garage Ressort de la porte de garage Biellette droite Support de porte Biellette courbée Poignée et corde de déclenchement d'urgence 4 - LiftMaster ATS | ATS2113X Manual - Page 41
de la boîte d'emballage Votre ouvre-porte de garage est emballé dans deux boîtes qui contiennent sont également indiquées ci-après. Tasseau de support du rail Visserie (Support du rail) Bouton-poussoir éclairè de la commande de porte Profilé (2) Support de la porte Fil de sonnerie blanc et blanc - LiftMaster ATS | ATS2113X Manual - Page 42
le rail par-dessus le pignon. Coupez l'adhésif de la coulisse. ATTENTION Afin d'éviter d'endommager SÉRIEUSEMENT l'ouvre-porte de garage, po à travers la bride arrière et l'orifice correspondant du support de rail. Support du rail Collet postérieur de l'ouvre-porte Collet latéral de Passer à - LiftMaster ATS | ATS2113X Manual - Page 43
garage est maintenant terminé. Lire les avertissements suivants avant de procéder à la section sur la pose. Patin du rail POSE IMPORTANTES INSTRUCTIONS de garage. 11. Placer l'étiquette d'essai d'inversion de sécurité/ ouverture manuelle bien en vue à l'intérieur de la porte de garage. 12. Au - LiftMaster ATS | ATS2113X Manual - Page 44
garage ainsi que les ressorts, câbles, poulies, supports garage. 2. Prolonger cet axe sur le linteau au-dessus de la porte. Ne pas oublier que l'on peut fixer le support ce support peut le support de SUPPORT DE LINTEAU AU PLANFOND EN OPTION Linteau 2 x 4 Ligne du centre vertical de la porte de garage - LiftMaster ATS | ATS2113X Manual - Page 45
, soit au plafond. Suivre les instructions qui répondent le mieux aux besoins particuliers. NE PAS poser le support de linteau sur des panneaux de - Porte de garage - Ligne du centre vertical de la porte de garage - Plafond fini - Ligne du centre vertical de la porte de garage Support de tête Tire - LiftMaster ATS | ATS2113X Manual - Page 46
immobiliser. GRANDEUR RÉELLE DES FIXATIONS Linteau Support de linteau Support de la poulie de la chaîne Anneau Support d'arrêt de linteau Axe de chape de Rail 5/16 de po x Rail 2-3/4 po Support de la poulie de la chaîne Anneau d'arrêt Porte de garage Axe de chape de 5/16 de po - LiftMaster ATS | ATS2113X Manual - Page 47
fonctionner la porte manuellement. Si la porte frappe le rail, lever le support de linteau. AVERTISSEMENT Pour éviter d'éventuelles BLESSURES GRAVES par suite de la chute d'un ouvre-porte de garage, fixer l'ouvre-porte SOLIDEMENT aux solives du garage. On DOIT utiliser des ancrages de béton si les - LiftMaster ATS | ATS2113X Manual - Page 48
vue à l'intérieur de la porte de garage. REMARQUE : NE PAS brancher et faire fonctionner instructions au sujet du détecteur inverseur de sécurité à partir de la page 15. TO PREVENT THE MOTOR PROTECTOR FROM TRIPPING, DO NOT EXCEED 8 DOOR OPERATIONS PER HOUR. FASTEN LABEL ADJACENT TO DOOR 12 Antenne - LiftMaster ATS | ATS2113X Manual - Page 49
peuvent causer la chute rapide et/ou imprévue d'une porte ouverte. • Ne JAMAIS utiliser la poignée de déclenchement d'urgence à moins que l'entrée de garage ne soit dégagée (absence de personnes et d'obstacle). • Ne JAMAIS utiliser la poignée pour ouvrir ou fermer la porte. Il y a risque de chute si - LiftMaster ATS | ATS2113X Manual - Page 50
la pose, ne pas faire fonctionner l'ouvre-porte pour le moment. Afin de minimiser les risques de chocs électriques, le cordon d'alimentation de l'ouvre-porte de garage comporte une fiche à trois broches, dont une de mise à la terre. Cette fiche ne peut être branchée que dans une prise de courant mise - LiftMaster ATS | ATS2113X Manual - Page 51
du garage de manière à ce que la cellule émettrice et la cellule réceptrice se fassent face l'une l'autre de part et du plancher du garage. Si les unités doivent être montées sur le mur, les supports doivent être . Aucune partie de la porte de garage (ni les guides, les ressorts, les charnières, - LiftMaster ATS | ATS2113X Manual - Page 52
Percer des trous de 3/8 de pouce Installation sur COULISSE de Porte Écrous de 1/4 de po-20 Mur intérieur du garage Support de fixation avec trous carrés Profilé Boulon à tête bombée de 1/4 de po-20 x 1/2 po Figure 4 Pose Différente sur le Mur Figure 5 Pose au Plancher - LiftMaster ATS | ATS2113X Manual - Page 53
à oreilles pour fixer les détecteurs aux supports, avec les diffuseurs dirigés l'un vers l'autre de part et d'autre de la porte. S'assurer que capteurs de l'inverseur de sécurité sont déjà installés dans votre garage, appliquez les instructions ci-dessous : • Coupez l'extrémité du câble du capteur - LiftMaster ATS | ATS2113X Manual - Page 54
Connexion à l'ouvre-porte de garage : • Enlever 1/4 po (6 mm) d'isolation de chaque série de fils. Séparer les fils blanc et blanc/noir suffisamment pour leur raccordement aux vis des bornes á - LiftMaster ATS | ATS2113X Manual - Page 55
de renforcement vertical mais nécessite effectivement des trous de fixation en haut et en bas pour le support de porte, fixer de la manière illustrée à la Figure 2. Support de linteau ATTENTION Les portes de garage en fi bre de verre, en aluminium ou en acier léger ont BESOIN d'être renforcées AVANT - LiftMaster ATS | ATS2113X Manual - Page 56
chariot PORTE ARTICULÉE SEULEMENT • S'assurer que la porte du garage est complètement fermée. Tirer la poignée de déclenchement d' Faire tenir l'axe de chape en place avec un anneau d'arrêt. - Fixer la biellette courbée au support de la porte de la même manière, à l'aide d'un axe de chape de 5/16 po - LiftMaster ATS | ATS2113X Manual - Page 57
soit, on DOIT faire l'essai du système d'inversion de sécurité. La porte de garage DOIT remonter au contact d'un objet d'une hauteur de 1-1/2 po (ou un 2 x porte ne se ferme toujours pas complètement et que le chariot heurte le support de la poulie (page 4), essayer de rallonger le bras de la porte - LiftMaster ATS | ATS2113X Manual - Page 58
de régler l'autre commande. • Après avoir effectué quelque réglage que ce soit, on DOIT faire l'essai du système d'inversion de sécurité. La porte de garage DOIT remonter au contact d'un objet d'une hauteur de 1-1/2 po (3,8 cm) (ou un 2 x 4 posé à plat) sur le sol. Vis de réglage de la force Panneau - LiftMaster ATS | ATS2113X Manual - Page 59
ce soit, on DOIT faire l'essai du système d'inversion de sécurité. La porte de garage DOIT remonter au contact d'un objet d'une hauteur de 1-1/2 po (3,8 cm) (ou un pouce, et les lumières de l'ouvre-porte clignoteront. La porte de garage ne se fermera pas à l'aide d'une télécommande si le témoin - LiftMaster ATS | ATS2113X Manual - Page 60
GRAVES, VOIRE MORTELLES. 12. TOUJOURS GARDER LA PORTE DE GARAGE BIEN ÉQUILIBRÉE (se CES INSTRUCTIONS. Utilisation de votre ouvre-porte de garage Votre ouvre garage ouverte. 4. Si on l'a arrêtée en position partiellement ouverte, elle se fermera. Ne dépassez pas 8 cycles complets d'operation - LiftMaster ATS | ATS2113X Manual - Page 61
Levier de déclenchement automatiquement. du chariot Tirer la poignée de Poignée de déclenchement d'urgence vers le bas et l'arrière (vers l'ouvre-porte de garage). Il sera alors possible d'ouvrir et de fermer la porte à la déclenchement d'urgence (tirer vers le bas et l'arrière en direction de - LiftMaster ATS | ATS2113X Manual - Page 62
la force. Seul un tournevis est requis. Suivre attentivement les instructions. Procéder toujours au contrôle de l'inversion de sécurit garage. Ne pas graisser les guides de la porte. Tous les trois ou quatre ans • Utilisez un chiffon pour éliminer la graisse sur le rail de l'ouvre-porte de garage - LiftMaster ATS | ATS2113X Manual - Page 63
serrures de la porte sont-elles toutes ouvertes? Se reporter aux avertissements des instructions de pose à la page 7. • De la neige ou de la glace électriques sont-ils bons? Se reporter à la page 12, 6e opération de pose. 3. La porte de garage fonctionne avec la commande de porte, mais pas avec la - LiftMaster ATS | ATS2113X Manual - Page 64
12. L'éclairage de l'ouvre-porte ne s'allume pas : • Changer les ampoules (maximum 75 watts). Utiliser une ampoule d'ouvre-porte de garage restera à sa position d'arrêt, entièrement supportée par les ressorts le cas contraire, le cas d'un garage ne possédant pas de porte de service, l'accessoire à - LiftMaster ATS | ATS2113X Manual - Page 65
-poussoirs supplémentaires peuvent également actionner d'autres ouvre-portes de garage et/ou commandes d'éclairage. (Les instructions pour la programmation de l'éclairage sont fournies avec ces accessoires.) Les instructions sont décrites et illustrées ci-dessous AVERTISSEMENT Afin d'éliminer les - LiftMaster ATS | ATS2113X Manual - Page 66
é doit être programmée de manière à faire fonctionner votre ouvre-porte de garage. UTILISATION DU BOUTON « LEARN » 1. Enfoncer et tenir le bouton « learn NIP temporaire Vous pouvez autoriser l'accès aux visiteurs ou aux techniciens de service à l'aide d'un NIP temporaire à 4 chiffres. Après un - LiftMaster ATS | ATS2113X Manual - Page 67
curité/ouverture manuelle bien en vue à l'intérieur de la porte de garage. REMARQUE : NE PAS brancher et faire fonctionner l'ouvre-porte pour le moment de la porte à l'aide de télécommandes à correctement aligné. Voir les instructions au sujet du détecteur main. Cependant, la porte s'ouvrira et se - LiftMaster ATS | ATS2113X Manual - Page 68
Support de poulie de chaîne Chariot complet Ensemble rail de 8 pieds (2,44 m) Ensemble rail de 10 pieds (3,05 m) Ensemble rail de 12 pieds (3,66 m) Ensemble rail de 14 pieds (4,27 m) Graisse à rail NON ILLUSTRÉ Support 14 pi (4,27 m) Support de fixation avec trous carrés Support de fixation avec fente - LiftMaster ATS | ATS2113X Manual - Page 69
et graisse Vis sans fin/pignon menant avec graisse, groupille cylindrique (2) Panneau d'extrémité avec toutes les étiquettes Douille d'ampoule Condensateur Support de condensateur Bornier avec vis RÉF. 10 11 12 13 14 15 16 17 18 N° DE PIÈCE DÉSIGNATION 41D4509 Ensemble de rechange moteur et - LiftMaster ATS | ATS2113X Manual - Page 70
permettre à une porte de 10 pieds (3,05 m) de s'ouvrir complètement. LOCK LIGHT CD1012 Rail complet de 12 pieds (3,66 m) : Pour permettre à une porte de 12 pieds (3,66 m) de s'ouvrir complètement. 376LM CD1014 108D36 Rail complet de 14 pieds (4,27 m) : Pour permettre à une porte de 14 pieds - LiftMaster ATS | ATS2113X Manual - Page 71
REMARQUES 35 - LiftMaster ATS | ATS2113X Manual - Page 72
Technical Support Group 6050 S. Country Club Rd. Tucson, Arizona 85706 NOTRE NUMÉRO DE SERVICE : 1-800-528-9131 GARANTIE LIMITÉE DE UN AN DE LIFTMASTER® PROBLÈMES RELATIFS OU CONNEXES À LA PORTE DU GARAGE OU À LA QUINCAILLERIE DE LA PORTE DU GARAGE, NOTAMMENT LES RESSORTS DE LA PORTE, LES GALETS
-
 1
1 -
 2
2 -
 3
3 -
 4
4 -
 5
5 -
 6
6 -
 7
7 -
8
-
9
-
10
-
11
-
12
-
13
-
14
-
15
-
16
-
17
-
18
-
19
-
20
-
21
-
22
-
23
-
24
-
25
-
26
-
27
-
28
-
29
-
30
-
31
-
32
-
33
-
34
-
35
-
36
-
37
-
38
-
39
-
40
-
41
-
42
-
43
-
44
-
45
-
46
-
47
-
48
-
49
-
50
-
51
-
52
-
53
-
54
-
55
-
56
-
57
-
58
-
59
-
60
-
61
-
62
-
63
-
64
-
65
-
66
-
67
-
68
-
69
-
70
-
71
-
72
 |
 |

Owner’s Manual
■
Please read this manual and the enclosed safety materials carefully!
■
Fasten the manual near the garage door after installation.
■
The door WILL NOT CLOSE unless the Protector System
®
is connected and properly
aligned.
■
Periodic checks of the opener are required to ensure safe operation.
■
The model number label is located on the front panel of your opener.
■
DO NOT exceed 8 complete cycles of door operation per hour.
The Chamberlain Group, Inc.
845 Larch Avenue
Elmhurst, Illinois 60126-1196
www.liftmaster.com
COMMERCIAL DOOR OPENER
Model ATS 2113X 1/2 HP
For Residential And Light Duty Commercial Use
Install on Sectional Doors Only
UP
FORCE
DOWN
FORCE
®