LiftMaster STAR1000 STAR1000 Commerical Access Control Recieiver Manual
LiftMaster STAR1000 Manual
 |
View all LiftMaster STAR1000 manuals
Add to My Manuals
Save this manual to your list of manuals |
LiftMaster STAR1000 manual content summary:
- LiftMaster STAR1000 | STAR1000 Commerical Access Control Recieiver Manual - Page 1
. COMMERCIAL ACCESS CONTROL RECEIVER MODEL STAR1000 To prevent possible SERIOUS INJURY or DEATH from electrocution: • Be sure power is NOT connected BEFORE installing the receiver. To prevent possible SERIOUS INJURY or DEATH from a moving gate or garage door: • ALWAYS keep remote controls out of - LiftMaster STAR1000 | STAR1000 Commerical Access Control Recieiver Manual - Page 2
Keypad Numeric data is entered through the numeric keypad. Insert wiring PROGRAMMING The receiver has the ability to learn a combination of remote be able to program the receiver. Upon initial power up, the system firmware revision is displayed for 5 seconds followed by the LiftMaster® logo. When - LiftMaster STAR1000 | STAR1000 Commerical Access Control Recieiver Manual - Page 3
. MAIN MENU COMMAND DESCRIPTION LEARN MENU LEARN DEVICE BLOCK LEARN DEVICE LEARN TO LOC # Program a device to the receiver. Block program a range of devices to the receiver. Program a device to a 4-digit number location. DELETE MENU DELETE DEVICE DELETE ALL DEVICES Delete a specified - LiftMaster STAR1000 | STAR1000 Commerical Access Control Recieiver Manual - Page 4
Remote Controls 811LM, 813LM, 892LT, 894LT, 891LM, 893LM, 890/893/895MAX, PPV1, PPV3, PPK1, PPK3, PPK1PH, PPK3PH, PPLV1, PPLK1, AND PPLK1PH Keypads receiver and/or transmitter are prohibited, except for changing the code setting or replacing the battery. THERE ARE NO OTHER USER SERVICEABLE PARTS - LiftMaster STAR1000 | STAR1000 Commerical Access Control Recieiver Manual - Page 5
actionnés de contact sec. Le STAR1000 est compatible avec les télécommandes , visitez : www.homelink.com. La capacité du ré reçoivent ou transmettent des ondes. 2. Monter le support sur la surface choisie avec les outils de fixation ad à un portail ou une porte de garage en mouvement : • Garder EN TOUT - LiftMaster STAR1000 | STAR1000 Commerical Access Control Recieiver Manual - Page 6
STAR1000 comporte du micrologiciel du système s'affichera pendant 5 secondes, suivie du logo LiftMaster®. Quand vous appuyez sur une touche, le message « CREATE PIN? » été correctement programmé, l'affichage LCD affichera le message « KEYPAD UNLOCKED » (Clavier déverrouillé). Sélectionner « OK » - LiftMaster STAR1000 | STAR1000 Commerical Access Control Recieiver Manual - Page 7
COMMANDES DE PROGRAMMATION Le tableau ci-dessous décrit les commandes utilisées pour programmer le récepteur. MENU PRINCIPAL COMMANDE MENU APPRENTISSAGE APPRENDRE APPAREIL BLOQUER APPRENTISSAGE APPAREIL APPRENDRE N° LOC DESCRIPTION Programmer un appareil sur le récepteur. Bloquer la - LiftMaster STAR1000 | STAR1000 Commerical Access Control Recieiver Manual - Page 8
rallonge 25 pieds (7,5 m 86LM 86LMT Transformateur 24V C.A. pour bornes à vis 95LM PIÈCES DE RECHANGE Antenne K76-36681 Module de mémoire K1D7530-4 Support de montage K13-36651-1 AVIS : Les règles de la FCC et d'Industrie Canada (IC) interdisent tout ajustement ou toute modifi cation de - LiftMaster STAR1000 | STAR1000 Commerical Access Control Recieiver Manual - Page 9
activación por contacto seco. El STAR1000 es compatible con los controles remotos de compatibilidad, visite www.homelink.com. La capacidad del receptor es del cableado (Figura 2). Consulte el manual del propietario del operador de puertas inversión de movimiento en la parte inferior de la puerta. No - LiftMaster STAR1000 | STAR1000 Commerical Access Control Recieiver Manual - Page 10
interfaz de usuario de STAR1000 consiste en una pantalla LCD de 5 líneas por 22 caracteres, 3 "teclas programables", flechas hacia arriba/ revisión del firmware del sistema por 5 segundos, seguido por el logotipo de LiftMaster®. Al presionar una tecla, aparecerá la opción "¿CREAR PIN?" 1. Presione - LiftMaster STAR1000 | STAR1000 Commerical Access Control Recieiver Manual - Page 11
COMANDOS DE PROGRAMACIÓN La tabla a continuación describe los comandos que se utilizan para programar el receptor. MENÚ PRINCIPAL MENÚ DE PROGRAMACIÓN COMANDO PROGRAMAR DISPOSITIVO BLOQUEAR LA FUNCIÓN DE PROGRAMAR DISPOSITIVO PROGRAMAR AL # DE UBICACIÓN DESCRIPCIÓN Programar un dispositivo al - LiftMaster STAR1000 | STAR1000 Commerical Access Control Recieiver Manual - Page 12
ESPECIFICACIONES Capacidad del sistema Voltaje de tensión Corriente en funcionamiento Corriente en stand by Supresión de sobretensión Rango de temperatura en funcionamiento Rango de temperatura para almacenar y enviar Frequency Capacidad de contacto del rel 1,000 dispositivos 9 - 30
-
 1
1 -
 2
2 -
 3
3 -
 4
4 -
 5
5 -
 6
6 -
 7
7 -
8
-
9
-
10
-
11
-
12
 |
 |

1
To prevent possible SERIOUS INJURY or DEATH from electrocution:
•
Be sure power is NOT connected BEFORE installing the receiver.
To prevent possible SERIOUS INJURY or DEATH from a moving gate
or garage door:
•
ALWAYS keep remote controls out of reach of children. NEVER
permit children to operate, or play with remote control transmitters.
•
Activate gate or door ONLY when it can be seen clearly, is properly
adjusted, and there are no obstructions to door travel.
•
ALWAYS keep gate or garage door in sight until completely closed.
NEVER permit anyone to cross path of moving gate or door.
To prevent possible SERIOUS INJURY or DEATH, the use of
CONSTANT OPERATION on residential openers is PROHIBITED.
When a receiver is used to activate a commercial door opener, a
reversing edge MUST be installed on the bottom of the door. Failure to
install a reversing edge under these circumstances may result in
SERIOUS INJURY or DEATH to persons trapped beneath the door.
COMMERCIAL ACCESS CONTROL RECEIVER
MODEL STAR1000
Control
Station
Receiver Without
Faceplate
Single Operator
9 - 30 volts AC/DC
250 mA max
Power Supply
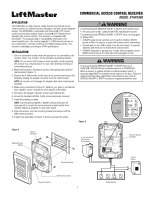
APPLICATION
The STAR1000 is a high capacity single channel commercial access
control receiver for commercial door operators, and dry contact triggered
devices. The STAR1000 is compatible with Security
✚
2.0
™
remote
controls and wireless keyless entries, Security
✚
2.0
™
Passport and
Passport Lite remote controls. This receiver is compatible with
HomeLink
®
. For programming or compatibility information visit
www.homelink.com. The receiver capacity is 1,000 devices and can be
any combination of remote controls and wireless keyless entries. The
receiver is watertight according to IPX44 specification.
INSTALLATION
1.
Select a convenient location near the operator to be controlled by the
receiver within “line of sight” of the intended transmitting location.
NOTE:
Do not mount LCD screen in direct sunlight. Avoid mounting
the receiver in a metal enclosure or near other wireless receiving or
transmitting devices.
2.
Mount the bracket to the desired surface with appropriate hardware
(not provided) (Figure 1).
3.
Remove the 4 (#8) screws on the back of the receiver and remove the
faceplate. Unplug the keypad connector from the control board.
NOTE:
Be careful not to damage the keypad cable while removing the
faceplate.
4.
Make wiring connections (Figure 2). Refer to your gate or commercial
door operator owner’s manual for more specific information.
5. Reconnect the keypad connector to the board (labeled J9).
6. Secure the faceplate with the 4 (#8) screws previously removed.
7. Install the antenna provided.
NOTE:
Use the optional 86LM or 86LMT antenna extension kit
(see page 4) to mount the remote antenna as high and far from
metallic objects as possible for best radio range.
8.
Snap the receiver onto the mounting bracket and secure with the
(#8) screws provided.
9. Tighten the watertight connector to secure and seal the wiring.
Figure 1
Mounting Bracket
Watertight Connector
Keypad Connector
Antenna
Connector
Figure 2
Backup Memory
Module
Relay
Connection
Power
Connection