Linksys NSS4100 Cisco NSS4000 and NSS6000 Series Network Storage System Gettin
Linksys NSS4100 - Gigabit Storage System Manual
 |
UPC - 745883578818
View all Linksys NSS4100 manuals
Add to My Manuals
Save this manual to your list of manuals |
Linksys NSS4100 manual content summary:
- Linksys NSS4100 | Cisco NSS4000 and NSS6000 Series Network Storage System Gettin - Page 1
GETTING STARTED GUIDE Linksys Business Series Network Storage System Getting Started Guide Linksys Business Series Network Storage System Models NSS4000 and NSS6000 Series - Linksys NSS4100 | Cisco NSS4000 and NSS6000 Series Network Storage System Gettin - Page 2
© 2007-2008 Copyright 2007-2008, Cisco Systems, Inc. Specifications are subject to change without notice. Linksys, the Cisco Systems logo, the Linksys Logo, and the Linksys One logo are registered trademarks of Cisco Systems, Inc. All other trademarks mentioned in this document are the property of - Linksys NSS4100 | Cisco NSS4000 and NSS6000 Series Network Storage System Gettin - Page 3
Power 10 NSS-supported UPS Product Families 11 Chapter 3: Part B: Configure the Network Storage System (NSS) . . . 13 Step 1: Access the NSS when there is no DHCP Server Present on your Network 14 Step 2: Log into the Configuration Interface 15 Option A: Linksys One Environment Login Steps - Linksys NSS4100 | Cisco NSS4000 and NSS6000 Series Network Storage System Gettin - Page 4
Contents Linksys Business Series Network Storage System Administrator Guide Mac Users: Accessing Storage through CIFS/SMB 47 Mac Users: Accessing Storage through FTP 48 Chapter 5: LEDs & Buttons 49 Power LED (Front Panel) 49 System LED (Front Panel) 50 Reset Button (Front Panel) 50 LAN - Linksys NSS4100 | Cisco NSS4000 and NSS6000 Series Network Storage System Gettin - Page 5
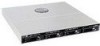
resources to dedicate elsewhere. The NSS is a Network Attached Storage (NAS) unit that appears as a native file server for the various clients within your network, including Windows, Apple Macintosh, UNIX, and Linux platforms. The biggest benefit to your users is that they can now access data that - Linksys NSS4100 | Cisco NSS4000 and NSS6000 Series Network Storage System Gettin - Page 6
to skip this step if you have an NSS4100 or NSS6100 as it is preconfigured with a RAID5 array. - Step 5: Create the volume(s). - Step 6: If you have multiple NSS units (one of which is a NSS6000 series unit), and you want to virtualize your storage, set up the export/import of the virtualized RAID - Linksys NSS4100 | Cisco NSS4000 and NSS6000 Series Network Storage System Gettin - Page 7
, or the Linksys Business Series Network Storage System Administrator Guide available from the Linksys website at www.linksys.com - Step 14: After you configure the NSS, save a copy of the configuration file to a location on the NSS and to a USB key. • Part C: Instruct your users how to access - Linksys NSS4100 | Cisco NSS4000 and NSS6000 Series Network Storage System Gettin - Page 8
Chapter 1 Getting Sarted Guide 6 Chapter 1: Introduction Recommended Installation Sequence - Linksys NSS4100 | Cisco NSS4000 and NSS6000 Series Network Storage System Gettin - Page 9
Started Guide 2 Ethernet Cable(s): Connect up to two Ethernet links from the NSS to your network. 3. Step 3: Connect the Power: Ensure you have connected the power the packaging, you are ready to set up the hardware. For the NSS6100 or NSS4100, skip this step and go to Step 2 to install the - Linksys NSS4100 | Cisco NSS4000 and NSS6000 Series Network Storage System Gettin - Page 10
Chapter 2 Getting Sarted Guide To install the disk drives into the NSS: 1. Remove a disk tray from the front of the NSS chassis by pushing in the tab on the - Linksys NSS4100 | Cisco NSS4000 and NSS6000 Series Network Storage System Gettin - Page 11
in the NSS, refer to the product support information offered on the Linksys website (www.linksys.com) for a list of recommended disk drives connected to your network. The default network setting for your Ethernet link(s) is Active Backup. This means that if you have two links, one link is available - Linksys NSS4100 | Cisco NSS4000 and NSS6000 Series Network Storage System Gettin - Page 12
Guide to your network. If you are connecting the NSS within the Linksys One environment, connect to connect the USB signal cable from the UPS to the UPS, refer to the list of supported UPS product families. • Mains: storage needs. 10 Chapter 2: Setting up the Hardware Step 3: Install the Power - Linksys NSS4100 | Cisco NSS4000 and NSS6000 Series Network Storage System Gettin - Page 13
UPS Product Families The NSS supports the following UPS product families: • APC Back-UPS Pro USB • APC Back-UPS RS USB • APC Back-UPS USB • APC Back-UPS LS USB • APC Back-UPS ES/CyberFort 350 • APC Smart-UPS USB Chapter Getting Started Guide 2 Chapter 2: Setting up the Hardware 11 Step - Linksys NSS4100 | Cisco NSS4000 and NSS6000 Series Network Storage System Gettin - Page 14
Chapter 2 Getting Sarted Guide 12 Chapter 2: Setting up the Hardware Step 3: Install the Power - Linksys NSS4100 | Cisco NSS4000 and NSS6000 Series Network Storage System Gettin - Page 15
description of the configuration options available, refer to the topics in the pdf version of the Linksys Business Series Network Storage System Administrator Guide available from the Linksys website (www.linksys.com) or from the Online Help available from the Help menu on the NSS configuration - Linksys NSS4100 | Cisco NSS4000 and NSS6000 Series Network Storage System Gettin - Page 16
Network Storage System Administrator Guide available from the Linksys website (www.linksys.com). • Step 14 - Save a Copy of the Configuration: After you configure the NSS, save a copy of the configuration to a location on the NSS and to a USB key. Step 1: Access the NSS when there is no DHCP Server - Linksys NSS4100 | Cisco NSS4000 and NSS6000 Series Network Storage System Gettin - Page 17
installed in a Linksys One Environment: 1. Login to the SVR. 2. Click the L1 Devices tab. The NSS appears in the list of devices. Note that you can change your administrator password and the NSS hostname from this window. 3. Click Show Details. Chapter 3: Configuring the Network Storage System 15 - Linksys NSS4100 | Cisco NSS4000 and NSS6000 Series Network Storage System Gettin - Page 18
3 Getting Sarted Guide A new tab appears with the hostname of the NSS. 4. Click the NSS tab. The NSS device is automatically assigned an IP address from the DHCP server in the SVR the page. 16 Chapter 3: Configuring the Network Storage System (NSS) Step 2: Log into the Configuration Interface - Linksys NSS4100 | Cisco NSS4000 and NSS6000 Series Network Storage System Gettin - Page 19
NAS" (For example, "http://NAS0018F804E44C".) • Browse for the NSS from the My Network Places window. • Select the NSS to a network drive from a mapped network defaults, both the username and password are set to "admin". 4. Click OK. Chapter 3: Configuring the Network Storage System - Linksys NSS4100 | Cisco NSS4000 and NSS6000 Series Network Storage System Gettin - Page 20
installing the NSS within the Linksys One environment, the NSS time is automatically set via the Linksys NTP server. When you first configure server(s)" appears in the System Status page. • If the SNMP traps are configured, an SNMP trap message is sent. 18 Chapter 3: Configuring the Network Storage - Linksys NSS4100 | Cisco NSS4000 and NSS6000 Series Network Storage System Gettin - Page 21
a RAID array, either for the first time, or when you are rebuilding it as a result of failed disks in the array, it is a good idea to set the Rebuild Priority to determine how you want to allocate the system resources for the rebuild. Chapter 3: Configuring the Network Storage System 19 (NSS) - Linksys NSS4100 | Cisco NSS4000 and NSS6000 Series Network Storage System Gettin - Page 22
min (NSS6000) to build a RAID5 array. To create an array: 1. From the Manager Menu, click Storage The RAID page appears: RAID. 2. The available disks appear in the New RAID Device table. Select each disk that you want to include in the array. 20 Chapter 3: Configuring the Network Storage System - Linksys NSS4100 | Cisco NSS4000 and NSS6000 Series Network Storage System Gettin - Page 23
Guide one volume before you can create users, groups, or shares. To create a volume: 1. From the Manager Menu, click Storage Volumes. The Storage one alphanumeric character, must begin with a letter, but cannot contain any spaces. Chapter 3: Configuring the Network Storage System 21 (NSS) - Linksys NSS4100 | Cisco NSS4000 and NSS6000 Series Network Storage System Gettin - Page 24
7, "Working With the Administrator Options," in the Linksys Business Series Network Storage System Administrator Guide for help on this.) 4. Re-enter the password in the Confirm Password field. 5. Click Add. 22 Chapter 3: Configuring the Network Storage System (NSS) Step 5: Create a Volume - Linksys NSS4100 | Cisco NSS4000 and NSS6000 Series Network Storage System Gettin - Page 25
Getting Started Guide 3 Step 6: Virtualize Storage within your Network The NSS virtualization feature lets you create storage physically located on other network NSS units into one logical storage unit. The recommended network configuration for using virtualization is to use an NSS6000 series to - Linksys NSS4100 | Cisco NSS4000 and NSS6000 Series Network Storage System Gettin - Page 26
the exported storage. Creating Virtualized Storage To create a JBOD with exported disks: 1. Log in to the configuration interface from the master unit. 2. From the Manager Menu, click Storage RAID. 24 Chapter 3: Configuring the Network Storage System (NSS) Step 6: Virtualize Storage within your - Linksys NSS4100 | Cisco NSS4000 and NSS6000 Series Network Storage System Gettin - Page 27
page appears. Chapter Getting Started Guide 3 Exported disks from other NSS units in the network appear in the New RAID NSS Network Identification To configure the NSS network identity: 1. From the Manager Menu, click Network Identification. Chapter 3: Configuring the Network Storage System - Linksys NSS4100 | Cisco NSS4000 and NSS6000 Series Network Storage System Gettin - Page 28
Getting Sarted Guide The Network Identification page the hostname for the NSS using the DHCP server, select Assign automatically via DHCP. If the DHCP server is not available or if it is not your users. 26 Chapter 3: Configuring the Network Storage System (NSS) Step 7: Configure the NSS - Linksys NSS4100 | Cisco NSS4000 and NSS6000 Series Network Storage System Gettin - Page 29
not successful).Note: If you are joined to a domain and make changes to the fields on this page, make sure you re-enter the domain password as the NSS automatically rejoins the domain when you click Update. Chapter 3: Configuring the Network Storage System 27 (NSS) - Linksys NSS4100 | Cisco NSS4000 and NSS6000 Series Network Storage System Gettin - Page 30
range should not change. 3. Set the volume that you want to assign as the home directory location for your users via the Home Directory Location field. 4. Click Update. 28 Chapter 3: Configuring the Network Storage System (NSS) Step 8: Configure the User/Group Ranges and Home Directory Location - Linksys NSS4100 | Cisco NSS4000 and NSS6000 Series Network Storage System Gettin - Page 31
the username. To rename an existing user profile, delete the user profile and then create a new one. User profiles are maintained by the administrator. Users cannot make changes to their passwords. Groups are an easy way to manage users with the same storage needs and privileges. A group consists of - Linksys NSS4100 | Cisco NSS4000 and NSS6000 Series Network Storage System Gettin - Page 32
pages must be made by the administrator. 6. To record the user's full name, enter it in the Real Name field. This field is optional. Note that you cannot enter the "/" character in this field. 30 Chapter 3: Configuring the Network Storage System (NSS) Step 9: Create any Locally Defined - Linksys NSS4100 | Cisco NSS4000 and NSS6000 Series Network Storage System Gettin - Page 33
Guide 3 7. To record the user's email address, enter it in the Email Address field. This field is optional. 8. Click OK to create the user and exit the New User page. Click Apply to create the user and then add another new user Add. Chapter 3: Configuring the Network Storage System 31 (NSS) - Linksys NSS4100 | Cisco NSS4000 and NSS6000 Series Network Storage System Gettin - Page 34
After you define at least one volume, you can create the shares that can be accessed by your users when they log into the NSS. There is a limit of 21 users and groups (the combined 2. Click Create Share. Shares. 32 Chapter 3: Configuring the Network Storage System (NSS) Step 10: Create a Share - Linksys NSS4100 | Cisco NSS4000 and NSS6000 Series Network Storage System Gettin - Page 35
-Only: If the share is configured as a public share, allow the users read-only access to the share. Users can access and view the share but cannot write to the share. (For NFS shares, refer to the information stated in the Public field.) Chapter 3: Configuring the Network Storage System 33 (NSS) - Linksys NSS4100 | Cisco NSS4000 and NSS6000 Series Network Storage System Gettin - Page 36
Default File Creation Attributes and Protocol checkboxes are greyed out as they are not relevant. Follow the steps in Chapter 6, "Adding a DFS Shared Folder," in the Linksys Business Series Network Storage System Administrator Guide to add shared folder links to the root. 7. Set the Allow users - Linksys NSS4100 | Cisco NSS4000 and NSS6000 Series Network Storage System Gettin - Page 37
NSS DFS root share, the user's rights to the DFS shared folder are those assigned to the corresponding target share on the remote system. To add a DFS root directory to a share on the NSS: 1. From the Manager Menu, click Shares Shares. Chapter 3: Configuring the Network Storage System 35 (NSS) - Linksys NSS4100 | Cisco NSS4000 and NSS6000 Series Network Storage System Gettin - Page 38
Chapter 3 Getting Sarted Guide The File Shares page appears. 2. Click Edit for the share to which you want to add a folder. The Edit Share page appears. 3. Click Add Shared Folder. 36 Chapter 3: Configuring the Network Storage System (NSS) Step 10: Create a Share - Linksys NSS4100 | Cisco NSS4000 and NSS6000 Series Network Storage System Gettin - Page 39
Guide 3 4. Select one password for the above account. 5. If you are adding a folder to DFS, click OK. If you are importing a remote server, click Import. NOTE: Make sure you review the restrictions and recommendations for using Microsoft DFS from the NSS. Chapter 3: Configuring the Network Storage - Linksys NSS4100 | Cisco NSS4000 and NSS6000 Series Network Storage System Gettin - Page 40
credentials. As a workaround in a non-domain (workgroup) environment, pre-map a file-share to each file server that needs special user credentials (other than the logged-in username and password). In this case, the MSDFS redirect proceeds smoothly because the PC-client already has an established - Linksys NSS4100 | Cisco NSS4000 and NSS6000 Series Network Storage System Gettin - Page 41
Guide 3 snapshots is greater, the amount of the reserve should be greater. Or, if there is a heavy amount of activity on the volume, set a higher reserve. NOTE: This feature is only available on NSS6000 series NAS units. To create a snapshot for a volume: 1. From the Manager Menu, click Storage - Linksys NSS4100 | Cisco NSS4000 and NSS6000 Series Network Storage System Gettin - Page 42
shares. The backup can be saved to a remote CIFS server or to another share on the NSS. To set up a scheduled backup: 1. From the Manager Menu, click Shares Backup. 2. Click Schedule Backup. 40 Chapter 3: Configuring the Network Storage System (NSS) Step 12: Create a Scheduled Backup for a Share - Linksys NSS4100 | Cisco NSS4000 and NSS6000 Series Network Storage System Gettin - Page 43
Getting Started Guide 3 3. in the direction of the bracket.) 4. Click one of the following to determine the destination for the backup: • backup on a remote CIFS server, click this option and then configure the hostname of the remote server, the remote share, as Network Storage System 41 (NSS) - Linksys NSS4100 | Cisco NSS4000 and NSS6000 Series Network Storage System Gettin - Page 44
Chapter 3 Getting Sarted Guide The Select Backup Schedule page appears. 7. Select the backup frequency as one of the following: • Daily you can download the pdf version of the Administrator Guide from the Linksys website (www.linksys.com). 42 Chapter 3: Configuring the Network Storage System ( - Linksys NSS4100 | Cisco NSS4000 and NSS6000 Series Network Storage System Gettin - Page 45
the USB flash device to another location on your network. 4. Click Update. 5. Click Save to save the configuration settings. If the configuration file does not successfully save to the specified volume, check the volume to ensure that it is not locked. Chapter 3: Configuring the Network Storage - Linksys NSS4100 | Cisco NSS4000 and NSS6000 Series Network Storage System Gettin - Page 46
Getting Sarted Guide 6. If you saved the file to the USB flash device, display the Storage Status page. 7. Click Unmount. NOTE: Removing the USB flash remove the unmounted USB flash device from the AUX-1 port. 44 Chapter 3: Configuring the Network Storage System (NSS) Step 14: - Linksys NSS4100 | Cisco NSS4000 and NSS6000 Series Network Storage System Gettin - Page 47
Chapter Getting Started Guide 4 Part C: Instruct Your Users How to Access the NSS Storage End users, using a Windows, UNIX, Linux, or Mac computer can easily access NSS storage. Once the end user logs into the NSS using their username and password, the shares to which the end user has read or - Linksys NSS4100 | Cisco NSS4000 and NSS6000 Series Network Storage System Gettin - Page 48
storage. UNIX/Linux Users: Accessing Storage through NFS UNIX and Linux users can access shares on the NSS via NFS. Due to the way that the NSS implements NFS file access privileges, only NFSv3 is supported for the mount if you do not already have one (e.g., mkdir /mnt/nas_share1). 3. Mount the NFS - Linksys NSS4100 | Cisco NSS4000 and NSS6000 Series Network Storage System Gettin - Page 49
Started Guide 4 UNIX/Linux Users: Accessing Storage through FTP UNIX and Linux users who have a user profile set up can access any shares to which they have privileges on the NSS storage using NFS or FTP. NOTE: Before your end users can access the shares on the NSS using FTP, the NSS network - Linksys NSS4100 | Cisco NSS4000 and NSS6000 Series Network Storage System Gettin - Page 50
and password when prompted by your FTP client. When your FTP client has logged in, a list of accessible shares appears as individual directories. 5. Depending on your privileges to the share, you can begin using the NSS storage. 48 Chapter 4: Accessing Network Storage Mac Users: Accessing Storage - Linksys NSS4100 | Cisco NSS4000 and NSS6000 Series Network Storage System Gettin - Page 51
System Details page following an unsuccessful upload. After the user clicks OK, the system reboots using the current version of the firmware.) • Blinking Yellow: The network configuration factory defaults are being reset. When resetting the network defaults, hold down the Reset button until you see - Linksys NSS4100 | Cisco NSS4000 and NSS6000 Series Network Storage System Gettin - Page 52
image is corrupt. - The firmware image is a previous version to the one currently installed. Downgrades are not supported. • Off: There are no system-related problems. Reset Button (Front Panel) The Reset button lets you restore the network setting system defaults or reset the box. • To restore - Linksys NSS4100 | Cisco NSS4000 and NSS6000 Series Network Storage System Gettin - Page 53
Guide Red: The disk drive is in a failed state. • Blinking Red: The disk drive is predicated to fail (via S.M.A.R.T.). We recommend that you replace the (from the Storage Status page on the configuration interface). NOTE: There can only be one locate request set for a disk drive at one time. • - Linksys NSS4100 | Cisco NSS4000 and NSS6000 Series Network Storage System Gettin - Page 54
Sarted Guide USB LED (Front Panel) Solid Green: The USB hard/flash drive is connected and is not safe to remove. Blinking Green: The USB hard/flash drive is connected and is being mounted or unmounted. Off: There is either no USB hard/flash drive connected to the NSS, or, if connected, the USB hard - Linksys NSS4100 | Cisco NSS4000 and NSS6000 Series Network Storage System Gettin - Page 55
Appendix Network Storage System (NSS) Getting Started Guide A Support Contact Information Linksys One Contact Information Visit Linksys online for information on the latest products and product updates at: http://www.linksys.com Can't find information about a product you want to buy on the web?
-
 1
1 -
 2
2 -
 3
3 -
 4
4 -
 5
5 -
 6
6 -
 7
7 -
8
-
9
-
10
-
11
-
12
-
13
-
14
-
15
-
16
-
17
-
18
-
19
-
20
-
21
-
22
-
23
-
24
-
25
-
26
-
27
-
28
-
29
-
30
-
31
-
32
-
33
-
34
-
35
-
36
-
37
-
38
-
39
-
40
-
41
-
42
-
43
-
44
-
45
-
46
-
47
-
48
-
49
-
50
-
51
-
52
-
53
-
54
-
55
 |
 |

GETTING STARTED GUIDE
Linksys Business Series Network Storage System
Models NSS4000 and NSS6000 Series
Linksys Business Series Network Storage System
Getting Started Guide