Linksys WIP320 User Guide - Page 14
Getting Started, Overview - battery replacement
 |
UPC - 745883577330
View all Linksys WIP320 manuals
Add to My Manuals
Save this manual to your list of manuals |
Page 14 highlights
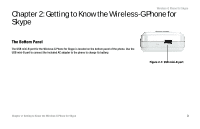
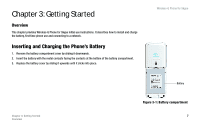
Chapter 3: Getting Started Overview This chapter provides Wireless-G Phone for Skype initial use instructions. It describes how to install and charge the battery, first time phone use and connecting to a network. Inserting and Charging the Phone's Battery 1. Remove the battery compartment cover by sliding it downwards. 2. Insert the battery with the metal contacts facing the contacts at the bottom of the battery compartment. 3. Replace the battery cover by sliding it upwards until it clicks into place. Wireless-G Phone for Skype Chapter 3: Getting Started Overview Battery Figure 3-1: Battery compartment 7
-
 1
1 -
2
-
3
-
4
-
5
-
6
-
7
-
8
-
 9
9 -
 10
10 -
 11
11 -
 12
12 -
 13
13 -
 14
14 -
 15
15 -
 16
16 -
 17
17 -
 18
18 -
 19
19 -
20
-
21
-
22
-
23
-
24
-
25
-
26
-
27
-
28
-
29
-
30
-
31
-
32
-
33
-
34
-
35
-
36
-
37
-
38
-
39
-
40
-
41
-
42
-
43
-
44
-
45
-
46
-
47
-
48
-
49
-
50
-
51
-
52
-
53
-
54
-
55
-
56
-
57
-
58
-
59
-
60
-
61
-
62
-
63
-
64
-
65
-
66
-
67
-
68
-
69
-
70
-
71
-
72
-
73
-
74
-
75
-
76
-
77
-
78
-
79
-
80
-
81
 |
 |

Wireless-G Phone for Skype
7
Chapter 3: Getting Started
Overview
Chapter 3: Getting Started
Overview
This chapter provides Wireless-G Phone for Skype initial use instructions. It describes how to install and charge
the battery, first time phone use and connecting to a network.
Inserting and Charging the Phone’s Battery
1.
Remove the battery compartment cover by sliding it downwards.
2.
Insert the battery with the metal contacts facing the contacts at the bottom of the battery compartment.
3.
Replace the battery cover by sliding it upwards until it clicks into place.
Battery
Figure 3-1: Battery compartment