MSI 785GTM-E45 User Guide - Page 55
Run BIOS Setup, and select Cell Menu. Under Cell, Enabled., ment under Power schemes. - fsb
 |
UPC - 816909062533
View all MSI 785GTM-E45 manuals
Add to My Manuals
Save this manual to your list of manuals |
Page 55 highlights
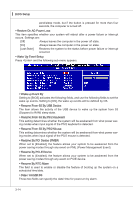
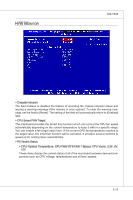
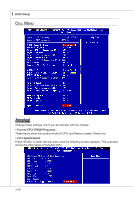
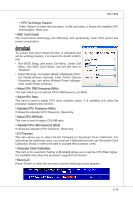
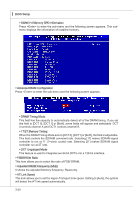
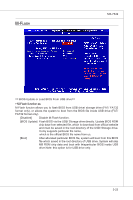
MS-7549 ▶ CPU Technology Support Press to enter the sub-menu. In this sub-menu, it shows the installed CPU technologies. Read only. ▶ AMD Cool'n'Quiet The Cool'n'Quiet technology can effectively and dynamically lower CPU speed and power consumption. Important To ensure that Cool'n'Quiet function is activated and will be working properly, it is required to double confirm that: • Run BIOS Setup, and select Cell Menu. Under Cell Menu, find AMD Cool'n'Quiet, and set this item to "Enabled". • Enter Windows, and select [Start]->[Settings]->[Control Panel]->[Power Options]. Enter Power Options Properties tag, and select Minimal Power Management under Power schemes. ▶ Adjust CPU FSB Frequency (MHz) This item allows you to set the CPU FSB frequency (in MHz). ▶ Adjust CPU Ratio This item is used to adjust CPU clock multiplier (ratio). It is available only when the processor supports this function. ▶ Adjusted CPU Frequency (MHz) It shows the adjusted CPU frequency. Read-only. ▶ Adjust CPU-NB Ratio This item is used to adjust CPU-NB ratio. ▶ Adjusted CPU-NB Frequency (MHz) It shows the adjusted CPU frequency. Read-only. ▶ EC Firmware This item allows you to select the EC Firmware for Advanced Clock Calibration. For unclocking the additional cores, you could set it [Special] and then set Advanced Clock Calibration [Auto] in order to be able to activate the processor cores. ▶ Advanced Clock Calibration This item is for overclock. Setting to [Enabled] allows you to set the CPU Ratio higher. It is available only when the processor supports this function. ▶ Memory-Z Press to enter the sub-menu and the following screen appears. 3-19
-
 1
1 -
2
-
3
-
4
-
5
-
6
-
7
-
8
-
9
-
10
-
11
-
12
-
13
-
14
-
15
-
16
-
17
-
18
-
19
-
20
-
21
-
22
-
23
-
24
-
25
-
26
-
27
-
28
-
29
-
30
-
31
-
32
-
33
-
34
-
35
-
36
-
37
-
38
-
39
-
40
-
41
-
42
-
43
-
44
-
45
-
46
-
47
-
48
-
49
-
 50
50 -
 51
51 -
 52
52 -
 53
53 -
 54
54 -
 55
55 -
 56
56 -
 57
57 -
 58
58 -
 59
59 -
 60
60 -
61
-
62
-
63
-
64
-
65
-
66
-
67
-
68
-
69
-
70
-
71
-
72
-
73
-
74
-
75
-
76
-
77
-
78
-
79
-
80
-
81
-
82
-
83
-
84
-
85
-
86
-
87
-
88
-
89
-
90
-
91
-
92
-
93
-
94
-
95
-
96
-
97
-
98
-
99
-
100
-
101
-
102
-
103
-
104
-
105
-
106
 |
 |