MSI CR61 User Manual
MSI CR61 Manual
 |
View all MSI CR61 manuals
Add to My Manuals
Save this manual to your list of manuals |
MSI CR61 manual content summary:
- MSI CR61 | User Manual - Page 1
1 Preface Notebook User's Manual - MSI CR61 | User Manual - Page 2
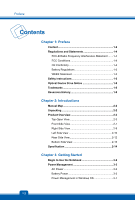
Battery Regulations 1-5 WEEE Statement 1-5 Safety Instructions 1-6 Optical Device Drive Notice 1-8 Trademarks 1-8 Reversion History 1-8 Chapter 2: Introductions Manual Begin to Use the Notebook 3-2 Power Management 3-3 AC Power 3-3 Battery Power 3-3 Power Management in Windows OS 3-7 1-2 - MSI CR61 | User Manual - Page 3
Energy Saving Tips 3-8 Basic Operations 3-9 Safety and Comfort Tips 3-9 Knowing the Keyboard 3-11 Knowing the Touchpad 3-15 Knowing the Smart Pad 3-17 About Hard Disk Drive 3-21 Using the Optical Storage Device 3-21 Connecting the External Devices 3-23 Peripheral Devices 3-23 Communication - MSI CR61 | User Manual - Page 4
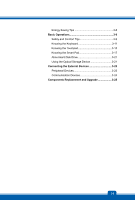
Preface ™ Regulations and Statements FCC-B Radio Frequency Interference Statement This equipment has been tested and found to comply with the limits for a Class B digital device, pursuant to part 15 of the FCC rules. These limits are designed to provide reasonable protection against harmful - MSI CR61 | User Manual - Page 5
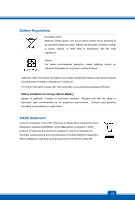
with the same or equivalent type recommended by the equipment manufacturer. Discard used batteries according to manufacturer's instructions. WEEE Statement Under the European Union ("EU") Directive on Waste Electrical and be obligated to take back such products at the end of their useful life. 1-5 - MSI CR61 | User Manual - Page 6
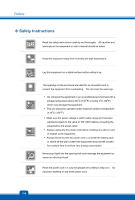
™ Safety Instructions Read the safety instructions carefully and thoroughly. All cautions and warnings on the equipment or user's manual should be to the equipment. Š Always disconnect the AC power cord or uninstall the battery pack or switch off the wall socket if the equipment would be left - MSI CR61 | User Manual - Page 7
replacement, use the same or equivalent type of battery recommended by the manufacturer only. Š Always keep the battery in a safe place. If any of the following situations arises, get the equipment checked by a service personnel: Š The power cord or plug is damaged. Š Liquid has penetrated into - MSI CR61 | User Manual - Page 8
as a "CLASS 1 LASER PRODUCT." To use this model properly, read the instruction manual carefully and keep this manual for your future reference. In case of any trouble with this model, please contact your nearest "AUTHORIZED service station." To prevent direct exposure to the laser beam, do not try - MSI CR61 | User Manual - Page 9
2 Introductions - MSI CR61 | User Manual - Page 10
tested and certified by our reputation for unsurpassed dependability and customer satisfaction. ™ Manual Map This User's Manual provides instructions instructions on using keyboard, touchpad, hard disk drive, and optical storage drive. Besides, the steps of installing and uninstalling the battery - MSI CR61 | User Manual - Page 11
™ Product Overview This section provides the description of basic aspects of the notebook. It will help you to know more about the appearance of this notebook before using it. Please be aware that the notebook shown in this section may vary from the actual one that users purchased. Top-open View The - MSI CR61 | User Manual - Page 12
This built-in Webcam can be used for picture microphone. 3. Stereo Speakers Give high quality sound blaster with stereo system and Hi-Fi function supported. 4. Power Button / Power LED Power Button Š Press the power button to turn the Š Hit any key at the keyboard to switch on the display. 2-4 - MSI CR61 | User Manual - Page 13
the battery running time. Š Press this button again to disable the TurboBattery+ function. Device Key Š Press this button to activate the S-Bar application. WLAN (WiFi) Š Press this button repeatedly to turn the WLAN function on or off recurrently. 6. Keyboard The built-in keyboard provides - MSI CR61 | User Manual - Page 14
the Bluetooth function on. Press again to turn it off. Š This function button will not be available when the Bluetooth function is not supported. 7. Touchpad Switch Press this button to enable or disable the touchpad function. The touchpad indicator, if equipped, glows when the touchpad function is - MSI CR61 | User Manual - Page 15
accessing the hard disk drive or the optical drive device. Bluetooth WLAN(WiFi) Bluetooth Š Bluetooth LED indicator glows blue when Bluetooth this function is disabled. Š Note: Functions listed here may be optional supported depending on the model users purchased. Š Warning: For flight safety - MSI CR61 | User Manual - Page 16
battery is being charged. Š Blinking amber if the battery fails and it is recommended to replace a new battery. Š Consult the local dealer for purchasing an equivalent type of battery recommended by the manufacturer. Š Battery The built-in card reader may support various types of memory card, such - MSI CR61 | User Manual - Page 17
The 15-pin-D-sub VGA port allows you to connect an external monitor or other standard VGA-compatible device (such as a projector) for a great view of the computer display. 3. USB 2.0 Ports The USB 2.0 port allows you to connect USB-interface peripheral devices, such as the mouse, keyboard, modem - MSI CR61 | User Manual - Page 18
various devices, such as storage devices, hard drives, or video cameras, and offers more advantages over high-speed data transferring. 4. Power Interface) is a new interface standard for PCs, displays and consumer electronics devices that supports standard, enhanced and high-definition video, - MSI CR61 | User Manual - Page 19
6. Audio Port Connectors Make high quality sound blaster with stereo system and Hi-Fi function supported. Headphone out Š Used for speakers or headphones. Microphone/ Line In Š Used for an external microphone. Š Connect the Center and Subwoofer speakers here. 2-11 - MSI CR61 | User Manual - Page 20
Introductions Rear Side View 1. Battery Pack This notebook will be powered by the battery pack when the AC/DC adapter is disconnected. 2-12 - MSI CR61 | User Manual - Page 21
pack. Slide it with one hand and pull the battery pack carefully with the other. 2. Battery Pack This notebook will be powered by the battery pack when the AC/DC adapter is disconnected. 3. Battery Lock/Unlock Button Battery cannot be moved when the button is positioned on lock status. Once the - MSI CR61 | User Manual - Page 22
Specification with your local dealers. Physical Characteristic Dimension Weight 383(W) x 249.5 (D) x 37.6~32.3 (H) mm 2.4 kg (with 6-cell battery) CPU Socket Processor Type Supported Processor 988 pins, rPGA Intel® Chief River Ivy Bridge Intel® Quad/ Dual-Core processor Core Chips PCH Intel - MSI CR61 | User Manual - Page 23
I/O Port Monitor (VGA) USB Mic-in / Line-in Headphone-out RJ45 HDMI Card Reader 10/ 100/ 1000 Ethernet 802.11 b/g/n Optionally supported 15.6" LED panel Controlled by K/B hot-keys Discrete / UMA (optional) Supported Supported Supported External display devices will be auto detected when connected. - MSI CR61 | User Manual - Page 24
Introductions Others Compliance Kensington Lock Hole WHQL x 1 2-16 - MSI CR61 | User Manual - Page 25
3 Getting Started - MSI CR61 | User Manual - Page 26
Getting Started ™ Begin to Use the Notebook For a new user of this notebook, we would like to suggest you follow the illustrations below to begin to use the notebook. 3-2 - MSI CR61 | User Manual - Page 27
adapter to the notebook and use the AC power while using this notebook for the first time. When the AC power is connected, recharging the battery will start immediately. Note that the AC/DC adapter included in the package is approved for your notebook; using other adapter model may damage either - MSI CR61 | User Manual - Page 28
as shown right. 2. Align the steady gutter and battery bolt with correct orientation and make sure they are joined properly. 3. Overturn the battery pack with the direction shown right 4. Press down the battery pack to fasten the battery pack in the battery tray. 5. Press the lock/unlock button to - MSI CR61 | User Manual - Page 29
lock/unlock button to the unlocked position. 3. Locate the battery release button on the bottom side. 4. Push and hold the release button to the battery releasing direction as shown on the bottom side. 5. Dig the edge of battery pack out of the battery tray with your finger tip. Be careful with your - MSI CR61 | User Manual - Page 30
cells that have no "memory effect." It is unnecessary to discharge the battery before recharging. However, to optimize the life of battery, we suggest that consuming the battery power completely once a month is necessary. Š If you do not use the notebook for a long time, it is suggested to remove - MSI CR61 | User Manual - Page 31
display or set your PC to standby/hibernate mode after a period of user inactivity. Follow the instructions below to adjust the power management settings in Windows OS: Power Options in Windows OS allow you to control the power management features of your display, hard drive, and battery. Go to the - MSI CR61 | User Manual - Page 32
in Power Options under Windows OS to optimize the computer's power management. Š Always disconnect the AC power cord or uninstall the battery pack or switch with an external ENERGY STAR qualified monitor, this feature also supports similar power management features of the monitor. To take advantage - MSI CR61 | User Manual - Page 33
™ Basic Operations If you are a beginner to the notebook, please read the following instructions to assure your own safety, and make yourself comfortable during the operations. Safety and Comfort Tips The notebook is a portable platform that allows you to - MSI CR61 | User Manual - Page 34
When sitting on the chair, adjust the chair's back (if available) to support your back comfortably. 4. Place your feet flat and naturally on the floor, 90-degree) when operating. 5. Put your hands on the desk naturally to support your wrists. 6. Adjust the angle/position of the LCD panel to have an - MSI CR61 | User Manual - Page 35
Knowing the Keyboard This notebook provides a full-functioned keyboard. This keyboard can be divided into four categories: Typewriter keys, Cursor keys, Numeric keys and Function keys. 1. Typewriter keys 2. Numeric keys 3. Cursor keys / Function keys 3-11 - MSI CR61 | User Manual - Page 36
right corner are used for editing purpose. Function Keys „ Windows Keys You can find the Windows Logo key ( ) on the keyboard, which are used to perform Windows-specific functions. For more information, please refer to your Windows manual or online help. „ General [Fn] Keys Switch the display - MSI CR61 | User Manual - Page 37
„ Quick Launch [Fn] Keys Use the [Fn] buttons on the keyboard to activate the specific applications or tools. With the help of these quick recurrently. + Webcam Š Press and hold the Fn button, and then press the F6 button to turn the Webcam function on. Press again to turn it off. + WLAN (WiFi) - MSI CR61 | User Manual - Page 38
Getting Started + Bluetooth (Optional) Š Press and hold the Fn button, and then press the F9 button to turn the Bluetooth function on. Press again to turn it off. Š This function button will not be available when the Bluetooth function is not supported. 3-14 - MSI CR61 | User Manual - Page 39
on the screen. To configure the touchpad, you can use the standard Microsoft or IBM PS/2 driver in your Windows operating system. The Mouse Properties in Control Panel allows you to change the configuration. „ Positioning place it on a proper location of the touchpad to continue the movement. 3-15 - MSI CR61 | User Manual - Page 40
Getting Started „ Point and Click When you have moved and placed the cursor over an icon, a menu item or a command that you want to execute, simply tap slightly on the touchpad or press the left button to select. This procedure, called as point and click is the basics of operating your notebook. - MSI CR61 | User Manual - Page 41
the notebook. Brief Usages to the Smart Pad For the further information on how to use the Smart Pad function specifically, please refer to the instructions of Smart Pad by double clicking the Smart Pad icon ( of the screen. ) on the lower right side Gestures Actions Functions Š Tapping the - MSI CR61 | User Manual - Page 42
Getting Started Gestures Actions Š Touch the touchpad with two fingers and remain the fingers on the touchpad. Š Move the two fingers on the touchpad vertically. Š Touch the touchpad with two fingers and remain both fingers on the touchpad. Š Move the two fingers on the touchpad horizontally. Š - MSI CR61 | User Manual - Page 43
and remain the fingers on the touchpad still. Š Move a finger to the right or to the left to select the expected window. Š All fingers leave from the touchpad and the selected window will be popped up. Functions Š Page Up Š Page Down Š Browse the directory of "Computer" Š Switching between all the - MSI CR61 | User Manual - Page 44
Getting Started Gestures Actions Š Touch the touchpad with two fingers and remain both fingers on the touchpad. Š Move a finger clockwise while another remains still to rotate a selected object clockwise. Refer to the first gesture. Š Move a finger counterclockwise while another remains still to - MSI CR61 | User Manual - Page 45
equipped with a 2.5-inch hard disk drive. The drive should be done by an authorized retailer or service representative. Using the Optical Storage Device Your notebook is video (HD) on a single-sided disk. Blu-ray supports the more advanced H.264 and VC-1 video encoding algorithms (codecs) as well as - MSI CR61 | User Manual - Page 46
Getting Started Inserting the Disk 1. Confirm that the notebook is turned on. 2. Touch the EJECT quick launch button nearby the keyboard and the disk tray will slide out partially. Note that the ODD EJECT button is functional under pure DOS system. However, in an Operating System - MSI CR61 | User Manual - Page 47
you to connect peripheral devices and communication devices. All functions and devices listed here are for reference only. Peripheral Devices The functions listed here are supported optionally, depending on the model users purchased. Contact the local dealer for detailed information. 3-23 - MSI CR61 | User Manual - Page 48
Getting Started Communication Devices 3-24 The functions listed here are supported optionally, depending on the model users purchased. Contact the local dealer for detailed information. - MSI CR61 | User Manual - Page 49
memory, hard disk drive, wireless LAN / Bluetooth module and battery pack preinstalled in the product users purchased may be upgradable or purchased. This notebook is equipped with a high-capacity Li-ion battery pack, and the battery pack is replaceable by users. This notebook is equipped with an - MSI CR61 | User Manual - Page 50
LAN module, and the module may be upgradable and replaceable by authorized dealer or service center. To learn more about upgrade limitation, please refer to the specification in the User's Manual provided. For any further information about the product users purchased, please contact the local
-
 1
1 -
 2
2 -
 3
3 -
 4
4 -
 5
5 -
 6
6 -
 7
7 -
8
-
9
-
10
-
11
-
12
-
13
-
14
-
15
-
16
-
17
-
18
-
19
-
20
-
21
-
22
-
23
-
24
-
25
-
26
-
27
-
28
-
29
-
30
-
31
-
32
-
33
-
34
-
35
-
36
-
37
-
38
-
39
-
40
-
41
-
42
-
43
-
44
-
45
-
46
-
47
-
48
-
49
-
50
 |
 |

Preface
1
Notebook
User’s Manual