MSI K9N2 SLI PLATINUM User Guide - Page 100
Remove a Spare, Migrate an Array, Migrating to an Array Larger Than 2 TB
 |
UPC - 816909045307
View all MSI K9N2 SLI PLATINUM manuals
Add to My Manuals
Save this manual to your list of manuals |
Page 100 highlights
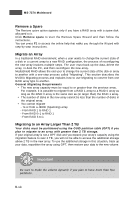
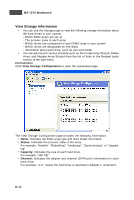
MS-7374 Mainboard Remove a Spare The Remove spare option appears only if you have a RAID array with a spare disk allocated to it. Click Remove spare to start the Remove Spare W izard and then follow the instructions. You can press F1 to access the online help that walks you through the W izard with step-by-step instructions. Migrate an Array In a traditional RAID environment, when a user wants to change the current state of a disk or a current array to a new RAID configuration, the process of reconfiguring the new array involves multiple steps. The user must back up the data, delete the array, re-boot the PC, and then reconfigure the new array. MediaShield RAID allows the end user to change the current state of the disk or array to another with a one-step process called "Migrating". This section describes the NVIDIA Migrating process and explains how to use Migrating to convert from one RAID array type to another. General Migrating Requirements • The new array capacity must be equal to or greater than the previous array. For example, it is possible to migrate from a RAID 1 array to a RAID 0 array as long as the RAID 0 array is the same size as (or larger than) the RAID 1 array. • The number of disks in the new array cannot be less than the number of disks in the original array. • You cannot migrate - To or from a JBOD (Spanning) array - From RAID 1 to RAID 1 - From RAID 0+1 to RAID 1 - From RAID 5 to 1 Migrating to an Array Larger Than 2 TB Your disks must be partitioned using the GUID partition table (GPT) if you plan to migrate to an array with greater than 2 TB storage. If your original array is not a GPT disk and you expand your array's capacity using the migration feature to over 2 TB, you will not be able to access the additional storage above 2 TB in the new array. To use the additional storage in this situation, back up your data, repartition the array using GPT, then restore your data to the new volume. Important Be sure to make the volume dynamic if you plan to have more than four p ar t it io ns . B-14
-
 1
1 -
2
-
3
-
4
-
5
-
6
-
7
-
8
-
9
-
10
-
11
-
12
-
13
-
14
-
15
-
16
-
17
-
18
-
19
-
20
-
21
-
22
-
23
-
24
-
25
-
26
-
27
-
28
-
29
-
30
-
31
-
32
-
33
-
34
-
35
-
36
-
37
-
38
-
39
-
40
-
41
-
42
-
43
-
44
-
45
-
46
-
47
-
48
-
49
-
50
-
51
-
52
-
53
-
54
-
55
-
56
-
57
-
58
-
59
-
60
-
61
-
62
-
63
-
64
-
65
-
66
-
67
-
68
-
69
-
70
-
71
-
72
-
73
-
74
-
75
-
76
-
77
-
78
-
79
-
80
-
81
-
82
-
83
-
84
-
85
-
86
-
87
-
88
-
89
-
90
-
91
-
92
-
93
-
94
-
 95
95 -
 96
96 -
 97
97 -
 98
98 -
 99
99 -
 100
100 -
 101
101 -
 102
102 -
 103
103 -
 104
104 -
 105
105 -
106
-
107
-
108
-
109
-
110
-
111
-
112
-
113
-
114
-
115
-
116
-
117
-
118
-
119
-
120
-
121
-
122
-
123
-
124
-
125
-
126
-
127
-
128
-
129
-
130
-
131
 |
 |