MSI K9N2 SLI PLATINUM User Guide - Page 89
RAID Configuration - drivers windows 7
 |
UPC - 816909045307
View all MSI K9N2 SLI PLATINUM manuals
Add to My Manuals
Save this manual to your list of manuals |
Page 89 highlights
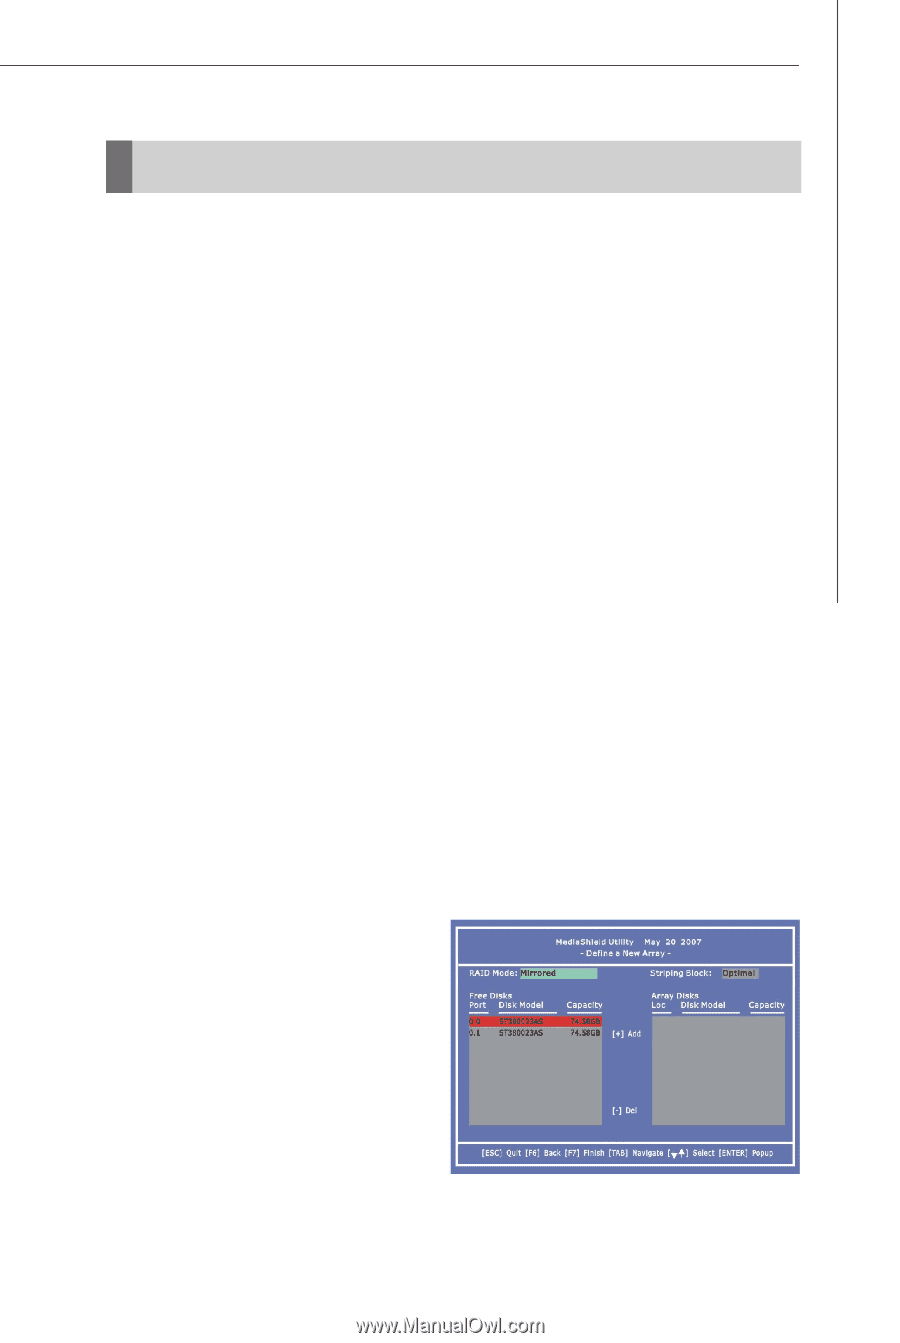
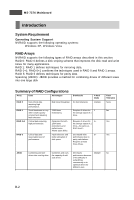
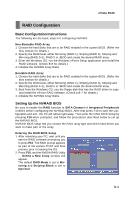
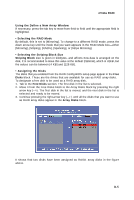
nVidia RAID RAID Configuration Basic Configuration Instructions The following are the basic steps for configuring NVRAID: Non-Bootable RAID Array 1. Choose the hard disks that are to be RAID enabled in the system BIOS. (Refer the bios section for details.) 2. Specify the RAID level, either Mirroring (RAID 1), Striping (RAID 0), Striping and Mirroring (RAID 0+1), RAID 5 or JBOD and create the desired RAID array. 3. Enter the W indows OS, run the W indows nForce Setup application and install the RAID software. (Check B-8 for details.) 4. Initialize the NVRAID Array Disks. Bootable RAID Array 1. Choose the hard disks that are to be RAID enabled in the system BIOS. (Refer the bios section for details.) 2. Specify the RAID level, either Mirroring (RAID 1), Striping (RAID 0), Striping and Mirroring (RAID 0+1), RAID 5 or JBOD and create the desired RAID array. 3. Boot from the W indows CD, use the floppy disk that has the RAID driver to copy and install the nForce RAID software. (Check p.B-7 for details.) 4. Initialize the NVRAID Array Disks. Setting Up the NVRAID BIOS Be sure to enable the RAID function in SATA Channel of Integrated Peripherals in BIOS before configuring the NVRAID BIOS. After that press F10 to save the configuration and exit. The PC will reboot right away. Then enter the RAID BIOS Setup by pressing F10 when prompted, and follow the procedures described below to set up the NVRAID BIOS. NVRAID BIOS setup lets you choose the RAID array type and which hard drives you want to make part of the array. Entering the RAID BIOS Setup 1. After rebooting your PC, wait until you see the RAID software prompting you to press F10. The RAID prompt appears as part of the system POST and boot process prior to loading the OS. 2. Press F10, and the NVIDIA RAID Utility --- Define a New Array window will appear. The default RAID Mode is set to Mirroring and Striping Block is set to Optimal. B-3
-
 1
1 -
2
-
3
-
4
-
5
-
6
-
7
-
8
-
9
-
10
-
11
-
12
-
13
-
14
-
15
-
16
-
17
-
18
-
19
-
20
-
21
-
22
-
23
-
24
-
25
-
26
-
27
-
28
-
29
-
30
-
31
-
32
-
33
-
34
-
35
-
36
-
37
-
38
-
39
-
40
-
41
-
42
-
43
-
44
-
45
-
46
-
47
-
48
-
49
-
50
-
51
-
52
-
53
-
54
-
55
-
56
-
57
-
58
-
59
-
60
-
61
-
62
-
63
-
64
-
65
-
66
-
67
-
68
-
69
-
70
-
71
-
72
-
73
-
74
-
75
-
76
-
77
-
78
-
79
-
80
-
81
-
82
-
83
-
 84
84 -
 85
85 -
 86
86 -
 87
87 -
 88
88 -
 89
89 -
 90
90 -
 91
91 -
 92
92 -
 93
93 -
 94
94 -
95
-
96
-
97
-
98
-
99
-
100
-
101
-
102
-
103
-
104
-
105
-
106
-
107
-
108
-
109
-
110
-
111
-
112
-
113
-
114
-
115
-
116
-
117
-
118
-
119
-
120
-
121
-
122
-
123
-
124
-
125
-
126
-
127
-
128
-
129
-
130
-
131
 |
 |