Magellan MobileMapper CE Getting Started Guide
Magellan MobileMapper CE - Hiking GPS Receiver Manual
 |
UPC - 763357115567
View all Magellan MobileMapper CE manuals
Add to My Manuals
Save this manual to your list of manuals |
Magellan MobileMapper CE manual content summary:
- Magellan MobileMapper CE | Getting Started Guide - Page 1
MobileMapper™CE NETWORK GENERATION Getting Started Guide - Magellan MobileMapper CE | Getting Started Guide - Page 2
by Magellan Navigation could void the user's authority to operate this equipment. CAUTION: To comply with FCC RF exposure compliance requirements, a separation distance of at least 20 cm must be maintained between the antenna of this device and all persons. In the presence of RF field, the receiver - Magellan MobileMapper CE | Getting Started Guide - Page 3
USER GUIDE CAREFULLY BEFORE USING THE PRODUCT. 1. MAGELLAN NAVIGATION WARRANTY Magellan Navigation warrants their GPS receivers longer. Magellan Navigation warrants that software products or software included Magellan Navigation reserves the right to refuse to provide service tear; (2) batteries; (3) - Magellan MobileMapper CE | Getting Started Guide - Page 4
which could require modifications to the receiver. Examples of such conditions include but are not limited to changes in the GPS or GLONASS transmission.). Opening, dismantling or repairing of this product by anyone other than an authorized Magellan Navigation Service Center will void this warranty - Magellan MobileMapper CE | Getting Started Guide - Page 5
Introduction 1 Key Features 1 Software Provided as Standard 2 About Windows CE .NET 2 Receiver Description 3 Front Panel 3 Back Panel 3 Side Panel 4 I/O Module 4 Resetting MobileMapper CE 4 Preparing for First-Time Use 5 Charging the battery 5 Turning the Receiver On 6 Calibrating the - Magellan MobileMapper CE | Getting Started Guide - Page 6
Using the File Transfer Service 55 Creating Shortcuts for Remote Services 57 Optimizing Accuracy 58 General Guidelines 58 Recording Data for Post-Processing 59 Appendices 61 Updating MobileMapper CE OS Firmware 61 Updating MobileMapper CE GPS Firmware 62 About Almanac Files 64 Choosing the - Magellan MobileMapper CE | Getting Started Guide - Page 7
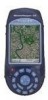
English Introduction Thank you for purchasing a MobileMapper CE from Magellan. This Getting Started guide will give you useful information about your Windows CE GPS handheld computer. It will also guide you in your first steps using the system. MobileMapper CE is a handheld device that integrates - Magellan MobileMapper CE | Getting Started Guide - Page 8
been approved. Please contact Magellan to discuss your software development project. About Windows CE .NET Windows CE is a version of the Windows operating system designed for small devices such as personal digital assistants (PDAs) or handheld PCs. The Windows CE graphical user interface (GUI) is - Magellan MobileMapper CE | Getting Started Guide - Page 9
: • Full color transflec- tive liquid crystal display (LCD) • ¼ VGA GPS Receiver includes: • Integrated GPS accurate to sub-meter with SBAS • Ready for RTCM real-time corrections Power button Power indicator Battery indicator Microphone Scrolling button Alphanumeric keypad Back Panel Power - Magellan MobileMapper CE | Getting Started Guide - Page 10
connector Resetting MobileMapper CE To reset MobileMapper CE, hold down the ESC, Enter and Power keys simultaneously until the screen goes blank. The MobileMapper CE switches off. You can then power on the device by pressing the power button. To reset only the GPS receiver, (see GPS Reset on page - Magellan MobileMapper CE | Getting Started Guide - Page 11
for First-Time Use Charging the battery Before using your MobileMapper CE handheld PC, you must first charge the battery: 1. Locate the removable battery. 2. Open the battery door. 3. Insert the battery into the battery compartment in the back of the MobileMapper CE handheld as shown below: 4. Close - Magellan MobileMapper CE | Getting Started Guide - Page 12
) and then let it charge the battery for up to six hours. Connect cable from AC adapter to this input 7. To detach the clip-on I/O module, press the release button on the module. Turning the Receiver On Once you have charged the battery in your MobileMapper CE, press the red power button to turn - Magellan MobileMapper CE | Getting Started Guide - Page 13
Time Update MobileMapper CE will automatically update the system date & time using the GPS time determined by the integrated GPS receiver and the zone field (see opposite) and then select OK on top of the screen. Please note that you should wait for a while, after turning on MobileMapper CE, before - Magellan MobileMapper CE | Getting Started Guide - Page 14
MobileMapper CE Companion CD, copy the appro- priate language install files (.CAB) to your MobileMapper CE device. Use either an SD Card or download then Settings>Control panel>Regional Settings. - Select your preferred locale and user interface language as shown on the screen below (left). - Once - Magellan MobileMapper CE | Getting Started Guide - Page 15
the USB data cable. This allows you to install software and transfer files to/ from MobileMapper CE. To connect to a PC: 1. Install ActiveSync on the desktop computer. (Microsoft ActiveSync is included on the MobileMapper CE Companion CD. You may also download it from the Microsoft web site at www - Magellan MobileMapper CE | Getting Started Guide - Page 16
English Working in Windows CE .NET Environment User Interface For Text Input MobileMapper CE comes with an integrated physical keypad and like most Windows CE devices, you may also use an onscreen keyboard enters an "a," twice enters a "b," three times enters a "c" and four times enters a "2." 10 - Magellan MobileMapper CE | Getting Started Guide - Page 17
and Hold" action is slightly different: you must remove the stylus to let the menu pop up. When you operate the touch screen of the MobileMapper CE, use the supplied stylus. If the tip of the stylus is damaged, do not use it. If you operate the touch screen with a damaged stylus - Magellan MobileMapper CE | Getting Started Guide - Page 18
were using it. - GPS receiver has been reset. - Or the receiver has not been used for more than a few months. Take the MobileMapper CE to a location where there fields underneath, enter the date and time (bottom of the screen) and then tap OK to start the initialization process. This closes the GPS - Magellan MobileMapper CE | Getting Started Guide - Page 19
availability and accuracy of the position computed by the unit. Select the tab, then Programs>GPS Utilities>GPS Settings to run the GPS Settings utility the DOP type on which to set an upper limit (see next field). The position of GPS satellites in orbit determine the DOP values for a given site. - Magellan MobileMapper CE | Getting Started Guide - Page 20
accuracy degradation. - Elevation Mask: Angle that specifies that any satellite must be at least a specified number of degrees above the horizon before the signals from the satellite are to be used. Ensure that the elevation mask set in your receiver , Autonomous GPS or Differential GPS). - The - Magellan MobileMapper CE | Getting Started Guide - Page 21
the following parameters relevant to the MobileMapper CE unit: - Speed - Altitude - Heading - Vertical speed. Statistics Window (Stats) This window provides the averaged coordinates of the computed position and shows the accuracy figures corresponding to the GPS receiver used in static mode. The - Magellan MobileMapper CE | Getting Started Guide - Page 22
Stats>Enable Stats>Reset Stats>Setup Avg Thresholds About GPS Status... Function software version of the GPS Status utility. Connecting the Internal GPS Receiver to your Application As explained in GPS Ports Configuration on page 44, the COM2 port in MobileMapper CE is a virtual COM port named "GPS - Magellan MobileMapper CE | Getting Started Guide - Page 23
Introduction You will use a cell phone associated with MobileMapper CE to operate in NTRIP or Direct IP mode via Parameter Modem command, GPRS call number User Name Password Domain Definition Both parameters are 99***10# *99# *99***1# Modem Command (for "Orange" operator only) +cgdcont=10,"IP"," - Magellan MobileMapper CE | Getting Started Guide - Page 24
the Modem command (1st and 2nd tables above) are redundant data. We recommend that you type in the modem command and let MobileMapper CE automatically fill in the Domain field once you have entered the modem command line (see Step 6: Establish the GPRS Connection on page 24). When first implementing - Magellan MobileMapper CE | Getting Started Guide - Page 25
Re-boot Bluetooth Manager on On MobileMapper CE, exit from Bluetooth MobileMapper CE Manager and then re-launch this program. Establish a Bluetooth link 4 between MobileMapper CE and the cell phone On MobileMapper CE: - List the cell phone's local services - Establish a Bluetooth link - Create - Magellan MobileMapper CE | Getting Started Guide - Page 26
to do this. 3. Make its local Bluetooth device discoverable from external Bluetooth devices such as MobileMapper CE. Again, refer to the instructions manual of your cell phone to do this. 4. On MobileMapper CE, tap to search for the Blue- tooth-enabled devices present in the vicinity, including - Magellan MobileMapper CE | Getting Started Guide - Page 27
the cell phone (see below). Enter a Pin Code 1. Tap inside the Pin field and type in any number. A two- to four-figure number is recommended. ( then be asked to enter the pin number you have previously defined in MobileMapper CE (see Step 1). When the units have successfully been paired, a yellow circle - Magellan MobileMapper CE | Getting Started Guide - Page 28
after a few seconds. NOTE: Keep the cell phone on during this step. Step 4: Establish a Bluetooth Link Between MobileMapper CE and the Cell Phone List the Cell Phone's Local Services 1. Tap . The cell phone icon appears instantly and you can see a yellow circle included indicative of an active pair - Magellan MobileMapper CE | Getting Started Guide - Page 29
NOTE: COM1 is the only physical COM port on MobileMapper CE. COM2 is an internal virtual port and COM3 is shortcut will allow you to save time for future connections as you won't have to list the local services of the cell phone to re-activate the Bluetooth link. Instead you will just have to double- - Magellan MobileMapper CE | Getting Started Guide - Page 30
a modem field, select the port used on MobileMapper CE (i.e. the 10. Tap Finish. A new icon appears in the Connection window (see example opposite). Step 6: Establish the GPRS Connection 1. Double-tap the icon you have just created in the connection window. 2. Enter the following parameters: • User - Magellan MobileMapper CE | Getting Started Guide - Page 31
"User Authenticated" and "Connected". The GPRS connection is now established. 8. Tap Hide to close the message window. 9. Tap to close the Connection window. 10.Now it's time to select your DGPS mode (refer to Select- ing a DGPS Mode on page 28). Troubleshooting You may encounter problems when - Magellan MobileMapper CE | Getting Started Guide - Page 32
MobileMapper CE and make the cell phone discoverable. 1. On MobileMapper CE, tap >Settings>Control Panel and double-tap connection between the cell phone and MobileMapper CE. Tap OK to close the message successively: "Opening Port", "Dialing...",... "User Authenticated" and "Connected". The GPRS - Magellan MobileMapper CE | Getting Started Guide - Page 33
English Disconnecting GPRS You may want to disconnect the GPRS connection. Follow the instructions below to do this from the MobileMapper CE: 1. In the task bar, tap >Settings>Network and Dial-up Con- nections. 2. Tap on the icon representing the currently active GPRS connection. 3. Do one of - Magellan MobileMapper CE | Getting Started Guide - Page 34
SBAS satellites (SBAS) are received by MobileMapper CE itself through one of its GPS reception channels. This is the most straightforward technique to implement DGPS in MobileMapper CE. 2. Beacon: Differential corrections are received by the beltcarried Magellan MobileMapper beacon. This unit is - Magellan MobileMapper CE | Getting Started Guide - Page 35
differential corrections received over xx sec! Correction age limit = xx sec". This will happen after a time tied to the value you will have assigned to the Real Time Correction Age Limit parameter. When this warning message appears, MobileMapper CE will automatically switch to Autonomous GPS mode - Magellan MobileMapper CE | Getting Started Guide - Page 36
of its reception channels to SBAS satellites, whenever visible and received, and only the best one will be involved in the DGPS processing. - Start your application. Beacon Two different connections to MobileMapper CE are possible with MobileMapper Beacon: via Bluetooth (preferred) or using a wire - Magellan MobileMapper CE | Getting Started Guide - Page 37
Beacon icon. The screen lists the only service available from MobileMapper Beacon which is its Serial Port service. - Double-tap the Serial Port service icon. A dialog box opens prompting you to associate MobileMapper CE's COM4 with MobileMapper Beacon. - Just tap OK. A message box appears - Magellan MobileMapper CE | Getting Started Guide - Page 38
method: you have to specify the frequency to which you want the receiver to tune). • Tune By Site (manual method: you have to specify the region, country and name of the DGPS source, i.e. the reference station, you want MobileMapper Beacon to receive) (see screen example opposite). - Tap OK. 32 - Magellan MobileMapper CE | Getting Started Guide - Page 39
close the DGPS Configuration window. The following two messages are displayed successively: "Please wait..." and "Processing incoming data packets...". - Tap OK to close the message window. - Run GPS Status (see Viewing Current GPS Status on page 14) and check that MobileMapper CE is now operating - Magellan MobileMapper CE | Getting Started Guide - Page 40
following to implement the Direct IP DGPS mode: - Tap on , then Programs>GPS Utilities>DGPS Configuration. - Tap on the holds the key information allowing MobileMapper CE to connect to a given Direct IP Configuration field. Two new buttons (Edit and Delete) are shown under this field allowing you to - Magellan MobileMapper CE | Getting Started Guide - Page 41
the desired configuration from the Direct IP Configuration field, set the Real-Time Correction Age Limit Processing incoming data packets...". - Tap OK to close the message window. - Run GPS Status (see Viewing Current GPS Status on page 14) and check that MobileMapper CE is now operating in DGPS - Magellan MobileMapper CE | Getting Started Guide - Page 42
several NTRIP configurations in MobileMapper CE will therefore allow you to quickly change the NTRIP caster without having to reenter the relevant connection parameters each time you do that. - To enter your first NTRIP configuration, with New selected in the NTRIP Configuration field, tap on the - Magellan MobileMapper CE | Getting Started Guide - Page 43
of the second configuration and tap OK to save this new configuration. - After selecting the desired configuration from the NTRIP Configuration field, tap OK. MobileMapper CE connects to the NTRIP caster. The NTRIP Settings window is displayed again on which you can choose a network and station - Magellan MobileMapper CE | Getting Started Guide - Page 44
field. • Cancel to return to the NTRIP Settings screen without changing the choice made in the Station field Processing incoming data packets...". - Tap OK to close the message window. - Run GPS Status (see Viewing Current GPS Status on page 14) and check that MobileMapper CE is now operating in DGPS - Magellan MobileMapper CE | Getting Started Guide - Page 45
device providing RTCM corrections data. If you want to use COM1 on MobileMapper CE to communicate with the external device, connect the adequate serial cable between the two units. - Tap on , then Programs>GPS Utilities>DGPS Configuration - Tap on the Select Mode button - In the Select Differential - Magellan MobileMapper CE | Getting Started Guide - Page 46
are displayed successively: "Please wait..." and "Processing incoming data packets...". - Tap OK to close the message window. - Run GPS Status (see Viewing Current GPS Status on page 14) and check that MobileMapper CE is now operating in DGPS mode. - Start your application. Returning to Autonomous - Magellan MobileMapper CE | Getting Started Guide - Page 47
idle. The MobileMapper CE system has three power saving modes when the battery power is used: 1. User Idle mode: processes are still running. The power LED is on. Press any key or tap on the screen to switch on the display again. 3. Full Shut Down Mode: The system is shut down. The MobileMapper CE - Magellan MobileMapper CE | Getting Started Guide - Page 48
On Charge LED (Amber) Off Solid Amber Blinking Amber Indicates: Not charging Battery is fully charged Battery is charging The charge LED will give charging information only if the receiver is on. Memory Management The MobileMapper CE has three types of memory: - The Nand Flash memory ("MyDevice - Magellan MobileMapper CE | Getting Started Guide - Page 49
you to configure and monitor MobileMapper CE's internal GPS receiver. This chapter describes the full set of GPS Utilities, which includes the following items: - DGPS Configuration - GPS Initialization - GPS Ports Configuration - GPS Reset - GPS Settings - GPS Status - Mission Planning Note that - Magellan MobileMapper CE | Getting Started Guide - Page 50
Configuration utility, you can ask MobileMapper CE to output data messages to another device through the GPS auxiliary output port or to the application running on MobileMapper CE through the GPS VSP output port (VSP=Virtual Serial Port; this port is also known as COM2). Using this utility, you - Magellan MobileMapper CE | Getting Started Guide - Page 51
to run this utility if for example you want to force the GPS receiver to acquire new almanac data from the GPS constellation and then use this data in the position computation process. - Tap on , then Programs>GPS Utilities>GPS Reset. A warn- ing message appears explaining that you are about to run - Magellan MobileMapper CE | Getting Started Guide - Page 52
on page 12). Until a new almanac file is received from the GPS constellation, MobileMapper CE uses a non-erasable almanac file stored in its memory to start the satellite acquisition process. GPS Settings See Setting Up GPS on page 13. GPS Status See Viewing Current GPS Status on page 14. Mission - Magellan MobileMapper CE | Getting Started Guide - Page 53
the location on Earth for which Mission Planning will determine the GPS constellation. - You can key in the exact coordinates of your updates the coordinates in the Latitude and Longitude fields. - Then tap OK to validate these coordinates. This software version of the Mission Planning utility. 47 - Magellan MobileMapper CE | Getting Started Guide - Page 54
Two Utilities Use the icon located at the far right in the task bar to switch from a running application to another. For example if DGPS Configuration and GPS Status are both running in the background while using Mission Planning, the menu opposite will pop up when you tap this button. Just tap - Magellan MobileMapper CE | Getting Started Guide - Page 55
IP DGPS mode, the cell phone used is the host device and MobileMapper CE is the inquiring device. The local service used in the cell phone is the Dial-Up Networking service. • When you output GPS data via the auxiliary port, MobileMapper CE is the host device and the external device receiving the - Magellan MobileMapper CE | Getting Started Guide - Page 56
English Bluetooth Range The maximum range in class 2 devices is 10 meters (30 feet) typically. A minimum distance of about 60 cm Bluetooth-Enabled Devices Use the following two buttons to let MobileMapper CE's local Bluetooth controller detect the Bluetooth-Enabled devices present nearby: 50 - Magellan MobileMapper CE | Getting Started Guide - Page 57
PIN code. This code should be entered in any remote device that attempts to pair itself with MobileMapper CE. - To change the PIN code, enter the desired code in the Default PIN field. - To make the device discoverable (or detectable), enable the Let other devices discover check box. Otherwise - Magellan MobileMapper CE | Getting Started Guide - Page 58
an auxiliary output (see GPS Ports Configuration on page 44). • File Transfer Service. This service allows any two Bluetooth-enabled devices to exchange files. • Object Push Service. This service is required to run the File Transfer Service but is not usable as such in MobileMapper CE. To list the - Magellan MobileMapper CE | Getting Started Guide - Page 59
a computer screen, follow the procedure below, based on the use of MobileMapper CE's Serial Port Service: - On MobileMapper CE, make sure: • The Serial Port Service is activated and a COM port is assigned to it (COM3 for example). • NMEA messages are enabled (see GPS Port Configuration, page 45). 53 - Magellan MobileMapper CE | Getting Started Guide - Page 60
(see GPS Port Configuration, page 44). - On the computer: • Run Bluetooth. • Detect MobileMapper CE. • If required, pair the two devices (you'll need to enter the PIN code defined in the MobileMapper CE Bluetooth properties; see page 51). • List the local services offered by MobileMapper CE • Use - Magellan MobileMapper CE | Getting Started Guide - Page 61
MobileMapper CE Bluetooth properties; see page 51). • List the local services offered by the remote (host) MobileMapper CE. • Double-tap the remote File Transfer Service want to download and then select Get file. This starts the file transfer. Once the transfer is complete, the downloaded file can - Magellan MobileMapper CE | Getting Started Guide - Page 62
remote device has been found, you can create a shortcut for this service. This means you will no longer have to ask MobileMapper CE to find this service to be able to use it. - To create a shortcut, tap and hold the service icon and then select Shortcut in the popup menu. This instantly creates - Magellan MobileMapper CE | Getting Started Guide - Page 63
the feature. 3. Average all point features for at least 30 seconds. 4. Make sure you are using the latest firmware (both the Operating System firmware and GPS firmware) for the MobileMapper CE receiver and the latest version of MobileMapper Office). 5. Adjust the SNR, PDOP and Elevation masks on the - Magellan MobileMapper CE | Getting Started Guide - Page 64
English Recording Data for Post-Processing There is one additional rule for optimizing MobileMapper CE accuracy when recording rover data that will be differentially corrected by MobileMapper Office in post-processed mode: All features must be logged while the receiver is continuously tracking at - Magellan MobileMapper CE | Getting Started Guide - Page 65
. When recording a job for post-processing, the receiver records GPS measurements the entire time the job GPS raw measurements before you log data into the first shapefile and stop logging raw measurements after you close the last shapefile. For a further discussion of MobileMapper CE accuracy - Magellan MobileMapper CE | Getting Started Guide - Page 66
version of MobileMapper CE Operating System (OS) firmware can be downloaded from ftp.magellangps.com in the /Mobile Mapping/MM CE/Firmware/OS Firmware/ folder. 1. Turn on MobileMapper CE and either attach it to external power or make sure that there is at least a 25% charge in the battery (tap Start - Magellan MobileMapper CE | Getting Started Guide - Page 67
the receiver back on. 12.You may verify that the new OS firmware has been successfully uploaded by tapping: >Settings>Control Panel 13.Scroll down to the Thales System Info icon. Double-tap on this icon. Confirm that the OS F/W Version is that which you just uploaded. Updating MobileMapper CE GPS - Magellan MobileMapper CE | Getting Started Guide - Page 68
>Settings>Control Panel and scroll down to the Thales System Info icon. 14.Double-tap the Thales System Info icon and confirm that the GPS F/W version is that which you just uploaded. 15.To update another MobileMapper CE receiver with the latest GPS firmware, remove the SD card and insert it into - Magellan MobileMapper CE | Getting Started Guide - Page 69
Files When first using your MobileMapper CE, and because there is no recent almanac file available yet in the unit, the internal GPS receiver (or Mission Planning if used at that time) will use a default almanac file stored in its protected memory. After receiving GPS satellites for about 12 to - Magellan MobileMapper CE | Getting Started Guide - Page 70
you the ability to analyze the key reception parameters of the MobileMapper Beacon. You can do this anytime, when setting the DGPS beacon mode, or later while using the beacon provided you first ask MobileMapper CE to stop processing the incoming correction data packets. This is done by tapping the - Magellan MobileMapper CE | Getting Started Guide - Page 71
be, depending on the value of the SNR. SNR DGPS Data Reception Quality SNR - Magellan MobileMapper CE | Getting Started Guide - Page 72
9 61 Almanac data 63 Authentication 52 Automatic tuning 32 Autonomous GPS 14 Azmth/Elvn 15 B Backlight 7 , Battery door 3 5 , , Beacon 28 30 31 , , , Bluetooth Manager 20 22 49 65 C Calibrating the screen 7 Carrier 25 CD 9 Charging 5 Cold Reset 45 , COM2 16 44 Custom 13 D DC Power Input 4 , , , DGPS - Magellan MobileMapper CE | Getting Started Guide - Page 73
Reset Serial Port Service 52 53 10 Thales System Info 61 Thresholds 16 Tree Canopy 13 Tune by site 32 U Update GPS firmware 61 Update OS firmware 60 Upload files 56 Urban Canyon 13 , USB 9 61 USB flash drive 4 USB host port 4 User Idle mode 41 User Name 17 V VRS 37 VSP 44 VTG 45 W Windows CE .NET 10 - Magellan MobileMapper CE | Getting Started Guide - Page 74
MobileMapper™ CE Getting Started Guide Magellan Mobile Mapping Solutions Contact Information: In USA @magellangps.com In Singapore +65 6235 3678 I Fax +65 6235 4869 In China +86 10 6566 9866 I Fax +86 10 6566 0246 Email [email protected] In France +33 2 28 09 38 00 I Fax
-
 1
1 -
 2
2 -
 3
3 -
 4
4 -
 5
5 -
 6
6 -
 7
7 -
8
-
9
-
10
-
11
-
12
-
13
-
14
-
15
-
16
-
17
-
18
-
19
-
20
-
21
-
22
-
23
-
24
-
25
-
26
-
27
-
28
-
29
-
30
-
31
-
32
-
33
-
34
-
35
-
36
-
37
-
38
-
39
-
40
-
41
-
42
-
43
-
44
-
45
-
46
-
47
-
48
-
49
-
50
-
51
-
52
-
53
-
54
-
55
-
56
-
57
-
58
-
59
-
60
-
61
-
62
-
63
-
64
-
65
-
66
-
67
-
68
-
69
-
70
-
71
-
72
-
73
-
74
 |
 |

MobileMapper
™
CE
NETWORK GENERATION
Getting Started Guide