Magellan Triton 300 Triton User Manual Addendum - English, French, Spanish - Page 1
Magellan Triton 300 - Hiking GPS Receiver Manual
 |
UPC - 763357118223
View all Magellan Triton 300 manuals
Add to My Manuals
Save this manual to your list of manuals |
Page 1 highlights
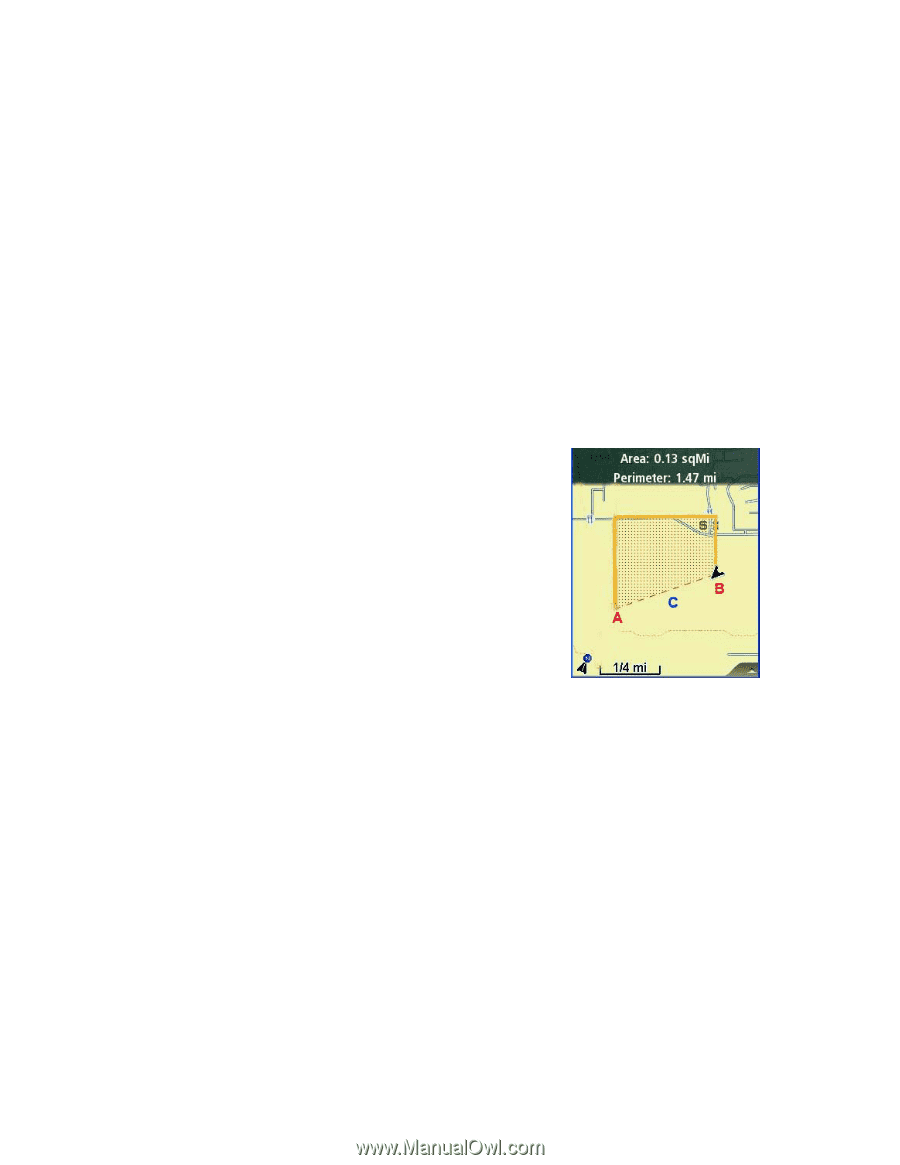
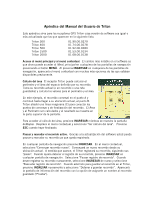
Triton User Manual Addendum This addendum applies to Triton GPS receivers that have a software version that is equal to or higher then the ones listed. Triton 300 Triton 400 Triton 500 Triton 1500 Triton 2000 01.90.00.0279 01.74.00.0278 01.92.00.0283 01.53.00.0134 01.68.00.0138 The Main Menu and Contextual Menu Access. The most noticeable change in the software is that you can now access the Main Menu on any of the Navigational screens by pressing the MENU button. Pressing ENTER on any of the Navigational screens brings up the contextual menu with many more options then were previously available. Area Calculation. The Triton receiver can calculate the perimeter and area of the space defined by your track. It takes your current track (or a saved track or route) and computes the values for the perimeter and area. In this example, the track was started at point A and continued around to it's current location, point B. The Triton has added an imaginary line ( C ) to connect the start and end points of the track. The Area and Perimeter are then computed and displayed at the top of the screen. To access area calculation, press ENTER while viewing the Map screen. Scroll down the contextual menu and select "View Area Calculation". Press ESC when you are done. Pause and Resume Active Track. With this software update you can pause and then resume recording your track. From any navigational screen press ENTER. On the contextual menu, select "Start New Track". This will initiate a new track beginning at your current location. As you move, the Triton will record your track, following your "footsteps". When you want to pause the recording of your track, press ENTER from any navigational screen. Select "Pause Track Record". When you want to begin recording your track again, select ENTER again and select "Resume Track Record". When you are ready to save the track to the Triton, press ENTER again and select "Stop & Save Track". The track Info screen is displayed with the option of assigning a name to the saved track ("Trail"). User Grid. (Advanced Users) You can set a user grid as the Coordinate System for your Triton. When selecting User Grid, you will be presented with options to define the parameters of the User Grid.
-
 1
1 -
 2
2 -
 3
3 -
 4
4 -
 5
5 -
 6
6 -
 7
7 -
8
 |
 |