Magnavox DP100MW8 Owners Manual
Magnavox DP100MW8 Manual
 |
UPC - 053818570470
View all Magnavox DP100MW8 manuals
Add to My Manuals
Save this manual to your list of manuals |
Magnavox DP100MW8 manual content summary:
- Magnavox DP100MW8 | Owners Manual - Page 1
Owner's Manual Español INFORMATION DVD FUNCTIONS SETUP PRECAUTIONS Please read before using this unit. DVD/CD Player DP100MW8 Supplied Accessories remote control (NB079UD) batteries (AA x2) STANDBY-ON DISPLAY OPEN/CLOSE SEARCH MODE AUDIO SUBTITLE ANGLE REPEAT 1 4 7 CLEAR A-B PAUSE 2 3 5 - Magnavox DP100MW8 | Owners Manual - Page 2
COVER (OR BACK). NO USER SERVICEABLE PARTS INSIDE. REFER SERVICING TO QUALIFIED SERVICE PERSONNEL. The caution marking is located modifications are expressly approved in the manual. The user could lose the authority and used in accordance with the instructions, may cause harmful interference to radio - Magnavox DP100MW8 | Owners Manual - Page 3
a bookcase or rack unless proper ventilation is provided or the manufacturer's instructions have been adhered to. 11) Power Sources - This product should be for service. 20) Replacement Parts - When replacement parts are required, be sure the service technician has used replacement parts specified - Magnavox DP100MW8 | Owners Manual - Page 4
picture problems with 525 progressive scan output, it is recommended that the user switch the connection to the 'standard definition' output. If there are questions regarding your TV set compatibility with this 525p DVD player, please contact our customer service center. Symbols Used in this Manual - Magnavox DP100MW8 | Owners Manual - Page 5
the unit may not read it correctly. Unplayable Discs NEVER play back the following discs as malfunction may result! DVD-RAM / DVD-audio / CD-i / photo CD / video CD / DVD with region codes other than 1 or ALL / DTS-CD / DVD-ROM for personal computers / CD-ROM for personal computers On the following - Magnavox DP100MW8 | Owners Manual - Page 6
on the front panel lights up. Refer to pages 14-15 for more details. • When "PROGRESSIVE" is "ON", video signals from the unit's VIDEO OUT and S-VIDEO OUT jacks will be distorted or not be output at all. If your TV is not compatible with progressive scanning; Use this unit in interlace mode and set - Magnavox DP100MW8 | Owners Manual - Page 7
deck etc.) without Dolby Digital decoder. PCM * To complete these settings, refer to pages 14-15. Note: • The audio source on a disc in a Dolby Digital multi-channel surround format cannot be recorded as digital sound by an MD or DAT deck. • By hooking this unit up to a Dolby Digital decoder, you - Magnavox DP100MW8 | Owners Manual - Page 8
chapters or titles. • To skip tracks. (CD) • To skip folders or files. (MP3) • To turn the unit on/off. • To turn the unit on/off. STOP SUBTITLE TOP MENU ZOOM • To stop playback. • To select subtitles on a disc. • To call up the top menu on a disc. • To magnify part of a picture. (x2 / x3 / x4 - Magnavox DP100MW8 | Owners Manual - Page 9
up when power is on. P-SCAN OPEN/ CLOSE PLAY STOP IR 2 2341 Note: • When you play back a CD-RW/-R with MP3 files, details on page 10. • A " " may appear at the top-right on the TV screen when the operation is prohibited by the disc or this unit. • Some DVD may start playback from title - Magnavox DP100MW8 | Owners Manual - Page 10
audio CD, track search is not available for programmed or random playback. Note: • Depending on the disc being played back, this function can also be performed by directly entering the desired chapter number with [the Number buttons]. Refer to the manual accompanying the disc. • For DVD, title - Magnavox DP100MW8 | Owners Manual - Page 11
Display You can check the information about the current disc by pressing [DISPLAY] on the remote control. 1 03/24 001/002 00:00:40 00:14 - 01:11:28 NORMAL disc current play mode setting DISPLAY elapsed time of entire disc DVD FUNCTIONS 4 4 Note: • Some DVD will not allow you to set chapter - Magnavox DP100MW8 | Owners Manual - Page 12
when moving to another title, chapter, track/file or folder. • This function is not available with some discs or during repeat A-B playback. • During playback, press [MODE]. CD/MP3:twice DVD: three times 2 Select "RANDOM". Then press [ENTER]. ENTER ENTER Random playback will start. Note: • During - Magnavox DP100MW8 | Owners Manual - Page 13
discs will only allow you to change the subtitle from the disc menu. Refer to the manual accompanying the discs for details. Audio Language Some DVD MODE Press twice. (once for CD and MP3) 2 Using [s DVD player is connected to a TV or stereo using the red and white AUDIO OUT jacks on the DVD player - Magnavox DP100MW8 | Owners Manual - Page 14
DISC MENU PLAYER MENU DVD FUNCTIONS LANGUAGE menu DISPLAY menu AUDIO menu LANGUAGE_AUDIO AUDIO SUBTITLE DISC MENU PLAYER MENU ORIGINAL ENGLISH FRENCH SPANISH GERMAN ITALIAN SWEDISH OTHERS DISPLAY_TV ASPECT TV ASPECT STILL MODE PROGRESSIVE 4:3 LETTER BOX 4:3 PAN & SCAN supported by the disc - Magnavox DP100MW8 | Owners Manual - Page 15
PROGRESSIVE" will switch to "OFF" and it will exit the "SETUP" menu. Before proceeding... 1. Make sure your TV has progressive scan. 2. Connect with component video only on the discs which are recorded in the Dolby Digital format. DOWN SAMPLING: • When playing back disc with copyright protection, - Magnavox DP100MW8 | Owners Manual - Page 16
Setting Parental control limits the disc viewing that exceed your settings. (An incorrect password will not be acceptable.) This feature prevents your children from viewing inappropriate materials. Parental Levels Parental level allows you to set the rating levels of your DVD. Playback will stop if - Magnavox DP100MW8 | Owners Manual - Page 17
, press [SETUP] to exit the menu at step 2. INFORMATION INFORMATION Troubleshooting Guide If the unit does not perform properly when operated as instructed in this owner's manual, refer to the following. Problem No power No sound or picture Distorted picture Completely distorted picture or black - Magnavox DP100MW8 | Owners Manual - Page 18
Specifications Output signal format : NTSC color free of charge in the USA in the event of defect in materials or workmanship as follows: DURATION: PARTS: FUNAI CORP. will provide parts to replace defective parts obtain service under this REMOTE CONTROL), ANY COSMETIC PARTS, COMPLETE ASSEMBLY PARTS - Magnavox DP100MW8 | Owners Manual - Page 19
en el manual de manejo. 2 Instalación de las pilas en el control remoto 1 2 3 3 Para cambiar el idioma en la pantalla 1 Confirme que ha seleccionado "LANGUAGE". STANDBY-ON STOP SETUP LANGUAGE AUDIO SUBTITLE DISC MENU PLAYER MENU ENTER 2 Seleccione "PLAYER MENU". ENTER LANGUAGE_PLAYER - Magnavox DP100MW8 | Owners Manual - Page 20
front page of the owner's manual. 2 Installing the Batteries for the Remote Control 1 2 3 3 To Change the On-Screen Language 1 Confirm that "LANGUAGE" is selected. STANDBY-ON SETUP STOP LANGUAGE AUDIO SUBTITLE DISC MENU PLAYER MENU ENTER 2 Select "PLAYER MENU". ENTER LANGUAGE_PLAYER
-
 1
1 -
 2
2 -
 3
3 -
 4
4 -
 5
5 -
 6
6 -
 7
7 -
8
-
9
-
10
-
11
-
12
-
13
-
14
-
15
-
16
-
17
-
18
-
19
-
20
 |
 |

PRECAUTIONS
SETUP
DVD FUNCTIONS
INFORMATION
Español
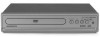
DVD/CD Player
DP100MW8
Supplied Accessories
Owner’s Manual
Please read before using this unit.
If you need additional operating assistance
after reading this owner’s manual, please call
TOLL FREE : 1-800-605-8610
or visit our web site at
INSTRUCCIONES EN ESPAÑOL INCLUIDAS.
remote control
(NB079UD)
batteries (AA x2)
RCA audio/video
cables
(WPZ0102TM018/
WPZ0102LTE01)
owner’s manual
(1VMN23462)
1
2
3
4
5
6
7
8
9
0
+10
PLAY
STOP
Owner's Manual
Contents
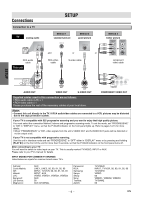
If your TV has antenna in jack only
, it is still possible
to connect this unit to your TV by using an RF
modulator. In this case, follow the instructions below.
1)
Disconnect the power cords of the devices from
the AC outlet.
2)
Make the connection as illustrated below.
3)
Set your RF modulator’s channel 3/4 switch to
either 3 or 4
, whichever the TV channel is least
used in your area. If your RF modulator has a
modulator/antenna switch, set it according to the
manual supplied with the RF modulator.
4)
Plug in the power cords of the devices to the AC outlet.
5)
Turn on your TV and choose the same channel
as you set the RF modulator’s channel 3/4
switch to.
For more details, follow the manual
supplied with the RF modulator.
rear of TV
rear of your RF
modulator
AUDIO IN
TO TV
ANT. IN
L
R
CHANNEL
4
3
VIDEO IN
ANT. IN
Set channel 3 or 4
rear of this unit
RF coaxial cable
RF coaxial
cable
VHF / UHF
antenna
cable TV
company
or
RCA video cable
RCA audio cable
L
R
VIDEO
OUT
AUDIO
OUT
S-VIDEO
OUT
C
R
/P
R
C
B
/P
B
VIDEO
OUT
Y
L
R
AUDIO
OUT
DIGITAL
AUDIO OUT
COMPONENT
VIDEO OUT
COAXIAL
PRECAUTIONS
Laser Safety
....................................................................
2
■
Important Safeguards
...................................................
3
Location and Handling
.....................................................
4
Avoid the Hazards of Electrical Shock and Fire
..............
4
Moisture Condensation Warning
.....................................
4
About Copyright
...............................................................
4
Notice for Progressive Scan Outputs
..............................
4
Symbols Used in this Manual
..........................................
4
Maintenance
....................................................................
4
■
About the Discs
.............................................................
5
Playable Discs
.................................................................
5
Unplayable Discs
.............................................................
5
SETUP
■
Connections
...................................................................
6
Connection to a TV
..........................................................
6
Connection to an Audio System
......................................
7
Rear Terminals
................................................................
7
■
About the Remote Control
............................................
8
Remote Control
...............................................................
8
Installing the Batteries for the Remote Control
...............
8
DVD FUNCTIONS
■
Playback
.........................................................................
9
■
MP3 Playback
................................................................
10
■
Search Functions
.........................................................
10
Using Track Search
........................................................
10
Using Title / Chapter Search
..........................................
10
Using Time Search
.........................................................
10
■
On-Screen Display
........................................................
11
■
Repeat / Random / Programmed Playback
................
12
Repeat Playback
............................................................
12
Repeat A-B Playback
.....................................................
12
Random Playback
..........................................................
12
Programmed Playback
...................................................
12
■
Special Settings
............................................................
13
Subtitle Language
...........................................................
13
Audio Language
.............................................................
13
Camera Angles
...............................................................
13
Black Level Setting
.........................................................
13
Stereo Sound Mode
........................................................
13
Virtual Surround
..............................................................
13
■
DVD Setting
...................................................................
14
LANGUAGE Setting
.......................................................
14
DISPLAY Setting
............................................................
15
AUDIO Setting
................................................................
15
PARENTAL Setting
........................................................
16
OTHERS Setting
............................................................
16
Reset to the Default Setting
(Except for PARENTAL Setting)
.....................................
17
INFORMATION
■
Troubleshooting Guide
................................................
17
■
Specifications
...............................................................
18
■
Limited Warranty
..........................................................
18
■
Español
..........................................................................
19
■
Quick Use Guide
............................................
Back Cover
Connecting to RF Modulator (Not Supplied)
Note:
• RF modulator is not supplied with this unit. You need to
purchase it at your local store.
• The quality of picture may become poor if this unit is
connected to an RF modulator.
© 2007 Funai Electric Co., Ltd.