Magnavox DV220MW9 User manual, English (US) - Page 21

Timer Recording, Note for Timer Recording & OTR - dvd player

Page 21 highlights

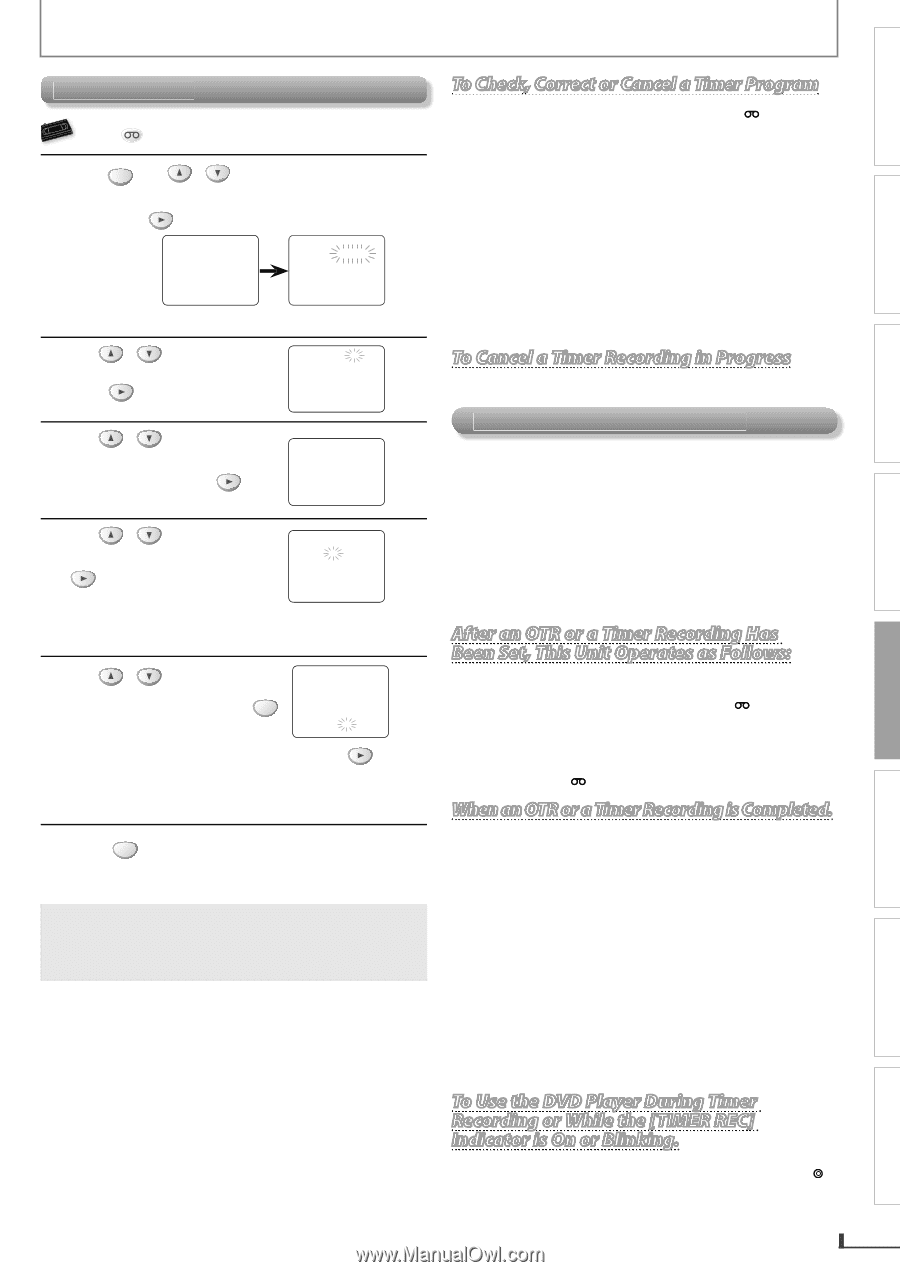
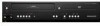
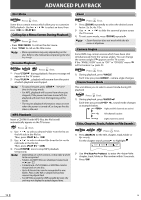
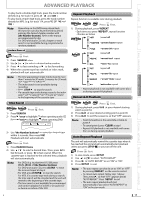
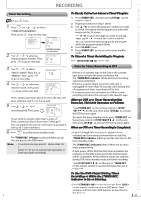
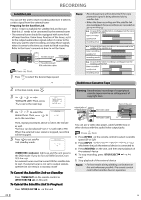
RECORDING PRECAUTIONS PREPARATION BASIC OPERATIONS ADVANCED PLAYBACK RECORDING Timer Recording VCR VHS Press first. 1 SETUP Press , use / to select "TIMER PROGRAMMING". Then, press to go to next step. - M E N U - B TIMER PROGRAMMING SATELLITE LINK AUTO REPEAT [OFF] CLOCK SET LANGUAGE SELECT TIMER PROGRAMMING PROG 12345678 DATE START TIME END TIME L1/L2 REC SPEED 2 Use / to select an empty program number. Then, press to go to next step. Available program number blinks. PROGRAM NUMBER 1 DATE - - / - - START TIME END TIME L1/L2 - - REC SPEED - - 3 Use / to select "ONCE", "DAILY" (Mon-Fri), or "WEEKLY". Then, press to go to next step. 4 Use / to select the desired month. Then, press to go to the next step. PROGRAM NUMBER 1 B ONCE DAILY WEEKLY ONE TIME PROGRAM PROGRAM NUMBER 1 DATE 1 0 / 0 6 TUE START TIME END TIME L1/L2 - - REC SPEED - - Then, repeat procedures above to select the day, start time, end time, and "L1" or "L2" as well. 5 Use / to select recording speed. Then, press . CLEAR ONE TIME PROGRAM PROGRAM NUMBER 1 DATE 1 0 / 0 6 TUE START TIME 0 7 : 3 0 PM END TIME 0 8 : 3 0 PM L1/L2 L1 REC SPEED SP B SP SLP To set another program after step 5, press . Then, repeat procedures from steps 2 through 5. You can program the unit to record up to 8 programs, and up to 1 year in advance. 6 Press TIMER SET to set the timer standby mode. The [TIMER REC] indicator on this unit lights up and the unit goes to the DVD mode. Note: • To go back one step, press [s] during steps 3 to 5. • Select "L1" or "L2" to activate rear input jacks or front input jacks accordingly. EN To Check, Correct or Cancel a Timer Program 1) Press [TIMER SET], and then press [VCR ] on the remote control. 2) Repeat procedures in step 1 above. 3) Use [K / L] to select the program number you want to check. The details of the program you select will appear on the TV screen. Use [s / B] to go to the digit you want to change. Then, use [K / L] to enter the correct numbers. You can cancel the entire program by pressing [s] while the program number blinks. 4) Press [CLEAR] to exit. 5) Press [TIMER SET] to return to the timer standby mode. To Cancel a Timer Recording in Progress Press [STOP/EJECT C A] on the unit. Note for Timer Recording & OTR • If there is no cassette tape in the unit or the cassette tape does not have the erase-protection tab, the [TIMER REC] indicator blinks and timer recording cannot be performed. • If there is a power failure occurred or the unit is unplugged for more than 30 seconds, clock setting and all programmed timer recordings will be lost. • If a cassette tape runs out before an OTR or a timer recording is finished, the unit ejects the cassette tape. After an OTR or a Timer Recording Has Been Set, This Unit Operates as Follows: • Press [TIMER SET] on the remote control or [STOP/ EJECT C A] on the unit, then press [VCR ] to activate the VCR function again. • To cancel the timer standby mode, press [TIMER SET] on the remote control or [STOP/EJECT C A] on the unit, then press [VCR ] to activate the VCR function again. When an OTR or a Timer Recording is Completed. • If "AUTO POWER OFF" function for DVD has been activated and some timer programming are left, the [TIMER REC] indicator lights up and the unit goes to the timer standby mode. • The [TIMER REC] indicator blinks if there are no more timer programming. • If auto power off for DVD has NOT been activated, the unit goes to the DVD mode and all the VCR functions will be unavailable. All the DVD functions are available during OTR, timer standby mode and timer recording. • Press [STOP/EJECT C A] on this unit or [TIMER SET] on the remote control to use the VCR when the unit is turned off. To Use the DVD Player During Timer Recording or While the [TIMER REC] Indicator is On or Blinking. • Press [STANDBY-ON] to turn on the unit. Press [DVD ] on the remote control to choose DVD mode. Then continue with the other DVD features as described in this manual. 21 OPTIONAL SETTINGS TROUBLESHOOTING INFORMATION

  • 1
  • 2
  • 3
  • 4
  • 5
  • 6
  • 7
  • 8
  • 9
  • 10
  • 11
  • 12
  • 13
  • 14
  • 15
  • 16
  • 17
  • 18
  • 19
  • 20
  • 21
  • 22
  • 23
  • 24
  • 25
  • 26
  • 27
  • 28

PRECAUTIONS
PREPARATION
ADVANCED PLAYBACK
BASIC OPERATIONS
RECORDING
OPTIONAL SETTINGS
TROUBLESHOOTING
INFORMATION
EN
21
RECORDING
Timer Recording
VHS
VHS
VHS
VHS
VHS
Press
VCR
first.
1
Press
SETUP
, use
/
to select
“TIMER PROGRAMMING”.
Then, press
to go to next step.
TIMER PROGRAMMING
PROG
12345678
DATE
START
TIME
END
TIME
L1/L2
REC SPEED
- M E N U -
B
TIMER PROGRAMMING
SATELLITE LINK
AUTO REPEAT
[OFF]
CLOCK SET
LANGUAGE SELECT
Available program
number blinks.
2
Use
/
to select an
empty program number. Then,
press
to go to next step.
PROGRAM NUMBER
1
DATE
– – / – –
START
TIME
– – : – –
– –
END
TIME
– – : – –
– –
L1/L2
– –
REC
SPEED
– –
3
Use
/
to select
“ONCE“, “DAILY“ (Mon-Fri), or
“WEEKLY“. Then, press
to go to next step.
PROGRAM
NUMBER
1
B
ONCE
DAILY
WEEKLY
4
Use
/
to select the
desired month. Then, press
to go to the next step.
ONE TIME PROGRAM
PROGRAM NUMBER
1
DATE
1 0 / 0 6 TUE
START
TIME
– – : – –
– –
END
TIME
– – : – –
– –
L1/L2
– –
REC
SPEED
– –
Then, repeat procedures above to select the day, start
time, end time, and “L1” or “L2” as well.
5
Use
/
to select
recording speed. Then, press
CLEAR
.
ONE TIME PROGRAM
PROGRAM NUMBER
1
DATE
1 0 / 0 6 TUE
START
TIME
0 7 : 3 0
PM
END
TIME
0 8 : 3 0
PM
L1/L2
L1
REC
SPEED
SP
B
SP
SLP
To set another program after step 5, press
.
Then, repeat procedures from steps 2 through 5.
You can program the unit to record up to 8 programs,
and up to 1 year in advance.
6
Press
TIMER SET
to set the timer standby mode.
The
[TIMER REC] indicator
on this unit lights up and
the unit goes to the DVD mode.
Note:
To go back one step, press
[
s
]
during steps 3 to
]
5.
Select “L1” or “L2” to activate rear input jacks or
front input jacks accordingly.
gram
To Check, Correct or Cancel a Timer Prog
g
To Check, Correct or Cancel a Timer Program
1)
Press
[TIMER SET]
, and then press
[VCR
]
on the
remote control.
2)
Repeat procedures in step 1 above.
3)
Use
[
K
/
L
]
to select the program number you want
to check. The details of the program you select will
appear on the TV screen.
Use
[
s
/
B
]
to go to the digit you want to change.
Then, use
[
K
/
L
]
to enter the correct numbers.
You can cancel the entire program by pressing
[
s
]
while the program number blinks.
4)
Press
[CLEAR]
to exit.
5)
Press
[TIMER SET]
to return to the timer standby
mode.
To Cancel a Timer Recording in Progress
Press
[STOP/EJECT
C
A
]
on the unit.
Note for Timer Recording & OTR
If there is no cassette tape in the unit or the cassette
tape does not have the erase-protection tab,
the
[TIMER REC] indicator
blinks and timer recording
cannot be performed.
If there is a power failure occurred or the unit is
unplugged for more than 30 seconds, clock setting and
all programmed timer recordings will be lost.
If a cassette tape runs out before an OTR or a timer
recording is finished, the unit ejects the cassette tape.
After an OTR or a Timer Recording Has
g
After an OTR or a Timer Recording Has
Operates as Follows:
Been Set, This Unit Op
p
Been Set, This Unit Operates as Follows:
• Press
[TIMER SET]
on the remote control or
[STOP/
EJECT
C
A
]
on the unit, then press
[VCR
]
to activate
the VCR function again.
To cancel the timer standby mode, press
[TIMER SET]
on
the remote control or
[STOP/EJECT
C
A
]
on the unit,
then press
[VCR
]
to activate the VCR function again.
pleted.
ng is Com
When an OTR or a Timer Recording
g
p
When an OTR or a Timer Recording is Completed.
If “AUTO POWER OFF” function for DVD has been
activated and some timer programming are left, the
[TIMER REC] indicator
lights up and the unit goes to the
timer standby mode.
• The
[TIMER REC] indicator
blinks if there are no more
timer programming.
If auto power off for DVD has NOT been activated, the
unit goes to the DVD mode and all the VCR functions
will be unavailable. All the DVD functions are available
during OTR, timer standby mode and timer recording.
• Press
[STOP/EJECT
C
A
]
on this unit or
[TIMER SET]
on the remote control to use the VCR when the unit is
turned off.
To Use the DVD Player During Timer
Recording or While the [TIMER REC]
g
Recording or While the [TIMER REC]
g.
Indicator is On or Blinking.
g
Indicator is On or Blinking.
• Press
[STANDBY-ON]
to turn on the unit. Press
[DVD
]
on the remote control to choose DVD mode. Then
continue with the other DVD features as described in
this manual.