Magnavox MBP5210 User manual, English (US) - Page 18
Beforeyou Start - wireless setup
 |
View all Magnavox MBP5210 manuals
Add to My Manuals
Save this manual to your list of manuals |
Page 18 highlights
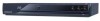
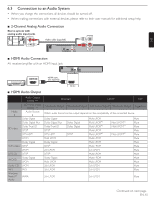
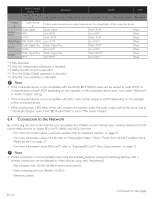
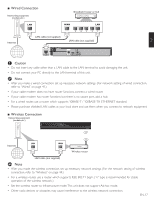
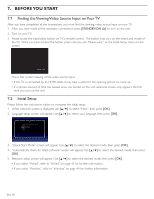
7. BEFORE YOU START 7.1 Finding the Viewing Video Source Input on Your TV After you have completed all the connections, you must find the viewing video source Input on your TV. 1. After you have made all the necessary connections, press [STANDBY/ON .] to turn on the unit. 2. Turn on your TV. 3. Please locate the input/video button on TV's remote control. The button may vary on the brand and model of the TV. Once you have located the button, press until you see "Please wait..." or the Initial Setup menu on the screen. Please Wait... This is the correct viewing of the video source input. • If the TV is connected by an HDMI cable, it may take a while for the opening picture to come up. • If a certain amount of time has passed since you turned on the unit, welcome screen only appears the first time you turn on the unit. 7.2 Initial Setup Please follow the instructions below to complete the initial setup. 1. While welcome screen is displayed, use [Î / ï] to select "Next", then press [OK]. 2. Language setup screen will appear. Use [Î / ï] to select your language, then press [OK]. Language Please select your language for on-screen display. English Español Français Back 3. "Quick Start Mode" screen will appear. Use [Î / ï] to select the desired mode, then press [OK]. 4. "Automatically check for latest software" screen will appear. Use [Î / ï] to select the desired mode, then press [OK]. 5. Network setup screen will appear. Use [Î / ï] to select the desired mode, then press [OK]. • If you select "Wired", refer to "Wired" on page 41 for further information. • If you select "Wireless", refer to "Wireless" on page 44 for further information. EN-18
-
 1
1 -
2
-
3
-
4
-
5
-
6
-
7
-
8
-
9
-
10
-
11
-
12
-
 13
13 -
 14
14 -
 15
15 -
 16
16 -
 17
17 -
 18
18 -
 19
19 -
 20
20 -
 21
21 -
 22
22 -
 23
23 -
24
-
25
-
26
-
27
-
28
-
29
-
30
-
31
-
32
-
33
-
34
-
35
-
36
-
37
-
38
-
39
-
40
-
41
-
42
-
43
-
44
-
45
-
46
-
47
-
48
-
49
-
50
-
51
-
52
-
53
-
54
-
55
-
56
-
57
-
58
-
59
-
60
-
61
-
62
-
63
-
64
-
65
-
66
-
67
-
68
 |
 |