Magnavox MDR513H User manual, English (US) - Page 25
Main Menu, General Setting Menu - channel list
 |
UPC - 609585189706
View all Magnavox MDR513H manuals
Add to My Manuals
Save this manual to your list of manuals |
Page 25 highlights
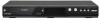
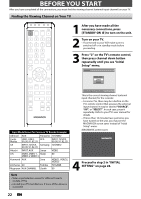
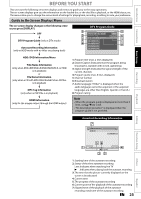
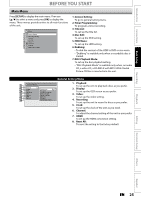
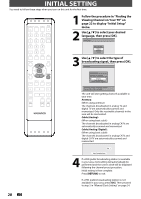
Introduction Connections Basic Setup BEFORE YOU START Main Menu Press [SETUP] to display the main menu. Then use [K / L] to select a menu and press [OK] to display the menu. These menus provide entries to all main functions of the unit. Setup 1 General Setting 2 Timer Programming 3 Title List 4 Disc Edit 45 HDD Menu 46 Dubbing 47 DISC Playback Mode 1. General Setting: To go to general setting menu. 2. Timer Programming: To program a timer recording. 3. Title List: To call up the title list. 4. Disc Edit: To set up the DVD setting. 5. HDD Menu: To set up the HDD setting. 6. Dubbing: • To dub the content of the HDD to DVD or vice versa. • "Dubbing" is available only when a recordable disc is loaded. 7. DISC Playback Mode: To set up the disc playback setting. • "DISC Playback Mode" is available only when, an audio CD, a video CD, a CD-RW/-R with MP3 / JPEG / Kodak Picture CD files is inserted into the unit. 1 General Setting 2 Playback 3 Display 4 Video Recording 5 Clock 26 Channel HDMI 37 Reset All 48 Parental Lock Disc Audio Disc Menu Language Audio Language Subtitle Language Angle Icon Still Mode Variable Skip / Replay General Setting Menu 1. Playback: To set up the unit to play back discs as you prefer. 2. Display: To set up the OSD screen as you prefer. 3. Video: To set up the video setting. 4. Recording: To set up the unit to record to discs as you prefer. 5. Clock: To set up the clock of the unit as you need. 6. Channel: To adjust the channel setting of the unit as you prefer. 7. HDMI: To set up the HDMI connection setting. 8. Reset All: To reset the setting to the factory default. Recording Playback Editing Function Setup Others Español EN 25
-
 1
1 -
2
-
3
-
4
-
5
-
6
-
7
-
8
-
9
-
10
-
11
-
12
-
13
-
14
-
15
-
16
-
17
-
18
-
19
-
 20
20 -
 21
21 -
 22
22 -
 23
23 -
 24
24 -
 25
25 -
 26
26 -
 27
27 -
 28
28 -
 29
29 -
 30
30 -
31
-
32
-
33
-
34
-
35
-
36
-
37
-
38
-
39
-
40
-
41
-
42
-
43
-
44
-
45
-
46
-
47
-
48
-
49
-
50
-
51
-
52
-
53
-
54
-
55
-
56
-
57
-
58
-
59
-
60
-
61
-
62
-
63
-
64
-
65
-
66
-
67
-
68
-
69
-
70
-
71
-
72
-
73
-
74
-
75
-
76
-
77
-
78
-
79
-
80
-
81
-
82
-
83
-
84
-
85
-
86
-
87
-
88
-
89
-
90
-
91
-
92
-
93
-
94
-
95
-
96
-
97
-
98
-
99
-
100
-
101
-
102
-
103
-
104
-
105
-
106
-
107
-
108
-
109
-
110
-
111
-
112
-
113
-
114
-
115
-
116
-
117
-
118
-
119
-
120
-
121
-
122
-
123
-
124
-
125
-
126
-
127
-
128
 |
 |