Magnavox MDR513H User manual, English (US) - Page 95
Setting an Index Picture, to select Index Picture
 |
UPC - 609585189706
View all Magnavox MDR513H manuals
Add to My Manuals
Save this manual to your list of manuals |
Page 95 highlights
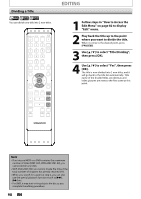
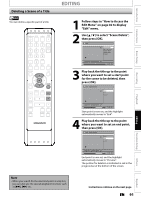
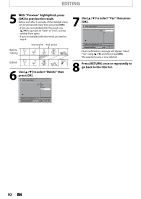
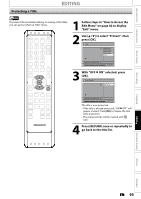
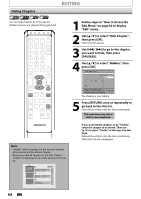
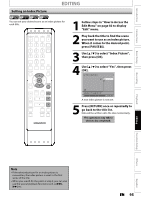
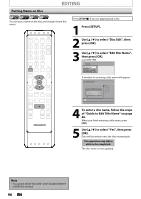
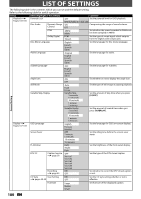
Introduction Connections Basic Setup Setting an Index Picture EDITING You can set your desired scene as an index picture for each title. OPEN/ STANDBY-ON DTV/TV SOURCE CLOSE .@/: ABC DEF GHI JKL MNO CHANNEL PQRS TUV WXYZ SPACE CLEAR SETUP AUDIO REPEAT HDMI DISC MENU TITLE OK DISPLAY RETURN V.REPLAY V.SKIP RAPID PLAY D.DUBBING TIMER HDD DVD REC MODE REC 1 Follow steps in "How to Access the Edit Menu" on page 82 to display "Edit" menu. 2 Play back the title to find the scene you want to use as an index picture. When it comes to the desired point, press [PAUSE F]. 3 Use [K / L] to select "Index Picture", then press [OK]. 4 Use [K / L] to select "Yes", then press [OK]. Edit - Index Picture 1 Yes No F NOV/21/10 11:00AM CH12 SP 1 : 05 : 00 A new index picture is now set. 5 Press [RETURN] once or repeatedly to go back to the title list. Data will be written onto the disc momentarily. This operation may take a while to be completed. Recording Playback Editing Function Setup Others Español Note • If the selected picture for an index picture is overwritten, the index picture is reset to the first scene of the title. • When you search for the point at step 2, you can also use the special playback functions such as [G], [D] etc. EN 95
-
 1
1 -
2
-
3
-
4
-
5
-
6
-
7
-
8
-
9
-
10
-
11
-
12
-
13
-
14
-
15
-
16
-
17
-
18
-
19
-
20
-
21
-
22
-
23
-
24
-
25
-
26
-
27
-
28
-
29
-
30
-
31
-
32
-
33
-
34
-
35
-
36
-
37
-
38
-
39
-
40
-
41
-
42
-
43
-
44
-
45
-
46
-
47
-
48
-
49
-
50
-
51
-
52
-
53
-
54
-
55
-
56
-
57
-
58
-
59
-
60
-
61
-
62
-
63
-
64
-
65
-
66
-
67
-
68
-
69
-
70
-
71
-
72
-
73
-
74
-
75
-
76
-
77
-
78
-
79
-
80
-
81
-
82
-
83
-
84
-
85
-
86
-
87
-
88
-
89
-
 90
90 -
 91
91 -
 92
92 -
 93
93 -
 94
94 -
 95
95 -
 96
96 -
 97
97 -
 98
98 -
 99
99 -
 100
100 -
101
-
102
-
103
-
104
-
105
-
106
-
107
-
108
-
109
-
110
-
111
-
112
-
113
-
114
-
115
-
116
-
117
-
118
-
119
-
120
-
121
-
122
-
123
-
124
-
125
-
126
-
127
-
128
 |
 |