Magnavox MSR90D6 Quick Start Guide
Magnavox MSR90D6 - Dvd Recorder Magnovox Manual
 |
UPC - 053818570173
View all Magnavox MSR90D6 manuals
Add to My Manuals
Save this manual to your list of manuals |
Magnavox MSR90D6 manual content summary:
- Magnavox MSR90D6 | Quick Start Guide - Page 1
[STANDBY-ON ] to turn the unit on. 1.Switch the input selector on your TV to an appropriate external input channel (usually near channel 0). 2.Press a button on the TV's original remote control (see the table below) to select an external input channel until the DVD recorder's picture appears. Input - Magnavox MSR90D6 | Quick Start Guide - Page 2
will be turned off automatically. After all recordings, finalize your disc! Finalize DVD-RW/-R/+R discs after recording. Make edits compatible on DVD+RW discs after editing. DVD+RW Editing titles DVD-RW/DVD-R DVD+R Playable This Unit DVD player Not Playable Not finalized guide Stop - Magnavox MSR90D6 | Quick Start Guide - Page 3
, JVC DVD-RW 4x DVD Recorder MSR90D6 Playing discs Editing Changing the Setup menu INSTRUCCIONES EN ESPAÑOL INCLUIDAS Please read before using this equipment. If you need additional operating assistance after reading this owner's manual or to order replacement accessories, please call TOLL FREE - Magnavox MSR90D6 | Quick Start Guide - Page 4
user to the presence of important operating and maintenance (servicing) instructions manual. The user will not occur in a particular installation. If this equipment does cause harmful interference to radio or television reception, which can be determined by turning the equipment off and on, the user - Magnavox MSR90D6 | Quick Start Guide - Page 5
sources, refer to the operating instructions. 11. Grounding or Polarization - This product is equipped with a polarized alternating-current line plug (a plug having one blade wider than the other). This plug will fit into the power outlet only one way. This is a safety feature. If you are unable to - Magnavox MSR90D6 | Quick Start Guide - Page 6
DVD recorder, please contact our customer service center. Supplied Accessory • Remote control (NA472UD) with two AAA batteries • RF cable • Audio/Video cables • Owner's Manual (WPZ0901CAB01 (WPZ0102TM015 (1VMN22173) or WPZ0901TM002) or WPZ0102LTE01) Owner's Manual • Quick Guide (1VMN22174 - Magnavox MSR90D6 | Quick Start Guide - Page 7
• Please refer to relevant topics on "Troubleshooting" on pages 71-74 before returning the product. • If this unit becomes inoperative, do not try to correct the problem by yourself. There are no user- serviceable parts inside. Turn off, unplug the power plug and please call our help line mentioned - Magnavox MSR90D6 | Quick Start Guide - Page 8
Setting the clock 21 Auto Clock Setting 21 Manual Clock Setting 22 Setting the Daylight Saving Time 23 Selecting the TV aspect ratio 23 Recording 24 Information on DVD recording 24 Information 24 Recordable disc 24 Recording mode 24 Making discs playable in other DVD player (Finalize/Make - Magnavox MSR90D6 | Quick Start Guide - Page 9
playing discs on a regular DVD player: Recorded discs can be played on regular DVD players, including computer DVD drives compatible with DVD-Video playback. You will need to finalize the discs recorded on DVD+R/DVD-RW/DVD-R discs to play in other DVD players. Others Progressive Scan system Unlike - Magnavox MSR90D6 | Quick Start Guide - Page 10
. 8. STANDBY-ON button Press to turn the unit on and off. If Remote control sensor Receive signals from your remote control so that you can control the unit from a distance. Front Panel Indicator Guide 123 1. POWER indicator Light on when power is on. 2. RECORD indicator Light on when recording - Magnavox MSR90D6 | Quick Start Guide - Page 11
Before you start Connections Getting started Recording Before you start Functional overview (cont'd) Rear Panel 12 receiver or other equipment with a standard video cable. 4. AC Power Cord Connect to a standard AC outlet to supply power to this unit. 5. COAXIAL DIGITAL AUDIO OUTPUT jack Use to - Magnavox MSR90D6 | Quick Start Guide - Page 12
Before you start Functional overview (cont'd) Remote Control 1 16* 2 3 17 4 18 5 19 6 7 20 8 21 9 10 11 22 13 12 23 14 24 15 (*) The unit can also be turned on by press- ing this button. 1. STANDBY-ON button Press to turn the unit on and off. If timer programmings have - Magnavox MSR90D6 | Quick Start Guide - Page 13
instruction's rules that apply in your country or area. • Do not recharge, short-circuit, heat, burn or disassemble batteries. Keep in mind the following when using the remote control: • Make sure that there is no obstacle between the remote control and the remote sensor on the unit. • Remote - Magnavox MSR90D6 | Quick Start Guide - Page 14
unit. Setup 1 Required Settings 2 Playback 3 Display 4 Recording 5 Clock 6 Channel 7 Disc Edit 1.Required Settings: To set Finalize (DVD+R/DVD-R/ DVD-RW only): Allows you to finalize a disc containing recorded titles. 5.Random Play: Allows you to activate the random playback feature - Magnavox MSR90D6 | Quick Start Guide - Page 15
remote control that selects an external input channel until the DVD recorder's picture appears. Check your TV owner's manual for details. Input Mode Names for Common TV Brands Admiral AUX LXI-Series Curtis Mathis LINE1, LINE2, 00, 90, 91, 92, 93 Magnavox , no video signal will be output from the - Magnavox MSR90D6 | Quick Start Guide - Page 16
box or satellite box is turned on. • You cannot record one channel while watching another channel. Note to the Cable TV System Installer : This reminder is provided to call the Cable TV system installer's attention to Article 820-40 of the National Electrical Code - Magnavox MSR90D6 | Quick Start Guide - Page 17
Before you start Connections Getting started Recording Connections Connection to an Audio System • When you change the connections, all devices should be turned off. • Refer to the operation manual accompanying external devices for more information. AUDIO Method 1 Stereo system Analog audio - Magnavox MSR90D6 | Quick Start Guide - Page 18
Getting started Easy DVD recording The following will help you to understand easily how to record to DVD discs. Note: Make sure batteries are in the remote control and you have connected this unit with the TV correctly. Step 1: Choose a disc type. There are several types of recordable DVD discs to - Magnavox MSR90D6 | Quick Start Guide - Page 19
• Setting pictures for thumbnails • Dividing a title (DVD+RW/DVD-RW only) • Putting name on disc Finalizing a Disc • This will allow DVD+R/DVD-RW/DVD-R discs recorded on this unit to be played back on a different DVD player - without finalization it will not be playable on other units. • After - Magnavox MSR90D6 | Quick Start Guide - Page 20
will automatically appear. Turn the TV on. Select the input to which the unit is connected. Initial Setup Refer to the table on page 13. Channel Preset TV's original remote control "Clock Setting" will appear. Then press [OK]. Initial Setup Clock Setting 5 Follow to step 3 in "Manual Clock - Magnavox MSR90D6 | Quick Start Guide - Page 21
Recording Getting started Channel setting (cont'd) To select a channel You can select a channel by directly entering channel using the Number buttons on the remote control will appear. Add Delete 2 3 3 1 Using [K / L], select "Manual Channel Preset". Press [OK]. Manual Channel Preset menu will - Magnavox MSR90D6 | Quick Start Guide - Page 22
[OK]. Option window will appear. TV Audio Select Stereo SAP 4 2 Using [K / L], select "Stereo" or "SAP". Press [OK]. 3 4 Stereo: 1 5 Outputs main-audio. SAP (Secondary Audio Program): Outputs sub-audio. 5 Press [SETUP] to exit. Notes on TV channel audio • When you record a TV program - Magnavox MSR90D6 | Quick Start Guide - Page 23
clock manually and cancel the Auto Clock Setting function: Using [K / L], select "OFF" in "Auto Clock Setting". Press [OK]. The Auto Clock Setting function will be canceled. 5 Press [SETUP] to exit. 6 Press [STANDBY-ON ] to turn off the unit. This unit will search for the time only when the power - Magnavox MSR90D6 | Quick Start Guide - Page 24
be activated. Although seconds are not displayed, they begin counting from zero. 7 Press [SETUP] to exit, if Clock menu appears. 22 EN Note • Your clock setting will be lost if either there is a power failure or this unit has been unplugged for more than 30 seconds when you set the clock manually. - Magnavox MSR90D6 | Quick Start Guide - Page 25
Before you start Connections Getting started Recording Getting started Setting the clock (cont'd) Setting the Daylight Saving Time When "Daylight Saving Time" is ON, the unit clock will automatically move forward one hour on the first Sunday in April and move back one hour on the last Sunday in - Magnavox MSR90D6 | Quick Start Guide - Page 26
this recorder: VERBATIM DVD+R 8x VERBATIM DVD+RW 4x VERBATIM DVD-R 8x VERBATIM DVD-RW 2x MAXELL DVD-R 16x JVC DVD-RW 4x • You can play DVD+RW in most DVD players without finalizing. To play discs other than DVD+RW in other DVD players, you will need to finalize. Note • This recorder cannot record - Magnavox MSR90D6 | Quick Start Guide - Page 27
Before you start Connections Getting started Recording Recording Information on DVD recording (cont'd) Making discs playable in other DVD player (Finalize/Make Edits Compatible) After recording on DVD+R/DVD-R/DVD-RW, you must finalize the disc in order to play on other units. (Refer to page 36.) - Magnavox MSR90D6 | Quick Start Guide - Page 28
or "OFF". Press [OK]. 4 Recording menu will appear. ON: Replacing the title list 1 5 3 Using [K / L], select "Replace Disc Menu". Press [OK]. OFF: Prohibiting additional record 5 Press [SETUP] to exit. Setting for Auto Chapter +VR +VR DVD+RW DVD+R DVD-RW DVD-R You can set a specified time - Magnavox MSR90D6 | Quick Start Guide - Page 29
you start Connections Getting started Recording Recording Basic recording +VR +VR DVD+RW DVD+R DVD-RW DVD-R Follow the steps below to record TV programs. 7 Press [REC I] to start record- 1 1 ing. "I" mark will be displayed for 5 6 2 4 Press [STANDBY-ON ]. seconds. Turn the TV on and - Magnavox MSR90D6 | Quick Start Guide - Page 30
screen during a Onetouch Timer Recording. • You cannot pause a Onetouch Timer Recording. • Unlike a Timer Recording, you can perform the following operations during a One-touch Timer Recording. -Turning the power off. -Using [REC I] and [STOP C]. • The unit will be turned off automatically under the - Magnavox MSR90D6 | Quick Start Guide - Page 31
step 1. Continue with the step 3 in "Manual Clock Setting" on page 22 before setting a timer programming. • Press [s / B] to move the cursor to the left and the right in the timer programming menu. • After step 8, the recording will start immediately after the recording time you set. EN 29 Español - Magnavox MSR90D6 | Quick Start Guide - Page 32
C] on the remote control is not effective. If the timer program did not complete correctly, the error number appears in the Timer Programming list. Note • Press [TIMER PROG.] to check the timer programming in process. When the Timer Recording is proceeding, that program will be highlighted with - Magnavox MSR90D6 | Quick Start Guide - Page 33
up to one minute or more, this program will be displayed with error number E40 in the timer programming list. When the End time of the programming currently being recorded and the Start time of the subsequent program are same: If PROG. A is a DVD recording program, the beginning of the PROG. B may - Magnavox MSR90D6 | Quick Start Guide - Page 34
Recording Overwriting an existing title Overwriting from the beginning of the title +VR DVD+RW DVD-RW 4 You can overwrite the existing title Using [K / L], select a title to be 1 2 from the beginning. overwritten. Press [OK]. 1 Turn on the unit. Make sure that the TV input is set on the - Magnavox MSR90D6 | Quick Start Guide - Page 35
Before you start Connections Getting started Recording Recording Overwriting an existing title (cont'd) Hints name: B After overwriting PROG. A Title name: A Title name: B 30 - 180 seconds will be cut off. When overwriting title is longer than the existing title: (Overwriting from the beginning - Magnavox MSR90D6 | Quick Start Guide - Page 36
Recording Settings for an external source Connection to an external source +VR +VR DVD+RW DVD+R DVD-RW DVD-R Connect the external source properly to the unit by using input jacks either EXT2 (Front) or EXT1 (Rear). When connecting an external equipment of monaural - Magnavox MSR90D6 | Quick Start Guide - Page 37
Recording Playing discs Recording Settings for an external source (cont'd) Recording from an external source +VR +VR DVD+RW DVD+R DVD-RW DVD-R Before recording from an external source, see the instructions for the connection on page 34. 1. Turn the remote control. • OFF" will appear instead - Magnavox MSR90D6 | Quick Start Guide - Page 38
other DVD players Finalizing a disc +VR +VR DVD+R DVD-RW DVD-R You will need to finalize discs to play in other DVD players. Finalizing may take several minutes up to an hour. A shorter recording period on the disc will require a longer time period for finalization. Do not unplug the power cord - Magnavox MSR90D6 | Quick Start Guide - Page 39
Before you start Connections Getting started Recording Recording Playing the discs in other DVD players (cont'd) Auto finalizing +VR +VR DVD+R DVD-RW DVD-R You can finalize discs automatically using Auto Finalize function. You can use this function to finalize discs after finishing all Timer - Magnavox MSR90D6 | Quick Start Guide - Page 40
will play on the unit. Other disc types are not guaranteed to play. Disc Logo DVD-VIDEO DVD+RW DVD+R is used primarily in the United States and Canada). This unit uses NTSC, so DVDs you play must be recorded in the NTSC system. You cannot play DVDs recorded in other color system . Region codes - Magnavox MSR90D6 | Quick Start Guide - Page 41
Connections Getting started Recording Playing discs Playing discs Playback Basic playback DVD+RW +VR +VR DVD+R DVD-RW DVD-R 1 Press [STANDBY-ON ]. Turn the TV on and be sure to select the input to which the unit is connected. 2 Press [OPEN/CLOSE A] . The disc tray will open. 3 Insert your - Magnavox MSR90D6 | Quick Start Guide - Page 42
disc to the disc tray guide. CD Video CD 4 Press [PLAY B] to start play- back. Playback will start. If you are playing a DVD-Video disc or Video CD with PBC function, a menu may appear. Refer to page 41 for details about a disc menu. If you are playing a finalized DVDR/DVD-RW disc, a title list - Magnavox MSR90D6 | Quick Start Guide - Page 43
the title menu DVD-V DVD+RW DVD+R DL +VR +VR DVD+R DVD-RW DVD-R Video DVD- RW Video DVD-R Some DVDs have a title menu, which lists the titles available on them. It helps you to start playback at a specific title. 1 Press [TITLE]. The title menu will appear. If the feature is not available - Magnavox MSR90D6 | Quick Start Guide - Page 44
DVD-R DVD+R DL +VR +VR DVD+R DVD-RW DVD-R You can skip TV commercials by You can press up to 6 times (180 pressing [CM SKIP], so that you seconds). can enjoy the recorded programs e.g. Press [CM SKIP] once. without interrupting. 1 1 During playback, press [CM SKIP]. Normal play will - Magnavox MSR90D6 | Quick Start Guide - Page 45
while using this mode. • This feature may not work at some point in a disc. • Audio is PCM during Rapid play mode. DVD-V DVD+RW DVD+R DL +VR +VR DVD+R DVD-RW DVD-R Video Video DVD-RW DVD-R Video CD 1 During playback, press [PAUSE F]. Play will pause and sound will be muted. 2 F Press [NEXT - Magnavox MSR90D6 | Quick Start Guide - Page 46
zoom play will start. Marker Setup DVD-V DVD+RW DVD+R DL +VR +VR DVD+R DVD-RW DVD-R Video DVD- RW Video DVD-R CD Video CD This feature allows you will be erased when you operate these operations listed below. - Opening the disc tray - Turning off the power - Recording to a recordable disc - Magnavox MSR90D6 | Quick Start Guide - Page 47
DVD-V DVD+RW DVD+R DL DVD+R Video DVD- RW Video DVD-R Using [PREV H] / [NEXT G] +VR DVD- RW +VR DVD-R 1 During playback, press [NEXT G] to skip the current title or chap- ter and move to the next. The title or chapter will Playing discs Before you start Connections Getting started Recording - Magnavox MSR90D6 | Quick Start Guide - Page 48
buttons, enter a desired track number to search. Press [OK]. Track search will start. Time search DVD-V Video DVD- RW DVD+RW Video DVD-R DVD+R CD 1 During playback, press [DISPLAY]. Display menu will appear. 11 0:00:00 DVD-Video 1 0:00:00 Audio CD DL +VR +VR - Magnavox MSR90D6 | Quick Start Guide - Page 49
Before you start Connections Getting started Recording Repeat/Random/Program playback Repeat playback DVD-V Video DVD- RW DVD+RW Video DVD-R DVD+R CD 1 During playback, press [DISPLAY]. Display menu will appear. DL +VR +VR DVD+R DVD-RW DVD-R Video CD MP3 3 Using [K / L], select a desired - Magnavox MSR90D6 | Quick Start Guide - Page 50
languages anytime during playback. 1 During playback, press [DISPLAY]. Display menu will appear. 11 0:00:00 DVD-Video 2 Using [{ / B], select . Press [OK]. Subtitle menu will appear. 11 0:00:00 DVD-Video OFF 1.English 2.French 3 Using [K / L], select a desired subtitle language. Press - Magnavox MSR90D6 | Quick Start Guide - Page 51
to display the disc menu. • This unit CANNOT record in both stereo and SAP (Secondary Audio Program) at the same time. 2 3 1 Note • Select Virtual Surround OFF in a case sound is dissorted. • The setting will be kept OFF when the unit is turned off. Editing Changing the Setup menu Others Español - Magnavox MSR90D6 | Quick Start Guide - Page 52
angles DVD-V Some DVD-Video discs feature scenes will appear. DL +VR +VR DVD+R DVD-RW DVD-R 3 Using [K / L], select a desired option. Press [OK]. Your setting will be activated. 11 0:00:00 DVD-Video This function reduces noise in the playback picture. When playing back discs recorded - Magnavox MSR90D6 | Quick Start Guide - Page 53
Recording Editing Guide to a title list Information on disc editing Editing discs Title list allows you to check the titles recorded page 57) • Dividing a title (DVD+RW/DVD-RW only) (Refer to page recording time is short. • Once a disc is finalized, editing the disc or recording to the disc will - Magnavox MSR90D6 | Quick Start Guide - Page 54
be brought back to the disc. When the last title, which is recorded in the disc, in the title list is deleted, the disc space to record on will be increased. For DVD+R and DVD-R disc, the disc space to record on will not be changed. 4 Using [K / L], select "Title Delete". Press [OK]. Confirmation - Magnavox MSR90D6 | Quick Start Guide - Page 55
you start Connections Getting started Recording Playing discs Editing Editing discs (cont'd) Putting names on titles DVD+RW +VR DVD+R DVD-RW +VR DVD-R You can put title names on the titles and change the names from this menu. The names you put on the titles will be displayed on a title list - Magnavox MSR90D6 | Quick Start Guide - Page 56
00:59 5 Using [K / L], select "Yes". Press [OK]. The selected chapter mark will be deleted. Note • Remaining time of the disc may decrease when adding chapter marks or increase when clearing chapter marks depending on the recording time or edited contents. Instructions continue on the next page. - Magnavox MSR90D6 | Quick Start Guide - Page 57
started Recording Editing Editing discs (cont'd) Clearing chapter marks (cont'd) 6 Press [RETURN] to exit. Data will be :00AM CH12 EP 0:00:59 4 Using [K / L], select "Yes". Press [OK]. Final confirmation window will appear. Chapter Mark - Delete All 3 Are you sure? Yes No Chapter 2/ 2 5 - Magnavox MSR90D6 | Quick Start Guide - Page 58
menu. 2 Using [K / L]], select "Current Chapter". Press [OK]. Option window will appear. Current Chapter 1 Chapter 2/ 2 Visible Visible Hidden +VR DVD-R 5 After this operation is completed, press [RETURN] twice to exit. Data will be written onto the disc momentarily. This operation may take - Magnavox MSR90D6 | Quick Start Guide - Page 59
Getting started Recording Editing Editing discs (cont'd) Setting pictures for thumbnails DVD+RW +VR +VR DVD+R DVD-RW DVD-R You can and [FWD D] for finding the thumbnail picture. Press [OK]. Confirmation window will appear. Index Picture 1 Yes No F NOV/22/05 11:00AM CH12 EP - Magnavox MSR90D6 | Quick Start Guide - Page 60
DVD+RW DVD-RW 4 You can divide one title into two new titles. 1 Follow steps 1 to 3 on page 52 to display the Edit menu. Using [K / L], select "Yes". Press [OK]. The title will Data will be at which you will divide the title. Press [OK]. Confirmation window will appear. Title Dividing 6 Yes - Magnavox MSR90D6 | Quick Start Guide - Page 61
Disc Name the steps of "Guide to edit title Disc Protect OFF ON name" on page 53. Erase Disc Make Edits Compatible When you finish entering a title name, press [OK]. Confirmation window will appear. Disc Edit Edit Disc Name Disc Protect OFF ON Finalize Edit Disc Name No Disc - Magnavox MSR90D6 | Quick Start Guide - Page 62
Name Disc Protect OFF ON Finalize 3 Using [K / L], select "Yes". Press [OK]. Data will be written onto the disc momentarily. This operation may take a while to be completed. Disc Edit Edit Disc Name Disc Protect OFF ON Erase Disc Finalize 60 EN Instructions continue on the next page - Magnavox MSR90D6 | Quick Start Guide - Page 63
Disc Make Edits Compatible 2 Using [K / L]], select "Disc Protect". Press [OK]. Confirmation window will appear. Disc Protect ON Yes No OFF Disc Edit Edit Disc Name Disc Protect ON Finalize OFF 3 2 Using [K / L], select "Yes". 3 Press [OK]. This operation may take a while - Magnavox MSR90D6 | Quick Start Guide - Page 64
Video DVD+RW DVD-RW DVD-RW You can erase all titles on a disc. If you want to record on DVD-RW 2 formatted with other than DVD+VR erasing the disc at step 2, select "No". DVD+RW You will need to perform "Make Edit Compatible" to play in other DVD players. Press [STOP C] if you are playing - Magnavox MSR90D6 | Quick Start Guide - Page 65
Recording case the DVD in playback recorded in 96kHz will be down sampled in 48kHz. Dolby Digital PCM Stream Set the type of sound signal which outputs from the digital audio output jack. Dynamic Range Control level of your DVD discs. (Change password Set the Playback Control. (Video CD - Magnavox MSR90D6 | Quick Start Guide - Page 66
Menu Audio Subtitle English Original OFF Language - Disc Menu English French Spanish Other • Using [K / L], select a setting. Press [OK]. Your setting will be activated. Audio Language (Default : Original) Set the Audio language. Language Disc Menu Audio Subtitle English Original OFF Language - Magnavox MSR90D6 | Quick Start Guide - Page 67
Recording Changing the Setup menu Language setting (cont'd) If "Other" is selected, press 4-digit code using the Number buttons. Language - Subtitle Code Input ---- • When you finish entering the code, press [OK]. Refer to the language code table on page 74. Note • Only the languages supported - Magnavox MSR90D6 | Quick Start Guide - Page 68
1 Press [SETUP]. 2 Using [K / L], select "Playback". Press [OK]. Playback menu will appear. 3 Using [K / L], select "Disc Audio". Press [OK]. 4 2 3 1 Note • Dynamic Range Control function is available only on the discs which are recorded in the Dolby Digital format. Digital Out Set the digital - Magnavox MSR90D6 | Quick Start Guide - Page 69
Recording Changing the Setup menu Audio setting (cont'd) A Settings for PCM (Default : 48kHz) Digital Out - PCM 48kHz 96kHz • Using [K / L], select a setting. Press [OK]. Your setting will Dynamic Range Control ON OFF • Using [K / L], select a setting. Press [OK]. Your setting will be activated - Magnavox MSR90D6 | Quick Start Guide - Page 70
this feature, you must set Progressive Scan mode to "ON". 1 Press [SETUP]. 2 Using [K / L], select "Playback". Press [OK]. Your setting will be for more than 3 seconds during DVD playback. • When selecting "No" or not pressing any keys on the unit or remote control within 15 seconds at step 5, - Magnavox MSR90D6 | Quick Start Guide - Page 71
Getting started Recording Changing the Setup menu Settings for Parental lock level Some DVD-Video discs feature a Parental Lock level. Playback will stop if the ratings exceed the levels you set, it will require you to enter a password before the disc will playback. This feature prevents your - Magnavox MSR90D6 | Quick Start Guide - Page 72
in Password Input window. Password will be cleared and parental levels will be set to "All". Settings for PBC (Playback Control) PBC (Video CD only) performed. Select PBC function "OFF" to perform those operations. • PBC setting turns to "ON" when loading Video CDs with PBC function, thus, even - Magnavox MSR90D6 | Quick Start Guide - Page 73
Recording Troubleshooting Before requesting service for this unit, check the table below for a possible cause of the problem you are experiencing. Some simple checks or a minor adjustment on your part may eliminate the problem and restore proper operation. Playing discs Symptom Power The power - Magnavox MSR90D6 | Quick Start Guide - Page 74
) (page 38). • The region code on the DVD-Video does not match the unit (page 38). • Moisture has condensed inside the unit. Remove the disc and leave the unit turned on for about two hours until the moisture evaporates (page 4). • If the disc was recorded on another recorder, the unit cannot play - Magnavox MSR90D6 | Quick Start Guide - Page 75
Insert the DVD-Video disc with region codes 1 or ALL. • Check the "Parental Lock" setting (pages 69-70). Recording Error This program is not allowed to be recorded. Recording Error This program is not recordable in +VR mode. Recording Error Can not record on this disc. Recording Error This disc is - Magnavox MSR90D6 | Quick Start Guide - Page 76
other recorder. Release the finalizing for this disc (page 36). Set "Replace Disc Menu" to "ON" to rewrite the menu, after that you will record to disc (page 26). * If you are still having trouble with the unit after checking "Troubleshooting", write down the error code and the error description - Magnavox MSR90D6 | Quick Start Guide - Page 77
) TV signals. Refer to page 68 for instructions on selective Progressive Scan mode. Regions code Regions associate discs and players with particular areas of the world. This unit will only play discs that have compatible region codes. You can find the region code of your unit by looking on the rear - Magnavox MSR90D6 | Quick Start Guide - Page 78
requirements Power consumption Weight Dimensions (width x height x depth) Operating temperature Operating humidity TV format Recording Recording format Recordable discs Video recording format Sampling frequency Compression format Audio recording format Sampling frequency Compression format Tuner - Magnavox MSR90D6 | Quick Start Guide - Page 79
Before you start Connections Getting started Recording Español Fácil grabación de DVD Estas instrucciones le ayudarán a entender fácilmente cómo grabar discos DVD. Nota: Asegúrese que las pilas están en el mando a distancia y que ha conectado correctamente esta unidad y el TV. Paso 1: Elija un - Magnavox MSR90D6 | Quick Start Guide - Page 80
con un simple procedimiento de elegir un título en la pantalla del menú. ¿Qué son títulos y capítulos? Título 1 Título 2 El contenido de un disco DVD se divide generalmente en títulos. Los títu- los pueden dividirse a su vez en capítulos. Capítulo 1 Capítulo 2 Capítulo 3 Capítulo1 Capítulo - Magnavox MSR90D6 | Quick Start Guide - Page 81
MEMO EN 79 - Magnavox MSR90D6 | Quick Start Guide - Page 82
other proof of original retail purchase will be required together with the product to obtain service under this warranty. This warranty shall MATERIALS, ANY ACCESSORIES (EXCEPT REMOTE CONTROL), ANY COSMETIC PARTS, COMPLETE ASSEMBLY PARTS, DEMO OR FLOOR MODELS. FUNAI CORP. AND ITS REPRESENTATIVES OR
-
 1
1 -
 2
2 -
 3
3 -
 4
4 -
 5
5 -
 6
6 -
 7
7 -
8
-
9
-
10
-
11
-
12
-
13
-
14
-
15
-
16
-
17
-
18
-
19
-
20
-
21
-
22
-
23
-
24
-
25
-
26
-
27
-
28
-
29
-
30
-
31
-
32
-
33
-
34
-
35
-
36
-
37
-
38
-
39
-
40
-
41
-
42
-
43
-
44
-
45
-
46
-
47
-
48
-
49
-
50
-
51
-
52
-
53
-
54
-
55
-
56
-
57
-
58
-
59
-
60
-
61
-
62
-
63
-
64
-
65
-
66
-
67
-
68
-
69
-
70
-
71
-
72
-
73
-
74
-
75
-
76
-
77
-
78
-
79
-
80
-
81
-
82
 |
 |
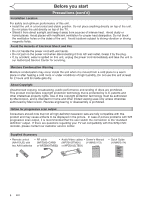
This unit can record to the following disc types.
I
This unit formats discs with DVD+VR mode.
I
DVD-R/DVD+R discs can only be recorded to once. DVD+RW/DVD-RW discs can be recorded to and erased
many times.
I
Discs that have been tested and are proven to be compatible with this recorder:
VERBATIM DVD+R 8x, VERBATIM DVD+RW 4x
VERBATIM DVD-R 8x, VERBATIM DVD-RW 2x, MAXELL DVD-R 16x, JVC DVD-RW 4x
I
We strongly recommend for good recording quality:
TDK DVD+R 4x/8x/16x, SONY DVD+R 4x/8x/16x, MAXELL DVD+R 4x/8x/16x, SONY DVD+RW 4x,
MAXELL DVD-R 8x/16x, MAXELL DVD-RW 4x
1
Connections
2
Setup
Follow to the back side of this sheet.
This unit is compatible to play the following discs.
Logo
Attributes
8cm/12cm, single-sided, single layer disc
Approx. max. recording time (SLP mode):
360 minutes (4.7GB) (for 12cm)
108 minutes (1.4GB) (for 8cm)
DVD+RW
DVD+R
8cm/12cm, single-sided, single layer disc
Approx. max. recording time (SLP mode):
360 minutes (4.7GB) (for 12cm)
108 minutes (1.4GB) (for 8cm)
DVD-RW
DVD-R
Logo
Attributes
DVD-RW
(VIDEO mode, Finalized)
Logo
Disc
DVD-VIDEO
DVD+RW
DVD+R
DVD+R Double Layer
DVD-R
(VIDEO mode, Finalized)
CD-DA (AUDIO CD)
Logo
Disc
CD-R
(CD-DA FORMAT,MP3 files)
Video CD
CD-RW
(CD-DA FORMAT,MP3 files)
The number inside the globe refers to region of the world.
This unit can play DVDs that are labeled for ALL regions or for Region 1.
MSR90D6
2
–1
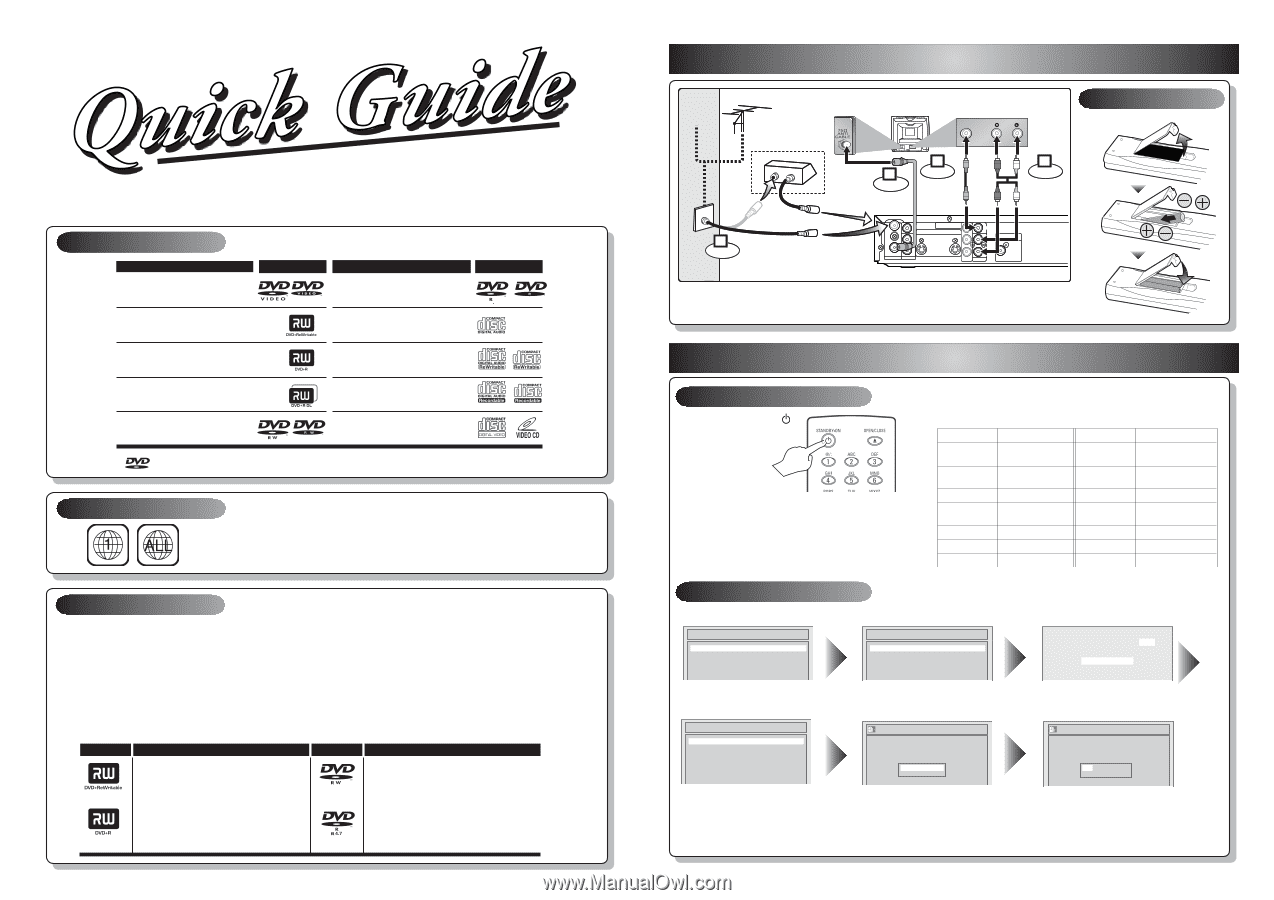
Watching on TV
2
–2
Initial Setup
Press
[STANDBY-ON
]
to turn the unit on.
1.Switch the input selector on your TV to an
appropriate external input channel
(usually near channel 0).
2.Press a button on the TV’s original remote control
(see the table below) to select an external input
channel until the DVD recorder’s picture appears.
Admiral
Curtis Mathis
GE
Hitachi
JVC
Kenwood
LXI-Series
Magnavox
AUX
LINE1, LINE2, 00, 90,
91, 92, 93
INPUT, TV/VCR, 00, 90,
91, 92, 93
INPUT, AUX
VIDEO, VIDEO1, VIDEO2,
VIDEO3
AUX
00
AUX CHANNEL
Input Mode Names for Common TV Brands
Panasonic
RCA
Samsung
Sanyo
Sharp
Sony
Toshiba
Zenith
TV/VIDEO
INPUT, TV/VCR, 00, 90,
91, 92, 93
TV/VIDEO
VIDEO
00
VIDEO1, VIDEO2, VIDEO3
TV/GAME
00
DVD Recorder
Playable discs
Region codes
Recordable discs
is a trademark of DVD Format/Logo Licensing Corporation.
I
Both A/V and RF cables must be connected to the TV for operation.
I
See front page of the Owner's Manual for the connection with the RF modulator.
Set up the following items when turning on the unit for the first time.
Press
[OK]
to Clock Setting.
Using
[
K
/
L
]
, enter the date
(month / day / year).
Press
[
{
/
B
]
to move the cursor.
Press
[OK]
.
TV Program will automatically
appear. (usually near channel 0)
ANTENNA
AUDIO IN
VIDEO IN
L
R
AUDIO OUT
VIDEO OUT
(E1)
IN
IN
OUT
OUT
S-VIDEO
COMPONENT
VIDEO OUTPUT
L
Y
P
B
/C
B
P
R
/C
R
R
DIGITAL AUDIO OUTPUT
PCM / BITSTREAM
COAXIAL
RF cable (not supplied)
RF cable (supplied)
Video
cable
(supplied)
Audio
cable
(supplied)
(Back of TV)
or
Cable
TV signal
Connect
Connect
Connect
Connect
Antenna
(Back of this unit)
IN
OUT
(Cable
box or
Satellite box)
Remote Control
Initial Setup
Français
Español
English
Initial Setup
Channel Preset
Auto Presetting Now
CH 1
Using
[
K
/
L
]
, select your desired
language and press
[OK]
.
Press
[OK]
to Channel Preset.
Then the unit will start getting available channels in your area.
Initial Setup
---- / -- / ---- ( ---- )
-- : ----
Initial Setup
JAN / 01 / 2006 ( SUN )
12: 00
AM
Press
[OK]
again.
Initial Setup
Clock Setting
ANTENNA
AUDIO IN
VIDEO IN
L
R
AUDIO OUT
VIDEO OUT
(E1)
IN
IN
OUT
OUT
S-VIDEO
COMPONENT
VIDEO OUTPUT
L
Y
P
B
/C
B
P
R
/C
R
R
DIGITAL AUDIO OUTPUT
PCM / BITSTREAM
COAXIAL
AUDIO IN
VIDEO
RF cable (not supplied)
RF cable (supplied)
Video
cable
(supplied)
Audio
cable
(supplied)
(Back of TV)
or
Cable
TV signal
Connect
Connect
Connect
Connect
Antenna
(Back of this unit)
2
1
3
4
IN
OUT
(Cable
box or
Satellite box)