Magnavox ZC320MW8 Owners Manual
Magnavox ZC320MW8 - DVD Recorder With TV Tuner Manual
 |
View all Magnavox ZC320MW8 manuals
Add to My Manuals
Save this manual to your list of manuals |
Magnavox ZC320MW8 manual content summary:
- Magnavox ZC320MW8 | Owners Manual - Page 1
Basic Setup Recording Playback Owner's Manual ZC320MW8 DIGITAL VIDEO DISC RECORDER THANK YOU FOR CHOOSING MAGNAVOX. NEED HELP FAST? READ YOUR QUICK GUIDE AND/OR OWNER'S MANUAL FIRST FOR QUICK TIPS THAT MAKE USING YOUR MAGNAVOX PRODUCT MORE ENJOYABLE. IF YOU HAVE READ YOUR INSTRUCTIONS - Magnavox ZC320MW8 | Owners Manual - Page 2
the input selector on your TV to an appropriate external input channel. Press a button on the TV's original remote control that selects an external input channel repeatedly until the DVD recorder's opening picture appears. Check your TV owner's manual for details. Settings for the Video Input You - Magnavox ZC320MW8 | Owners Manual - Page 3
Initial Setup Clock Setting JAN / 01 / 2007 ( MON ) 12 : 00 AM 3 DVD Recording 3 - 1 Basic Recording 1Press [OPEN/CLOSE A] to open the disc tray and insert your disc with its label facing up. * Make sure the disc is compatible with this unit. (Refer to page 20 in the owner's manual for the list - Magnavox ZC320MW8 | Owners Manual - Page 4
user to the presence of important operating and maintenance (servicing) instructions service person should remove the cover or attempt to service this device, due to possible eye injury. CAUTION: CAUTION: LOCATION: USE OF CONTROLS manual. The user experienced radio/TV technician for help. This Class - Magnavox ZC320MW8 | Owners Manual - Page 5
for cleaning. EXCEPTION: A product that is meant for uninterrupted service and, that for some specific reason, such as the possibility of the loss of an authorization code for a CATV converter, is not intended to be unplugged by the user for cleaning or any other purpose, may exclude the reference - Magnavox ZC320MW8 | Owners Manual - Page 6
In case of picture problems with 525(480) progressive scan output, it is recommended that the user switch the connection to the 'standard definition' output. If there are questions regarding your TV set compatibility with this 525p(480p) DVD player, please contact our customer service center. 4 EN - Magnavox ZC320MW8 | Owners Manual - Page 7
is true when the players are compatible with actual recordable DVD discs. Recording Playback Editing Function Setup Others © 2007 Funai Electric Co., Ltd. All rights reserved. No part of this manual may be reproduced, copied, transmitted, disseminated, transcribed, downloaded or stored in any - Magnavox ZC320MW8 | Owners Manual - Page 8
7 Symbols Used in this Owner's Manual 7 FUNCTIONAL OVERVIEW 8 Front Panel 8 Rear Panel 9 Remote Control 10 Connections CONNECTION TO AN EXTERNAL TUNER 12 SETTINGS FOR THE VIDEO INPUT 13 CONNECTION TO A TV 14 CONNECTION TO AN AUDIO SYSTEM 15 Basic Setup GUIDE TO ON-SCREEN DISPLAYS AND - Magnavox ZC320MW8 | Owners Manual - Page 9
unit is off. Symbols Used in this Owner's Manual To specify for what disc type each function is, we put the following symbols at the beginning of each item to operate. * DVD-RW/-R recorded in VR mode or non compatible recording format are not playable. * DVD-RW recorded in the mode other than +VR is - Magnavox ZC320MW8 | Owners Manual - Page 10
programmings have been set, press to set the unit in timer-standby mode. 11. PLAY B button* Press to start or resume playback. 12. STOP C button Press to stop playback or recording. 13. Infrared sensor window Receive signals from your remote control so that you can control the unit from a distance - Magnavox ZC320MW8 | Owners Manual - Page 11
jack Use to connect the S-video input of a TV monitor, AV receiver or other device with an S-video cable. 6. COMPONENT VIDEO OUTPUT jacks Use to connect a TV monitor with component video inputs with a component video cable. 7. AUDIO OUT jacks Use to connect a TV monitor, AV receiver or other device - Magnavox ZC320MW8 | Owners Manual - Page 12
remote control. • The maximum operable ranges from the unit are as follows. - Line of sight: approx. 23 feet (7m) - Either side of the center: approx. 16 feet (5m) within 30° - Above: approx. 16 feet (5m) within 15° - Below: approx. 10 feet (3m) within 30° DVD RECORDER instruction OK DISC SETUP - Magnavox ZC320MW8 | Owners Manual - Page 13
B buttons Press to select items or settings. 11. DISC MENU button Press to display the disc menu. 12. REC MODE button Press to switch the recording mode. 13. REC I button • Press once to start a recording. • Press repeatedly to start one-touch timer recording. 14. RAPID PLAY button During playback - Magnavox ZC320MW8 | Owners Manual - Page 14
AC outlet. rear of your TV 4 After making the connection as described above, make sure to select the appropriate video input type by VIDEO VIDEO OUT following the steps in "SETTINGS FOR THE VIDEO INPUT"IN IN L L Y DIGITAL AUDIO PB / CB OUT OUTPUT PCM/BITSTREAM on page 13. R AUDIO IN (E1 - Magnavox ZC320MW8 | Owners Manual - Page 15
OK DISC SETUP K MENU I REC REC MODE TIMER RAPID PLAY DISPLAY SOURCE 1 Press [SETUP] and use [K / L] to select "General Setting", then press [OK]. "General Setting" General Setting Playback Display Video Recording Clock Reset All Progressive Scan TV Aspect E1V(Rideeaor)InpVuidteo Input E1Vi( - Magnavox ZC320MW8 | Owners Manual - Page 16
channel. Press a button on the TV's original remote control that selects an external input channel until the DVD recorder's opening picture appears. Check your TV's manual for details. Note • Connect this unit directly to the TV. If the RCA audio/video cables are connected to a VCR, pictures may - Magnavox ZC320MW8 | Owners Manual - Page 17
deck or DAT deck. PCM If not connected to any external devices. PCM * To complete these settings, refer to page 68. Note • The audio source on a disc in a Dolby Digital multi channel surround format cannot be recorded as digital sound by an MD or DAT deck. • By connecting this unit to a Dolby - Magnavox ZC320MW8 | Owners Manual - Page 18
the various kinds of settings for playing back, recording, or editing to suite your preference. On-Screen Display / Menu The on-screen display changes in the following order as you press [DISPLAY]. OFF Disc Information/Menu Title Name Information (only when DVD+RW/DVD+R/DVD-RW/DVD-R is in playback - Magnavox ZC320MW8 | Owners Manual - Page 19
, and to effect it when playing back on the other unit. Finalize: (DVD+R/DVD-RW/-R only) Allows you to finalize a disc containing recorded titles. 4. Disc Protect : Allows you to protect a disc from accidental editing or recording. 5. Random Play: Allows you to activate the random playback feature - Magnavox ZC320MW8 | Owners Manual - Page 20
WXYZ 8 9 CLEAR SPACE 0 CM SKIP PREV H NEXT G 1 Press [STANDBY-ON y]. Turn the TV on. Select the input to which the unit is connected. 2 Use [K / L] to select your desired language, then press [OK] to set language. Initial Setup OSD Language English Français Español PLAY E B STOP C RETURN - Magnavox ZC320MW8 | Owners Manual - Page 21
Introduction Connections Basic Setup Recording SETTING THE CLOCK Set the clock before you try the timer programming. Clock Setting STANDBY-ON y General Setting Playback Display Video Clock Setting Recording Clock JAN / 01 / 2007 ( MON ) Reset All 12 : 00 AM K K OK DISC SETUP K - Magnavox ZC320MW8 | Owners Manual - Page 22
more details.) To play back discs other than DVD+RW on other DVD players, you will need to finalize. Unrecordable Discs • DVD-RW recorded in the mode other than +VR is not recordable on this unit unless you erase all contents in the disc (refer to page 63). • DVD-R recorded in the mode other than - Magnavox ZC320MW8 | Owners Manual - Page 23
Connections Basic Setup BEFORE RECORDING Make Recording Compatible Setting for Auto Chapter You can set a specified time for chapter marks. Use this feature to make the unfinalized +VR mode discs recorded on other unit recordable on this unit. When you make an additional recording on - Magnavox ZC320MW8 | Owners Manual - Page 24
SETUP 3 Press [OPEN/CLOSE A] to close the disc tray. It may take a while to load the disc completely. • When inserting a brand-new DVD+RW/DVDRW, the unit automatically starts to format. • If titles have been recorded on the disc, the title list is displayed. Press [STOP C] to exit the title list - Magnavox ZC320MW8 | Owners Manual - Page 25
appear in the title list. (Refer to "Guide to a Title List" on page 52.) e.g.) DVD+R I Press [PAUSE F] to pause recording. Press [PAUSE F]] or [REC I] again to restart recording. To set one-touch timer recording (OTR)... This is a simple way to set the recording time in blocks of 30 minutes. Press - Magnavox ZC320MW8 | Owners Manual - Page 26
time you want to start recording. • Do not change the external tuner's channel while you are recording. You cannot watch one channel and record another at the same time. • Set the clock before setting a timer programming. • Insert a recordable disc with enough recordable space. STANDBY-ON y OPEN - Magnavox ZC320MW8 | Owners Manual - Page 27
input position (E1/E2) to which your external tuner page 26. 8 Press [STANDBY-ON y] to set a timer programming. TIMER REC indicator will light up on the front panel. 1/1 Refer to "Recording Mode" on page 20. • You can check the remaining recordable space of the disc when you select the recording - Magnavox ZC320MW8 | Owners Manual - Page 28
E35 PCA full *1 E46 E36 Already finalized video format disc E40 Some portion has not been recorded because of program overlapping. Recording did not start at the start time. Power failed No disc when recording Already 49 titles recorded Already 254 chapters recorded Copy prohibited program It is - Magnavox ZC320MW8 | Owners Manual - Page 29
Basic Setup Recording TIMER RECORDING Hints for Timer Recording • If there is a power failure or this unit has been unplugged for more than 30 seconds, the clock setting and all timer programming will be lost. • If a disc is not inserted, TIMER REC indicator flashes and timer recording - Magnavox ZC320MW8 | Owners Manual - Page 30
to finish recording. Refer to the tuner's manual on how to set the timer. • Make sure to set the satellite link standby mode when you finish setting. 1 K K OK DISC SETUP K MENU I REC REC MODE TIMER RAPID PLAY DISPLAY SOURCE 4 Use [K / L] to select the time and recording mode, then press - Magnavox ZC320MW8 | Owners Manual - Page 31
. Basic Setup Recording Playback Editing Function Setup Others Notes • If the signal of external input breaks up over 5 seconds, satellite link function will be canceled. • If you have not set the clock, "Clock Setting" menu will appear at step 3. Follow to step 3 in "Clock Setting" on page - Magnavox ZC320MW8 | Owners Manual - Page 32
y]. Make sure that the TV input is set on the unit. 2) Load the disc that includes a title to input position (E1/E2) to which your external tuner is connected. Then select the desired channel to record on the external tuner. e.g.) DVD+RW selected title number to be overwritten 1 1 0:01:00 +RW - Magnavox ZC320MW8 | Owners Manual - Page 33
Introduction Connections Basic Setup Recording OVERWRITING UNNECESSARY TITLE Hints for Overwriting When you overwrite on the unnecessary title, there were various circumstances such as follows. Please note that following cases only describe the overwriting without any recording mode discrepancy - Magnavox ZC320MW8 | Owners Manual - Page 34
E1 (rear) input jacks of this unit by using S-video or RCA audio / video cables. or S-VIDEO VIDEO OUT OUT AUDIO OUT R L external device (camcorder, VCR etc.) VIDEO OUT AUDIO OUT R L S-VIDEO OUT S-video cable or RCA video cable RCA audio cable E2 to E2 IN DVD RECORDER or front of - Magnavox ZC320MW8 | Owners Manual - Page 35
Introduction Connections Basic Setup Recording EXTERNAL DEVICE RECORDING Recording from an External Device Before recording from an external device, refer to the instructions for the connection on page 32. STANDBY-ON y OPEN/CLOSE A .@/: ABC DEF 1 2 3 GHI JKL MNO 4 5 6 PQRS 7 TUV - Magnavox ZC320MW8 | Owners Manual - Page 36
OFF ON", then press [OK]. e.g.) DVD+RW Disc Edit Edit Disc Name Erase Disc Make Edits Compatible Disc Protect OFF ON 4 Use [K / L] to select "Yes", then press [OK]. Disc Edit Edit Disc Name Erase Disc Make Edits Compatible Disc Protect OFF OPNrotect this disc? Yes No A disc will be protected. This - Magnavox ZC320MW8 | Owners Manual - Page 37
Connections Basic Setup PLAYING THE DISCS IN OTHER DVD PLAYERS Finalizing a Disc You will need to finalize discs to play back in other DVD players. Finalizing may take several minutes up to an hour. A shorter recording period on the disc will require a longer time period for finalization. Do - Magnavox ZC320MW8 | Owners Manual - Page 38
PLAYING THE DISCS IN OTHER DVD PLAYERS Auto Finalizing You can finalize discs automatically using this function. You can use this function to finalize discs after finishing all timer recordings and at the end of the disc space. STANDBY-ON y OPEN/CLOSE A .@/: ABC DEF 1 2 3 GHI JKL MNO 4 - Magnavox ZC320MW8 | Owners Manual - Page 39
for region codes and color systems as described below. You can play back discs that have the following logos will play back on the unit. Other disc types are not guaranteed to play back. Playable discs Logos DVD-video DVD+RW DVD+R DVD-RW (Finalized video mode discs only) DVD-R (Finalized video - Magnavox ZC320MW8 | Owners Manual - Page 40
1 Press [STANDBY-ON y]. Turn on the TV and be sure to select the input to which the unit is connected. 2 Press [OPEN/CLOSE A] to open the disc tray and insert your disc with its label facing up. Align the disc to the disc tray guide. * Make sure the disc is compatible with this unit. (Refer to - Magnavox ZC320MW8 | Owners Manual - Page 41
1 Press [STANDBY-ON y]. Turn on the TV and be sure to select the input to which the unit is connected. 2 Press [OPEN/CLOSE A] to open the disc tray and insert your disc with its label facing up. Align the disc to the disc tray guide. * Make sure the disc is compatible with this unit. (Refer to - Magnavox ZC320MW8 | Owners Manual - Page 42
recorded disc space 5. Status of disc protection ("ON" is protected disc.) 6. Making edits compatible/finalize • When DVD+RW is inserted: If the disc needs to be set "Make Edits Compatible", "Needed" is displayed. Otherwise, "Not Needed" is displayed. (Refer to page 64.) • When DVD+R, DVD-RW or DVD - Magnavox ZC320MW8 | Owners Manual - Page 43
Basic Setup Recording Playback BASIC PLAYBACK Playing Back an Audio CD and a CD-RW/-R with MP3 Files 1 Follow steps 1 to 2 in "Direct Playback" on page that files to be played back in this unit are recorded under the following specifications: • Sampling frequency • Constant bit rate : - Magnavox ZC320MW8 | Owners Manual - Page 44
BASIC PLAYBACK Using the Title / Disc Menu DVD or video CD with PBC function may contain a title list, which describes the contents of the disc, or a disc menu, which guides you through the available functions in the disc. Pause 1) During playback, press [PAUSE F]. Playback will be paused and - Magnavox ZC320MW8 | Owners Manual - Page 45
disc from the beginning, press [STOP C] again while the playback is stopped. Skipping TV Commercials During Playback You can skip TV commercials to enjoy the recorded CM Skip 30 sec. (forwarding 30 seconds) Basic Setup Recording Playback Editing Function Setup 1) During playback, press - Magnavox ZC320MW8 | Owners Manual - Page 46
during playback. This function is available only on discs recorded in the Dolby Digital format, and plays back in a slightly faster/ slower . Note • Audio (language) setting cannot be changed while using this mode. • This feature may not work at some point in a disc. • Audio is PCM during rapid - Magnavox ZC320MW8 | Owners Manual - Page 47
Introduction Connections Basic Setup Recording Zoom SPECIAL PLAYBACK Marker Setting 1) During playback, press [DISPLAY]. 2) Use [{ / B] to select , then press [OK] within 1 second or wait for 1 second to display the selection menu. e.g.) DVD-video 1/ 5 1/ 5 0:01:00 / 1:23:45 DVD Video 3) - Magnavox ZC320MW8 | Owners Manual - Page 48
1) During playback, press [DISPLAY]. 2) Use [{ / B] to select , then press [OK]. e.g.) audio CD 1/ 5 0:00:15 / 0:05:00 CD 1/ 5 1/ 5 0:01:00 / 1:23:45 DVD Video e.g.) MP3 files 1/ 5 0:00:15 MP3 The number next to will be highlighted. 3) Title: Use [K / L] or [the Number buttons] to enter - Magnavox ZC320MW8 | Owners Manual - Page 49
Introduction Connections Basic Setup Time Search SEARCH 1) During playback, press [DISPLAY]. 2) Use [{ / B] to select , then press [OK]. e.g.) DVD-video 1/ 5 1/ 5 0:01:00 / 1:23:45 DVD Video e.g.) CD with PBC function. Recording Playback Editing Function Setup Others Español EN 47 - Magnavox ZC320MW8 | Owners Manual - Page 50
may vary depending the discs. 1) During playback press [DISPLAY]. 2) Use [{ / B] to select , then press [OK] within 1 second or wait for 1 second to display the selection menu. 1/ 5 1/ 5 0:01:00 / 1:23:45 DVD Video Note • Point B for the repeat A-B playback should be set within the same title - Magnavox ZC320MW8 | Owners Manual - Page 51
Introduction Connections Basic Setup Recording Playback REPEAT / RANDOM / PROGRAM PLAYBACK Program Playback You can program the disc to play back make program settings up to 50 tracks. • To cancel program playback, press [STOP C] twice during program playback. "OFF" appears on the TV screen. • - Magnavox ZC320MW8 | Owners Manual - Page 52
only allow you to change the subtitle from the disc menu. Press [TITLE] or [DISC MENU] to display the disc menu. • If a 4-digit language code appears in the subtitle menu, refer to the "LANGUAGE CODE" on page 79. When playing back a DVD-video recorded with 2 or more soundtracks (these are often in - Magnavox ZC320MW8 | Owners Manual - Page 53
Introduction Connections Basic Setup Recording SELECTING THE FORMAT OF AUDIO AND VIDEO DVD Video OFF Type 1 Type 2 Your setting will be activated. This function reduces noise in the playback picture. If noises appear on the TV screen during playing back discs recorded in long time recording - Magnavox ZC320MW8 | Owners Manual - Page 54
• Hiding Chapters (Refer to page 58.) • Setting Pictures for Thumbnails (Refer to page 59.) • Dividing a Title (DVD+RW/DVD-RW only) (Refer to page 60.) • Putting Name on Disc (Refer to page 61.) • Setting or Releasing Disc Protect (Refer to page 62.) • Erasing Disc (Refer to page 63.) • Making Edits - Magnavox ZC320MW8 | Owners Manual - Page 55
Basic Setup EDITING DISCS Deleting Titleys You can delete titles which you do not need anymore. Please be advised that the titles once deleted cannot be brought back to the disc. For DVD+RW/DVD-RW, when the last recorded title in the title list is deleted, the available disc space to record - Magnavox ZC320MW8 | Owners Manual - Page 56
0:00:59 3 To enter a title name, follow the steps of "Guide to Edit Title Name" on this page. Edit - Edit Title Name 1 ABC abc 123 @! ? character set Guide to Edit Title Name 1) Use [K / L] to select a desired character set, then press [OK]. 2) Follow the list below, use [the Number buttons - Magnavox ZC320MW8 | Owners Manual - Page 57
Introduction Connections Basic Setup Recording Playback EDITING DISCS Setting Chapter Marks You can put chapter marks in each title. Once a chapter is marked, you can use it for the chapter search feature. 1 Follow steps 1 to 3 in "Deleting Titles" on page 53 to display "Edit" menu. STANDBY - Magnavox ZC320MW8 | Owners Manual - Page 58
CLEAR SPACE 0 CM SKIP PREV H NEXT G PLAY E B STOP C RETURN K D PAUSE F TITLE K K OK DISC SETUP K MENU I REC REC MODE TIMER RAPID PLAY DISPLAY SOURCE 1 Follow steps 1 to 3 in "Deleting Titles" on page 53 to display "Edit" menu. 2 Use [K / L] to select "Chapter Mark", then press [OK - Magnavox ZC320MW8 | Owners Manual - Page 59
Connections Basic Setup Recording EDITING DISCS Clearing Chapter Marks (cont'd) STANDBY-ON y OPEN/CLOSE A .@/: ABC DEF 1 2 3 GHI JKL MNO 4 5 6 PQRS 7 TUV WXYZ 8 9 CLEAR SPACE 0 CM SKIP PREV H NEXT G PLAY E B STOP C RETURN K D PAUSE F TITLE K K OK DISC SETUP - Magnavox ZC320MW8 | Owners Manual - Page 60
chapters to be "Visible", select the chapter to be shown. Then use [K / L] to select "Visible" at the step 4 on this page. Data will be written onto the disc momentarily. After that, title list is displayed. Note • "Hidden" will be displayed in the preview window while previewing the hidden chapter - Magnavox ZC320MW8 | Owners Manual - Page 61
Introduction Connections Basic Setup EDITING DISCS Setting Pictures for Thumbnails You can set your desired scene as a thumbnail for each title. STANDBY- set. 5 Press [RETURN] to exit. Data will be written onto the disc momentarily. This operation may take a while to be completed. Recording - Magnavox ZC320MW8 | Owners Manual - Page 62
scene at this point. Data will be written onto the disc momentarily. This operation may take a while to be completed. Note • You cannot divide a title of the disc when the number of recording titles reaches the maximum of 49, and the number of recording chapters reaches the maximum of 254. 60 EN - Magnavox ZC320MW8 | Owners Manual - Page 63
a title name will appear. Edit Disc Name No Disc Name Disc Total Titles Disc Space Used Disc Protect Make Edits Compatible DVD+RW 3 0:30:48 OFF Needed ABC abc 123 @! ? 0:00:00 4 To enter a disc name, follow the steps of "Guide to Edit Title Name" on page 54. When you finish entering a title - Magnavox ZC320MW8 | Owners Manual - Page 64
EDITING DISCS Setting or Releasing Disc Protect To Disc" on page 61 to display "Disc Edit" menu. 2 Use [K / L] to select "Disc Protect OFF ON", then press [OK]. e.g.) DVD+RW Disc Edit Edit Disc Name Erase Disc Make Edits Compatible Disc Protect OFF ON • If the disc is already protected, "Disc - Magnavox ZC320MW8 | Owners Manual - Page 65
[STOP C] if you are playing back a disc. 1 Follow steps 1 to 2 in "Putting Name on Disc" on page 61 to display "Disc Edit" menu. 2 Use [K / L] to select "Erase Disc", then press [OK]. e.g.) DVD+RW Disc Edit Edit Disc Name Erase Disc Make Edits Compatible Disc Protect OFF ON 3 Use [K / L] to select - Magnavox ZC320MW8 | Owners Manual - Page 66
[STOP C] if you are playing back a disc. 1 Follow steps 1 to 2 in "Putting Name on Disc" on page 61 to display "Disc Edit" menu. 2 Use [K / L] to select "Make Edits Compatible", then press [OK]. Disc Edit Edit Disc Name Erase Disc Make Edits Compatible Disc Protect OFF ON PLAY E B STOP C RETURN - Magnavox ZC320MW8 | Owners Manual - Page 67
aspect ratio of your TV. Set the video input type for the external input. Insert chapter marks at even time interval. Set the unit to finalize the disc automatically. Make Recording Compatible ON Page 21 OFF Clock Page 19 Clock Setting Reset All Page 73 Yes No Set to prohibiting additional - Magnavox ZC320MW8 | Owners Manual - Page 68
Playback Display Video Recording Clock Reset All 3 Use [K / L] to select a desired item, then press [OK]. 1 Parental Lock 2 Disc Audio 3 Disc Menu Language 4 Audio Language 5 Subtitle Language 6 Angle Icon 7 Still Mode Submenu will appear. 4 Refer to 1 to 7 on pages 67-69 and set the selected item - Magnavox ZC320MW8 | Owners Manual - Page 69
Introduction Connections Basic Setup Recording SETUPS Playback (cont'd) 1 Parental Lock (Default: OFF) Some DVD-video feature a parental lock level. Playback will stop if the ratings exceed the levels you set, it will require you to enter a password before the disc will playback. This feature - Magnavox ZC320MW8 | Owners Manual - Page 70
range control function is available only on the discs which are recorded in the Dolby Digital format. B PCM (Default : 48kHz) Use [K / L] to select a setting, then press [OK]. General Setting Playback Display Video Recording Clock Reset All Parental Lock Disc AudioAudio Out PCM Disc Menu - Magnavox ZC320MW8 | Owners Manual - Page 71
]. Code Input ---- • When you finish entering the code, press [OK]. Refer to the language code table on page 79. 6 Angle Icon (Default : ON) Set to "ON" to show the angle icon during the playback. Use [K / L] to select a setting, then press [OK]. General Setting Playback Display Video Recording - Magnavox ZC320MW8 | Owners Manual - Page 72
K K OK DISC SETUP K MENU page and set the selected item. 5 When you finish with setting, press [SETUP] to exit. 1 OSD Language (Default : English) Set the language for the on-screen display. Use [K / L] to select a setting, then press [OK]. General Setting Playback Display Video Recording - Magnavox ZC320MW8 | Owners Manual - Page 73
desired item, then press [OK]. 1 Progressive Scan 2 TV Aspect 3 Video Input Submenu will appear. 4 Refer to 1 to 2 on page 72 and set the selected item. • For 3 refer to page 13. 5 When you finish with setting, press [SETUP] to exit. Recording Playback Editing Function Setup Others Español EN - Magnavox ZC320MW8 | Owners Manual - Page 74
this unit to the TV. (Refer to "Method 3" on page 14.) If not, use the RCA video cable and set the progressive scan to "OFF" or press and hold [SETUP] for more than 3 seconds during DVD playback. • When selecting "No" or not pressing any buttons on the unit or remote control within 15 seconds at - Magnavox ZC320MW8 | Owners Manual - Page 75
Introduction Connections Basic Setup Reset All Reset the setting to default. STANDBY-ON y OPEN/CLOSE A .@/: ABC DEF 1 2 3 GHI JKL MNO 4 5 6 PQRS 7 TUV WXYZ 8 9 CLEAR SPACE 0 CM SKIP PREV H NEXT G PLAY E B STOP C RETURN K D PAUSE F TITLE K K OK DISC SETUP K MENU - Magnavox ZC320MW8 | Owners Manual - Page 76
DIGITAL AUDIO OUTPUT jack, check the setting in "Disc Audio" (page 68). • Clean the disc with a cleaning cloth. • This unit is not compatible with DTS sound. • Batteries are weak. • There are obstacles between the remote control and the unit. • The remote control is far from the unit. • There - Magnavox ZC320MW8 | Owners Manual - Page 77
If the disc was recorded on another recorder, the unit cannot play back the disc if it was not finalized. Discs recorded on this unit cannot be played back on other DVD players. • If you are using DVD+R, DVD-RW/-R disc, please ensure you finalized the disc after recording (page 35). The disc does - Magnavox ZC320MW8 | Owners Manual - Page 78
. • It may take a few seconds for the disc tray to open after you have recorded or edited a disc. This is because the unit is adding disc data to the disc. • If there is a power failure or unplugging during recording, finalizing, formatting or editing (even after "Repairing" disappears), a repairing - Magnavox ZC320MW8 | Owners Manual - Page 79
that you will record to disc (page 21). * If you are still having trouble with the unit after checking "TROUBLESHOOTING", write down the error code and the error description for calling our help line mentioned on the front page to locate an Authorized Service Center. Playback Editing Function - Magnavox ZC320MW8 | Owners Manual - Page 80
on the external tuner using the remote control of this unit? No, this unit records only DVD. Possible when the region code of the disc is 1 and All. No, you cannot control the unit by PC. Yes, you can. Select "E1" or "E2" as your recording channel, and leave the external tuner on (pages 12, 2427 - Magnavox ZC320MW8 | Owners Manual - Page 81
Introduction Connections Basic Setup Recording Language Abkhazian Afar Afrikaans Albanian Amharic Arabic Armenian French Frisian Galician Georgian German Greek Greenlandic Guarani Gujarati Hausa Hebrew Hindi LANGUAGE CODE Code 4748 4747 4752 6563 4759 4764 5471 4765 4771 4772 4847 5167 4860 - Magnavox ZC320MW8 | Owners Manual - Page 82
Dolby Laboratories. It offers you sound of stereo(2ch) or multi channel audio. Finalize To make DVD, which have been recorded on, possible to play back in DVD players. With this unit, it is possible to finalize DVD+R, DVD-RW, and DVD-R. MP3 (MPEG audio layer 3) MP3 is a method of compressing files - Magnavox ZC320MW8 | Owners Manual - Page 83
Basic Setup SPECIFICATIONS Rear Front General System Power requirements Power consumption Dimensions (width x height x depth) Weight Operating temperature Operating humidity Recording Recording format Recording discs Video recording format Sampling frequency Compression format Audio recording - Magnavox ZC320MW8 | Owners Manual - Page 84
es una marca registrada de DVD Format/Logo Licensing Corporation. Códigos de Región El número presente en el interior el globo se refiere a una región del mundo.Este aparato puede reproducir discos DVD que estén rotulados para ALL las regiones o para la región 1. DVD+RW DVD+R Disco de 8 cm / 12 - Magnavox ZC320MW8 | Owners Manual - Page 85
OUT COMPONENT VIDEO OUTPUT cable de audio RCA Basic Setup Recording Playback Editing Function Setup sintonizador externo cable de S-video VIDEO VIDEO control remoto original del televisor hasta que aparezca la imagen inicial del grabador de DVD. Para obtener detalles consulte el manual - Magnavox ZC320MW8 | Owners Manual - Page 86
4 Utilice [{ / B] para seleccionar un elemento a configurar, y utilice [K / L] para seleccionar el contenido de su preferencia, y luego presione [OK]. Ajuste inicial Ajste Manual de Reloj ENE / 01 / 2007 ( LUN ) 12 : 00 AM Grabación Básica 1 Presione [OPEN/CLOSE A] para abrir la bandeja de discos - Magnavox ZC320MW8 | Owners Manual - Page 87
Introduction Connections Basic Setup Recording ESPAÑOL Grabación con Temporizador Usted SPACE 0 CM SKIP PREV H NEXT G PLAY E B STOP C RETURN K D PAUSE F TITLE 2 K K OK DISC MENU SETUP 4 I REC REC MODE TIMER 1 RAPID PLAY DISPLAY SOURCE 1 Presione [TIMER]. 2 Utilice [K / L] para - Magnavox ZC320MW8 | Owners Manual - Page 88
, flood, lightning or other acts of God. THIS WARRANTY DOES NOT COVER PACKING MATERIALS, ANY ACCESSORIES (EXCEPT REMOTE CONTROL), ANY COSMETIC PARTS, COMPLETE ASSEMBLY PARTS, DEMO OR FLOOR MODELS. FUNAI CORP. AND ITS REPRESENTATIVES OR AGENTS SHALL IN NO EVENT BE LIABLE FOR ANY GENERAL, INDIRECT OR
-
 1
1 -
 2
2 -
 3
3 -
 4
4 -
 5
5 -
 6
6 -
 7
7 -
8
-
9
-
10
-
11
-
12
-
13
-
14
-
15
-
16
-
17
-
18
-
19
-
20
-
21
-
22
-
23
-
24
-
25
-
26
-
27
-
28
-
29
-
30
-
31
-
32
-
33
-
34
-
35
-
36
-
37
-
38
-
39
-
40
-
41
-
42
-
43
-
44
-
45
-
46
-
47
-
48
-
49
-
50
-
51
-
52
-
53
-
54
-
55
-
56
-
57
-
58
-
59
-
60
-
61
-
62
-
63
-
64
-
65
-
66
-
67
-
68
-
69
-
70
-
71
-
72
-
73
-
74
-
75
-
76
-
77
-
78
-
79
-
80
-
81
-
82
-
83
-
84
-
85
-
86
-
87
-
88
 |
 |
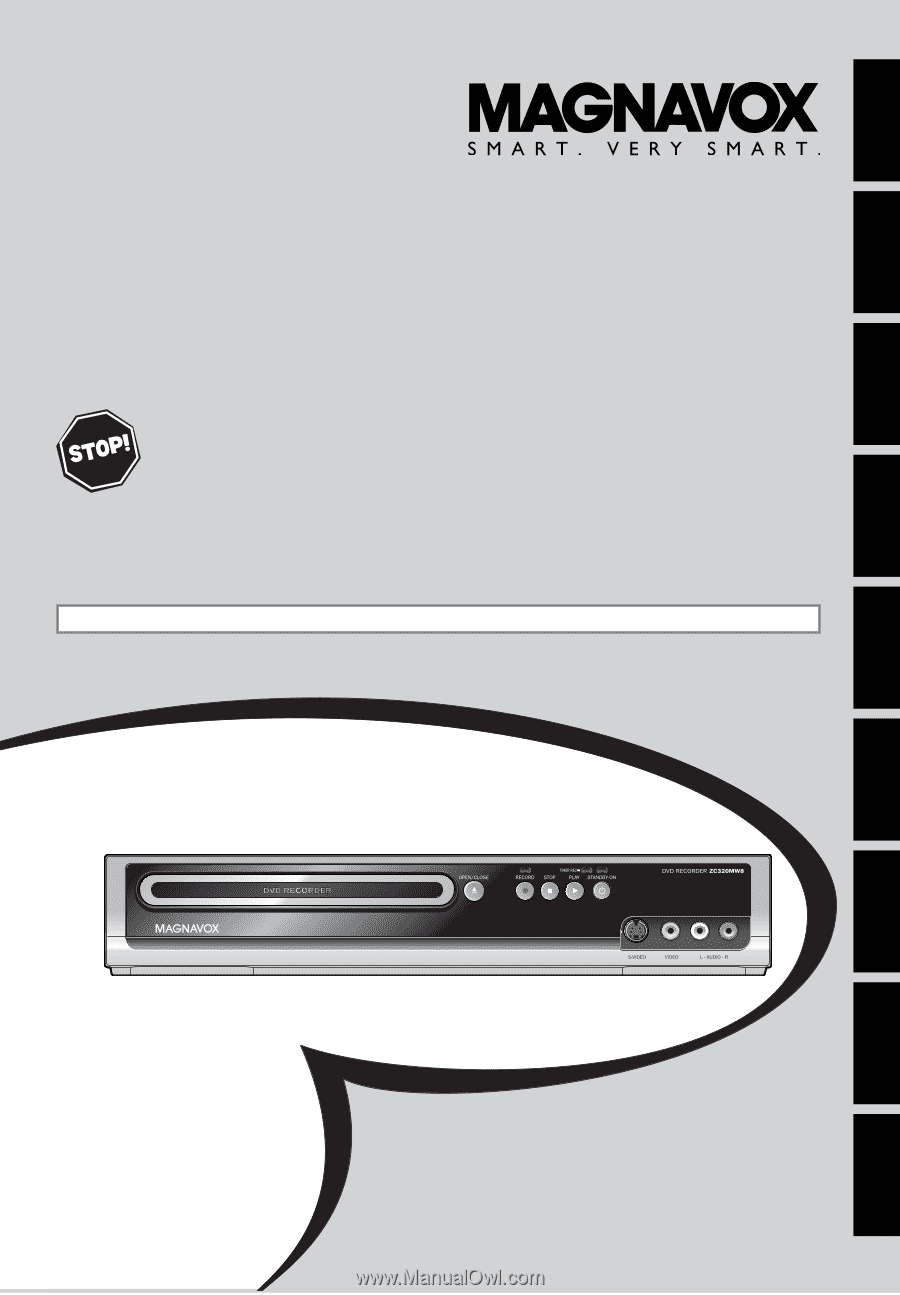
Owner's Manual
ZC320MW8
D
IGITAL
V
IDEO
D
ISC
R
ECORDER
DVD RECORDER
DVD RECORDER
T
HANK
YOU
FOR
CHOOSING
M
AGNAVOX
.
N
EED
HELP
FAST
?
R
EAD
YOUR
Q
UICK
G
UIDE
AND
/
OR
O
WNER
'
S
M
ANUAL
FIRST
FOR
QUICK
TIPS
THAT
MAKE
USING
YOUR
M
AGNAVOX
PRODUCT
MORE
ENJOYABLE
.
I
F
YOU
HAVE
READ
YOUR
INSTRUCTIONS
AND
STILL
NEED
ASSISTANCE
,
YOU
MAY
ACCESS
OUR
ONLINE
HELP
AT
HTTP
://
WWW
.
FUNAI
-
CORP
.
COM
OR
CALL
1-800-605-8610
WHILE
WITH
YOUR
PRODUCT
.
Recording
Playback
Editing
Introduction
Connections
Basic Setup
Function Setup
Others
Español
INSTRUCCIONES EN ESPAÑOL INCLUIDAS.
© 2007 Funai Electric Co., Ltd.