Magnavox ZC320MW8 Owners Manual - Page 16
Connection To A Tv - s manual
 |
View all Magnavox ZC320MW8 manuals
Add to My Manuals
Save this manual to your list of manuals |
Page 16 highlights
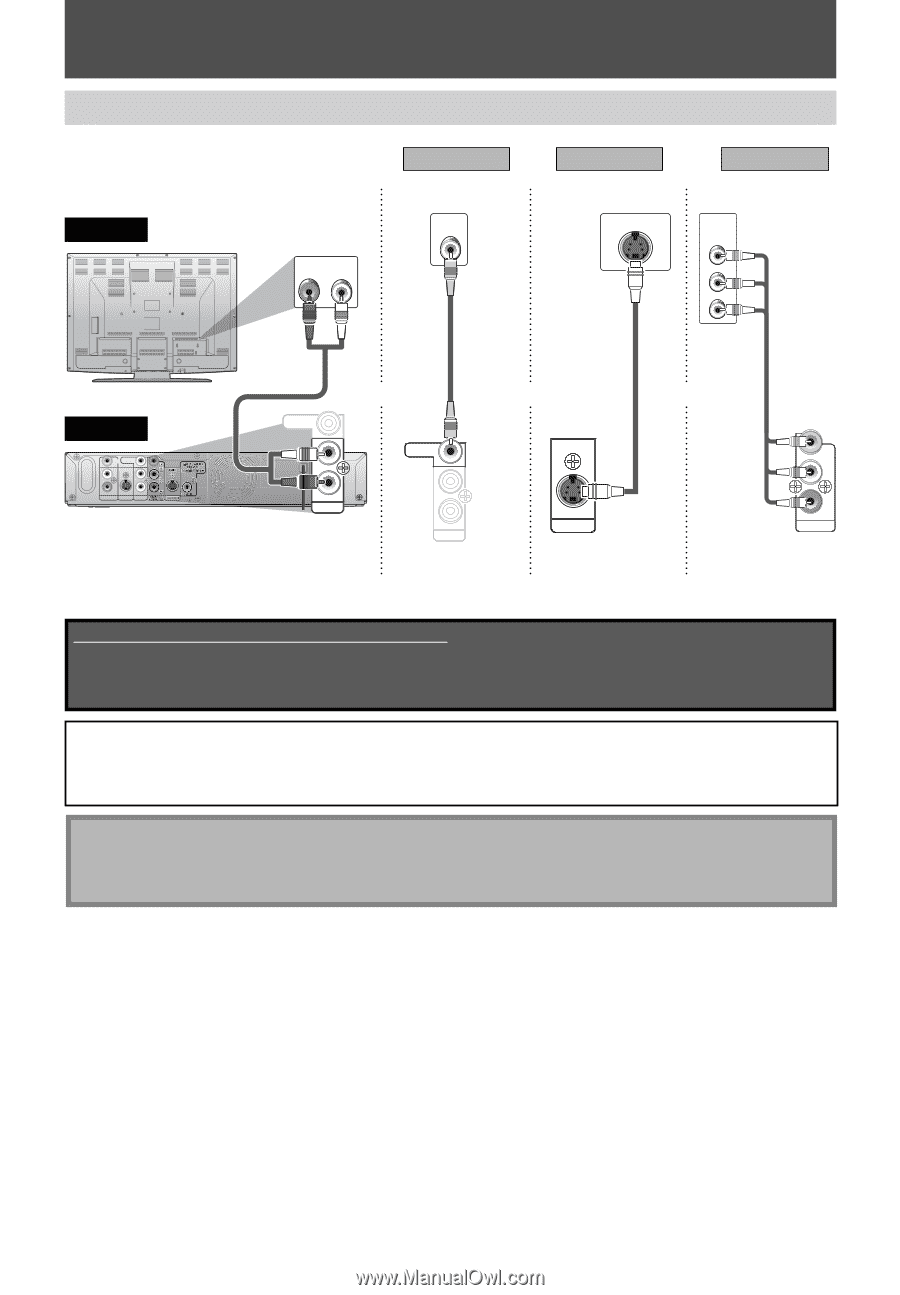
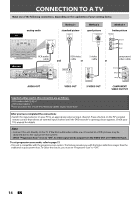
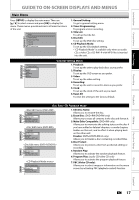
CONNECTION TO A TV Make one of the following connections, depending on the capabilities of your existing device. Method 1 Method 2 Method 3 analog audio standard picture good picture better picture TV AUDIO IN R L VIDEO IN S-VIDEO IN COMPONENT VIDEO IN Y PB/CB PR/CR (Green) (Blue) (Red) this unit VIDEO VIDEO OUT IN IN L L R R AUDIO IN S-VIDEO AUDIO OUT (E1) RCA audio cable and RCA video S-video cable or cable or component video cable VIDEO OUT L R AUDIO OUT AUDIO OUT VIDEO OUT L R AUDIO OUT VIDEO OUT OUT S-VIDEO S-VIDEO OUT (Green) Y PB / (Blue) CB (Red) PR / CR COMPONENT VIDEO OUTPUT COMPONENT VIDEO OUTPUT Supplied cables used in this connection are as follows: • RCA audio cable (L/R) x 1 • RCA video cable x 1 Please purchase the rest of the necessary cables at your local store. After you have completed the connections • Switch the input selector on your TV to an appropriate external input channel. Press a button on the TV's original remote control that selects an external input channel until the DVD recorder's opening picture appears. Check your TV's manual for details. Note • Connect this unit directly to the TV. If the RCA audio/video cables are connected to a VCR, pictures may be distorted due to the copy protection system. • When "Progressive Scan" is set to "ON", no video signal will be output from the VIDEO OUT or S-VIDEO OUT jack. To set progressive scan mode, refer to page 72 • This unit is compatible with the progressive scan system. The feature provides you with the higher definition images than the traditional output system does. To utilize this feature, you must set "Progressive Scan" to "ON". 14 EN
-
 1
1 -
2
-
3
-
4
-
5
-
6
-
7
-
8
-
9
-
10
-
 11
11 -
 12
12 -
 13
13 -
 14
14 -
 15
15 -
 16
16 -
 17
17 -
 18
18 -
 19
19 -
 20
20 -
 21
21 -
22
-
23
-
24
-
25
-
26
-
27
-
28
-
29
-
30
-
31
-
32
-
33
-
34
-
35
-
36
-
37
-
38
-
39
-
40
-
41
-
42
-
43
-
44
-
45
-
46
-
47
-
48
-
49
-
50
-
51
-
52
-
53
-
54
-
55
-
56
-
57
-
58
-
59
-
60
-
61
-
62
-
63
-
64
-
65
-
66
-
67
-
68
-
69
-
70
-
71
-
72
-
73
-
74
-
75
-
76
-
77
-
78
-
79
-
80
-
81
-
82
-
83
-
84
-
85
-
86
-
87
-
88
 |
 |