Magnavox ZC320MW8 Owners Manual - Page 65
Erasing Disc
 |
View all Magnavox ZC320MW8 manuals
Add to My Manuals
Save this manual to your list of manuals |
Page 65 highlights
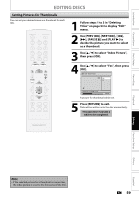
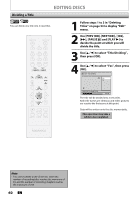
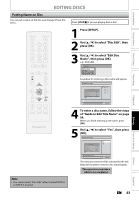
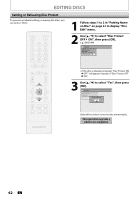
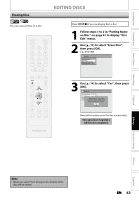
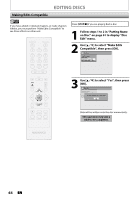
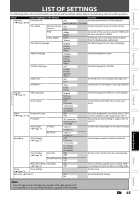
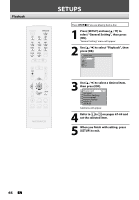
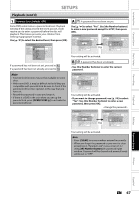
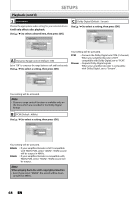
Introduction Connections Basic Setup Erasing Disc EDITING DISCS You can erase all titles on a disc. STANDBY-ON y OPEN/CLOSE A .@/: ABC DEF 1 2 3 GHI JKL MNO 4 5 6 PQRS 7 TUV WXYZ 8 9 CLEAR SPACE 0 CM SKIP PREV H NEXT G PLAY E B STOP C RETURN K D PAUSE F TITLE K K OK DISC SETUP K MENU I REC REC MODE TIMER RAPID PLAY DISPLAY SOURCE Press [STOP C] if you are playing back a disc. 1 Follow steps 1 to 2 in "Putting Name on Disc" on page 61 to display "Disc Edit" menu. 2 Use [K / L] to select "Erase Disc", then press [OK]. e.g.) DVD+RW Disc Edit Edit Disc Name Erase Disc Make Edits Compatible Disc Protect OFF ON 3 Use [K / L] to select "Yes", then press [OK]. Disc Edit Edit Disc Name Erase Disc Make Edits Compatible Disc Protect OWFhFen yOouNpress "Yes", all the contents in the disc will be erased. Are you sure to erase the disc? Yes No Data will be written onto the disc momentarily. This operation may take a while to be completed. Recording Playback Editing Function Setup Others Español Note • When you select "Yes" at step 3, all contents of the disc will be erased. EN 63
-
 1
1 -
2
-
3
-
4
-
5
-
6
-
7
-
8
-
9
-
10
-
11
-
12
-
13
-
14
-
15
-
16
-
17
-
18
-
19
-
20
-
21
-
22
-
23
-
24
-
25
-
26
-
27
-
28
-
29
-
30
-
31
-
32
-
33
-
34
-
35
-
36
-
37
-
38
-
39
-
40
-
41
-
42
-
43
-
44
-
45
-
46
-
47
-
48
-
49
-
50
-
51
-
52
-
53
-
54
-
55
-
56
-
57
-
58
-
59
-
 60
60 -
 61
61 -
 62
62 -
 63
63 -
 64
64 -
 65
65 -
 66
66 -
 67
67 -
 68
68 -
 69
69 -
 70
70 -
71
-
72
-
73
-
74
-
75
-
76
-
77
-
78
-
79
-
80
-
81
-
82
-
83
-
84
-
85
-
86
-
87
-
88
 |
 |