Makita BTW251Z Owners Manual
Makita BTW251Z Manual
 |
View all Makita BTW251Z manuals
Add to My Manuals
Save this manual to your list of manuals |
Makita BTW251Z manual content summary:
- Makita BTW251Z | Owners Manual - Page 1
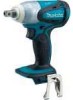
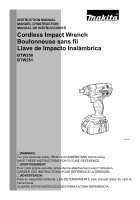
INSTRUCTION MANUAL MANUEL D'INSTRUCTION MANUAL DE INSTRUCCIONES Cordless Impact Wrench Boulonneuse sans fil Llave de Impacto Inalámbrica BTW250 BTW251 007450 WARNING: For your personal safety, READ and UNDERSTAND before using. SAVE THESE INSTRUCTIONS FOR FUTURE REFERENCE. AVERTISSEMENT: Pour votre - Makita BTW251Z | Owners Manual - Page 2
. The term "power tool" in all of the warnings listed below refers to your mains-operated (corded) power tool or battery-operated (cordless) power tool. SAVE THESE INSTRUCTIONS. Work area safety 1. Keep work area clean and well lit. Cluttered and dark areas invite accidents. 2. Do not operate power - Makita BTW251Z | Owners Manual - Page 3
help. Liquid ejected from the battery may cause irritation or burns. SERVICE 28. Have your power tool serviced by a qualified repair person using only identical replacement parts. This will ensure that the safety of the power tool is maintained. 29. Follow instruction for lubricating and changing - Makita BTW251Z | Owners Manual - Page 4
・ number of blow IMPORTANT SAFETY INSTRUCTIONS ENC007-2 FOR BATTERY CARTRIDGE 1. Before using battery cartridge, read all instructions and cautionary markings on (1) battery charger, (2) battery, and (3) product using battery. 2. Do not disassemble battery cartridge. 3. If operating time has - Makita BTW251Z | Owners Manual - Page 5
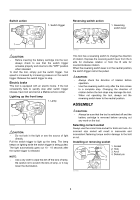
switch trigger release, have tool serviced at a Makita service center. Lighting up the the tool. • When not operating the tool, always set the reversing switch lever to the neutral position. ASSEMBLY that the tool is switched off and the battery cartridge is removed before carrying out any work - Makita BTW251Z | Owners Manual - Page 6
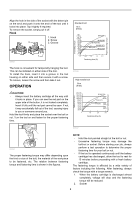
ft lbs) CAUTION: • Always insert the battery cartridge all the way until it locks in place. If you can see the red part on the upper side of the button, After fastening, always check the torque with a torque wrench. 1. When the battery cartridge is discharged almost completely, voltage will drop and - Makita BTW251Z | Owners Manual - Page 7
bar somewhat reduces the fastening force of the impact wrench. Compensate by fastening for a longer period of battery cartridge is removed before attempting to perform inspection or maintenance. Replacing carbon brushes 1. Limit mark 1 1. Rear cover 2. Screws 2 007458 Raise the arm part - Makita BTW251Z | Owners Manual - Page 8
maintenance or adjustment should be performed by Makita Authorized or Factory Service Centers, always using Makita replacement parts. ACCESSORIES CAUTION: • These accessories or attachments are recommended for use with your Makita tool specified in this manual. The use of any other accessories or - Makita BTW251Z | Owners Manual - Page 9
.4 V BL1430 BTW251 M10 - M16 instructions énumérées ci-dessous ne sont pas respectées. Le terme «outil électrique» qui figure sur tous les avertissements énumérés ci-dessous fait référence à un outil électrique branché sur une prise de courant (par un cordon d'alimentation) ou alimenté par batterie - Makita BTW251Z | Owners Manual - Page 10
utilisation de tels accessoires permet de réduire les risques liés à la présence de poussière dans l' , ses embouts, etc., en respectant les présentes instructions et de la façon prévue pour ce type . Utilisation et entretien des outils alimentés par batterie 23. Avant d'insérer le bloc-piles - Makita BTW251Z | Owners Manual - Page 11
un médecin. L'électrolyte qui s'échappe de la batterie peut causer des démangeaisons ou des brûlures. SERVICE 28. Faites réparer votre outil électrique par un l'ignorance des consignes de sécurité du présent manuel d'instructions peuvent entraîner une grave blessure. USD302-1 Symboles Les symboles - Makita BTW251Z | Owners Manual - Page 12
de la gâchette, faites-le réparer dans un centre de service après-vente Makita. Allumage de la lampe avant 1. Lampe 3 007451 1 • Mettez toujours l'outil hors tension avant d'insérer ou de retirer la batterie. • Pour retirer la batterie, sortez-la de l'outil tout en faisant glisser le bouton - Makita BTW251Z | Owners Manual - Page 13
jusqu'au fond, jusqu'à ce qu'elle verrouille en place. Si vous pouvez voir la partie rouge de la face supérieure du bouton, la batterie n'est pas parfaitement verrouillée. Insérez-la à fond, jusqu'à ce que la partie rouge ne soit plus visible. Sinon, elle risque de tomber accidentellement de - Makita BTW251Z | Owners Manual - Page 14
un certain nombre de facteurs, comme suit. Une fois le serrage terminé, vérifiez toujours le couple avec une clé dynamométrique. 1. Lorsque la batterie est presque complètement déchargée, la tension tombe et le couple de serrage diminue. 2. Douille • L'utilisation d'une douille de mauvaise dimension - Makita BTW251Z | Owners Manual - Page 15
vis à fond. Après avoir remplacé les charbons, insérez la batterie dans l'outil et rodez les brosses en faisant fonctionner l'outil à vide fonctionne pas bien, faites une demande de réparation auprès du centre de service après-vente Makita le plus près. Pour maintenir la SÉCURITÉ et la FIABILITÉ du - Makita BTW251Z | Owners Manual - Page 16
, port payé, à une usine ou à un centre de service après-vente Makita. Makita réparera l'outil gratuitement (ou le remplacera, à sa discrétion entretenu: l'outil a subi des modifications. MAKITA DÉCLINE TOUTE RESPONSABILITÉ POUR TOUT DOMMAGE ACCESSOIRE OU INDIRECT LIÉ À LA VENTE OU À L'UTILISATION - Makita BTW251Z | Owners Manual - Page 17
M10 - M14 (3/8"-9/16"/9,5mm-14,2mm) 12,7 mm (1/2") 0 - 2 200 r/min 0 - 3 200 230 N•m (2 040 in.lbs) 165 mm (6-1/2") 1,6 kg (3,5 lbs) 14,4 V c.d. BL1430 BTW251 M10 - M16 (3/8"-5/8"/9,5mm-15,8mm) M10 - M14 (3/8"-9/16"/ 9,5mm-14,2mm) 12,7 mm (1/2") 0 - 2 100 r/min 0 - 3 200 230 N•m (2 040 in.lbs) 165 - Makita BTW251Z | Owners Manual - Page 18
de ajuste o llave de apriete antes de encender la herramienta. Una llave de ajuste o llave de apriete que haya sido dejada puesta en una parte giratoria de la herramienta eléctrica podrá resultar en heridas personales. 13. No utilice la herramienta donde no alcance. Mantenga los pies sobre suelo - Makita BTW251Z | Owners Manual - Page 19
contacto con un cable con corriente hará que la corriente circule por las partes metálicas de la herramienta y electrocute al operador. 2. Póngase protectores de de las reglas de seguridad descritas en el presente manual de instrucciones puede ocasionar graves lesiones personales. USD302-1 - Makita BTW251Z | Owners Manual - Page 20
completamente trabada. Empújela suavemente hacia adentro hasta que no pueda ver la parte roja. Si esto no sucede, puede que accidentalmente se caiga de la de soltar el gatillo interruptor, pida a un centro de servicio Makita que le hagan el mantenimiento. Iluminación de la lámpara delantera 1. - Makita BTW251Z | Owners Manual - Page 21
roja del lado superior del botón, no estará bloqueado completamente. Insértelo completamente hasta que no pueda verse la parte roja. En caso contrario, podrá caerse accidentalmente de la herramienta y ocasionarle heridas a usted o a alguien que se encuentre cerca de usted. Sujete firmemente - Makita BTW251Z | Owners Manual - Page 22
007461 La fuerza de apriete adecuada puede diferir dependiendo del tipo y tamaño del tornillo, el material de la pieza de trabajo que se va a apretar, etc. La relación entre el par de fuerzas de apretar y el tiempo de apretar se muestra en las figuras. Perno o Tornillo estándar N m (ft lbs) Torsi - Makita BTW251Z | Owners Manual - Page 23
1. Cubierta trasera 2. Tornillos 2 007458 Levante la parte del brazo del resorte y después póngalo en la parte rebajada del alojamiento con un destornillador de punta plana recomendados para utilizar con su herramienta Makita especificada en este manual. El empleo de cualesquiera otros accesorios - Makita BTW251Z | Owners Manual - Page 24
O CONSECUENCIAL DERIVADO DE LA VENTA O USO DEL PRODUCTO. ESTA RENUNCIA SERÁ APLICABLE TANTO DURANTE COMO DESPUÉS DEL TÉRMINO DE ESTA GARANTÍA. MAKITA RENUNCIA LA RESPONSABILIDAD POR CUALQUIER GARANTÍA IMPLÍCITA, INCLUYENDO GARANTÍAS IMPLÍCITAS DE "COMERCIALIDAD" E "IDONEIDAD PARA UN FIN ESPECÍFICO - Makita BTW251Z | Owners Manual - Page 25
25 - Makita BTW251Z | Owners Manual - Page 26
26 - Makita BTW251Z | Owners Manual - Page 27
27 - Makita BTW251Z | Owners Manual - Page 28
area bien ventilada, y pongase el equipo de seguridad indicado, tal como esas mascaras contra el polvo que estan especialmente disenadas para filtrar particulas microscopicas. 884681B943 Makita Corporation 3-11-8, Sumiyoshi-cho, Anjo, Aichi 446-8502 Japan 28
-
 1
1 -
 2
2 -
 3
3 -
 4
4 -
 5
5 -
 6
6 -
 7
7 -
8
-
9
-
10
-
11
-
12
-
13
-
14
-
15
-
16
-
17
-
18
-
19
-
20
-
21
-
22
-
23
-
24
-
25
-
26
-
27
-
28
 |
 |

1
INSTRUCTION MANUAL
MANUEL D'INSTRUCTION
MANUAL DE INSTRUCCIONES
WARNING:
For your personal safety, READ and UNDERSTAND before using.
SAVE THESE INSTRUCTIONS FOR FUTURE REFERENCE.
AVERTISSEMENT:
Pour votre propre sécurité, prière de lire attentivement avant l'utilisation.
GARDER CES INSTRUCTIONS POUR RÉFÉRENCE ULTÉRIEURE.
ADVERTENCIA:
Para su seguridad personal, LEA DETENIDAMENTE este manual antes de usar la
herramienta.
GUARDE ESTAS INSTRUCCIONES PARA FUTURA REFERENCIA.
Cordless Impact Wrench
Boulonneuse sans fil
Llave de Impacto Inalámbrica
BTW250
BTW251
007450