Marantz AV7005 AV7005 User Manual - English - Page 102

Part names and functions

Page 102 highlights

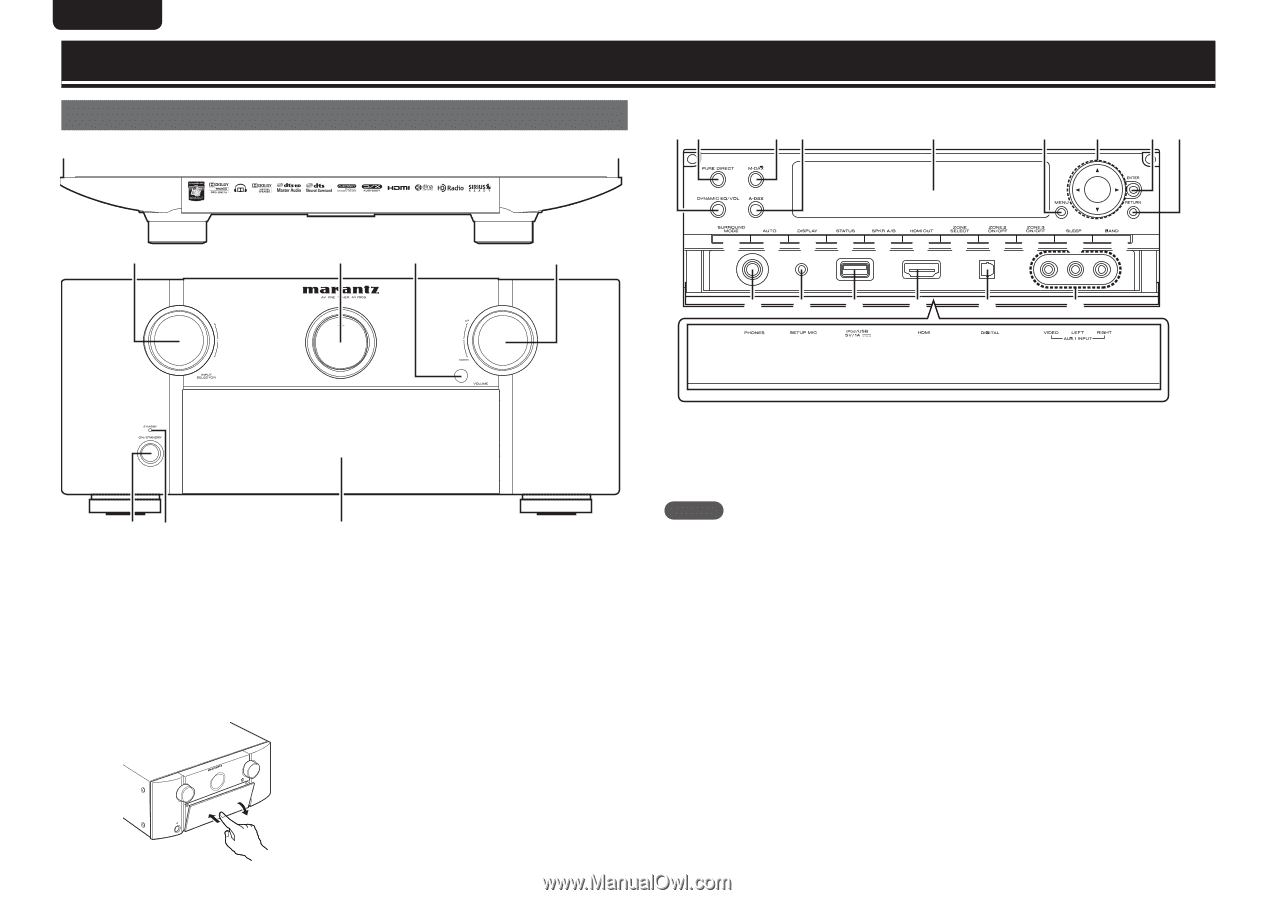
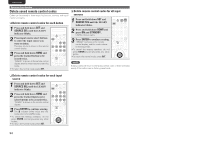
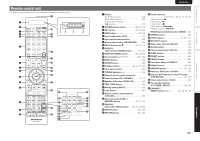
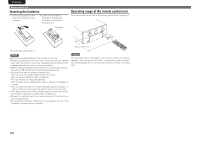
ENGLISH DEUTSCH FRANÇAIS ITALIANO ESPAÑOL NEDERLANDS SVENSKA Part names and functions Front panel For buttons not explained here, see the page indicated in parentheses ( ). GWith the door openH W2 W1 W0 Q9 Q8 Q7 Q6 Q5 Q4 W3 W4 W5 W6 W7 W8 W9 E0 E1 E2 E3 u y t r i o Q0 Q1 Q2 Q3 qw e q Power operation button (ON/STANDBY 7, 12) Turns power to this unit on and off (standby). w Power indicator 12) e Door When you are using buttons and/or terminals behind the door, press the bottom of the door to open it. When not using buttons and/or terminals behind the door, close it. Be careful not to catch your fingers when closing the door. r VOLUME control knob 26) t Remote control sensor 102) y Main display 99) u INPUT SELECTOR knob 25) i Headphones jack When the headphones are plugged into this jack, audio will no longer be output from the connected speakers or from the PRE OUT connectors. NOTE To prevent hearing loss, do not raise the volume level excessively when using headphones. o SETUP MIC jack 9, 52) Q0 iPod/USB port 20) Q1 HDMI connector 16) Q2 DIGITAL connector 19) Q3 AUX1 INPUT connectors 19) Q4 RETURN button 64 - 66) Q5 ENTER button 64 - 66) Q6 Cursor buttons (uio p 64 - 66) Q7 MENU button 66) Q8 Sub display 99) Q9 Audyssey DSX™ button (A-DSX 75) W0 M-DAX button / indicator 76) W1 PURE DIRECT button / indicator 46) W2 Dynamic EQ®/Dynamic Volume® button (DYNAMIC EQ/VOL 74) W3 SURROUND MODE button 44) W4 AUTO button 44, 60, 115) W5 DISPLAY button 60, 86) W6 STATUS button 88) W7 Speaker A/B switching button (SPKR A/B 26) W8 HDMI OUT button 16) W9 ZONE SELECT button 62) E0 ZONE2 ON/OFF button 62) E1 ZONE3 ON/OFF button 62) E2 SLEEP button 56) E3 BAND button 32) 98

  • 1
  • 2
  • 3
  • 4
  • 5
  • 6
  • 7
  • 8
  • 9
  • 10
  • 11
  • 12
  • 13
  • 14
  • 15
  • 16
  • 17
  • 18
  • 19
  • 20
  • 21
  • 22
  • 23
  • 24
  • 25
  • 26
  • 27
  • 28
  • 29
  • 30
  • 31
  • 32
  • 33
  • 34
  • 35
  • 36
  • 37
  • 38
  • 39
  • 40
  • 41
  • 42
  • 43
  • 44
  • 45
  • 46
  • 47
  • 48
  • 49
  • 50
  • 51
  • 52
  • 53
  • 54
  • 55
  • 56
  • 57
  • 58
  • 59
  • 60
  • 61
  • 62
  • 63
  • 64
  • 65
  • 66
  • 67
  • 68
  • 69
  • 70
  • 71
  • 72
  • 73
  • 74
  • 75
  • 76
  • 77
  • 78
  • 79
  • 80
  • 81
  • 82
  • 83
  • 84
  • 85
  • 86
  • 87
  • 88
  • 89
  • 90
  • 91
  • 92
  • 93
  • 94
  • 95
  • 96
  • 97
  • 98
  • 99
  • 100
  • 101
  • 102
  • 103
  • 104
  • 105
  • 106
  • 107
  • 108
  • 109
  • 110
  • 111
  • 112
  • 113
  • 114
  • 115
  • 116
  • 117
  • 118
  • 119
  • 120
  • 121
  • 122
  • 123
  • 124
  • 125
  • 126
  • 127
  • 128

98
ENGLISH
DEUTSCH
FRANÇAIS
ITALIANO
ESPAÑOL
NEDERLANDS
SVENSKA
Front panel
For buttons not explained here, see the page indicated in parentheses ( ).
q
w
e
r
u
t
y
q
Power operation button
(ON/STANDBY)
······································ (7, 12)
Turns power to this unit on and off (standby).
w
Power indicator
·········································· (12)
e
Door
When you are using buttons and/or terminals
behind the door, press the bottom of the door
to open it. When not using buttons and/or
terminals behind the door, close it. Be careful
not to catch your fingers when closing the door.
r
VOLUME control knob
······························· (26)
t
Remote control sensor
···························· (102)
y
Main display
················································ (99)
u
INPUT SELECTOR knob
····························· (25)
Part names and functions
G
With the door open
H
W
3
i
o
Q
0
Q
1
Q
2
Q
3
E
3
W
5
W
6
W
7
W
8
W
9
E
0
E
1
W
4
E
2
Q
5
W
0
W
1
Q
9
W
2
Q
4
Q
7
Q
6
Q
8
i
Headphones jack
When the headphones are plugged into this
jack, audio will no longer be output from the
connected speakers or from the PRE OUT
connectors.
NOTE
To prevent hearing loss, do not raise the volume
level excessively when using headphones.
o
SETUP MIC jack
······································ (9, 52)
Q
0
iPod/USB port
············································ (20)
Q
1
HDMI connector
·········································· (16)
Q
2
DIGITAL connector
····································· (19)
Q
3
AUX1 INPUT connectors
··························· (19)
Q
4
RETURN button
·································· (64 – 66)
Q
5
ENTER button
····································· (64 – 66)
Q
6
Cursor buttons (
uio p
)
·················· (64 – 66)
Q
7
MENU button
·············································· (66)
Q
8
Sub display
················································· (99)
Q
9
Audyssey DSX™ button (A-DSX)
············· (75)
W
0
M-DAX button / indicator
·························· (76)
W
1
PURE DIRECT button / indicator
··············· (46)
W
2
Dynamic EQ
®
/Dynamic Volume
®
button
(DYNAMIC EQ/VOL)
··································· (74)
W
3
SURROUND MODE button
························ (44)
W
4
AUTO button
································ (44, 60, 115)
W
5
DISPLAY button
···································· (60, 86)
W
6
STATUS button
·········································· (88)
W
7
Speaker A/B switching button
(SPKR A/B)
·················································· (26)
W
8
HDMI OUT button
······································ (16)
W
9
ZONE SELECT button
································ (62)
E
0
ZONE2 ON/OFF button
······························ (62)
E
1
ZONE3 ON/OFF button
······························ (62)
E
2
SLEEP button
·············································· (56)
E
3
BAND button
·············································· (32)