Marantz AV7005 AV7005 User Manual - English - Page 85
Audio Setup, Network Setup
 |
View all Marantz AV7005 manuals
Add to My Manuals
Save this manual to your list of manuals |
Page 85 highlights
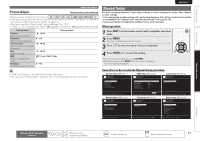
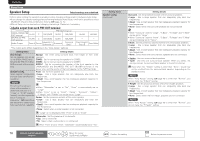
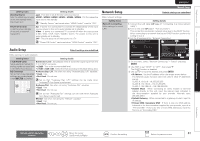
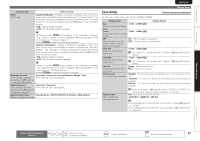
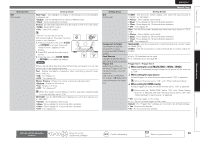
Simple version Basic version SVENSKA NEDERLANDS ESPAÑOL ITALIANO FRANÇAIS DEUTSCH ENGLISH Setting items Setting details Standby Source Sets the HDMI input source to put into standby when the power is on. Last : This item is set at the last-used input source. HDMI1 / HDMI2 / HDMI3 / HDMI4 / HDMI5 / HDMI6 : Put the respective input source into standby. "Standby Source" can be set when "HDMI Control" is set to "ON". Power Off Control Links the power standby of this unit to external equipment. All : If power to a connected TV is turned off independently of the input source, power to this unit is automatically set to standby. Video : If power to a connected TV is turned off when the input source is BD / DVD / VCR / SAT / GAME / AUX1 / TV, power to this unit is automatically set to standby. OFF : This unit does not link with power to a TV. "Power Off Control" can be set when "HDMI Control" is set to "ON". Network Setup Make network settings. Setting items Network Connecting Make settings for wired LAN. Audio Setup Default settings are underlined. Make settings for audio playback. Setting items Setting details 7.1ch IN SW Level Setup playback method for analog signals inputted from 7.1CH INPUT connectors. Subwoofer Level : Set playback level of subwoofer signal input from the 7.1CH INPUT connector. • +10dB : This is the recommended level. • +15dB / +5dB / 0dB : Select the level according to the player being used. EQ Customize Audyssey Byp. L/R : Set when not using "Audyssey Byp. L/R" equalizer. Set so that unused equalizer • Used : Use. settings are not displayed • Not Used : Do not use. when MULTEQ is pressed. Set so that "Audyssey Byp. L/R" settings can be made when Audyssey® Auto Setup is performed. Audyssey Flat : Set when not using "Audyssey Flat" equalizer. • Used : Use. • Not Used : Do not use. Set so that "Audyssey Flat" settings can be made when Audyssey Auto Setup is performed. Manual : Set when not using the "Manual" equalizer. • Used : Use. • Not Used : Do not use. Manual Setup Default settings are underlined. Setting details 1. Connect the LAN cable (vpage 24 "Connecting to a home network (LAN)"). 2. Turn on this unit (vpage 7 "Turn on power"). This unit performs automatic network setup due to the DHCP function. When connecting to a network that has no DHCP function, perform the setting in step 3. 3. Set the IP address at the "Network Connecting". MANUAL SETUP NETWORK SETUP NETWORK CONNECTING w MANUAL SETUP NETWORK SETUP NETWORK CONNECTING DHCP IP Address Exit Detail OFF 192.168.100.19 q DHCP IP Address Subnet Mask Default Gateway Primary DNS Secondary DNS Proxy Exit OFF [192.168.100.019] [255.255.255.000] [000.000.000.000] [000.000.000.000] [000.000.000.000] r e ENTER Enter Set IP address and proxy manually RETURN Return Set IP address manually RETURN Return q On the menu, select "Network Connecting" - "Detail" and press ENTER. w Use o p to set "DHCP" to "OFF", then press i. The DHCP function is disabled. e Use uip to input the address and press ENTER. • IP Address : Set the IP address within the ranges shown below. The Network Audio function cannot be used if other IP addresses are set. CLASS A: 10.0.0.0 - 10.255.255.255 CLASS B: 172.16.0.0 - 172.31.255.255 CLASS C: 192.168.0.0 - 192.168.255.255 • Subnet Mask : When connecting an xDSL modem or terminal adapter directly to this unit, input the subnet mask indicated in the documentation supplied by your provider. Normally input 255.255.255.0. • Default Gateway : When connected to a gateway (router), input its IP address. • Primary DNS, Secondary DNS : If there is only one DNS address indicated in the documentation supplied by your provider, input it at "Primary DNS". If there are two or more DNS addresses, input the first one at "Secondary DNS". Advanced version Information Remote control operation buttons Move the cursor (Up/Down/Left/Right) Confirm the setting Return to previous menu 81
-
 1
1 -
2
-
3
-
4
-
5
-
6
-
7
-
8
-
9
-
10
-
11
-
12
-
13
-
14
-
15
-
16
-
17
-
18
-
19
-
20
-
21
-
22
-
23
-
24
-
25
-
26
-
27
-
28
-
29
-
30
-
31
-
32
-
33
-
34
-
35
-
36
-
37
-
38
-
39
-
40
-
41
-
42
-
43
-
44
-
45
-
46
-
47
-
48
-
49
-
50
-
51
-
52
-
53
-
54
-
55
-
56
-
57
-
58
-
59
-
60
-
61
-
62
-
63
-
64
-
65
-
66
-
67
-
68
-
69
-
70
-
71
-
72
-
73
-
74
-
75
-
76
-
77
-
78
-
79
-
 80
80 -
 81
81 -
 82
82 -
 83
83 -
 84
84 -
 85
85 -
 86
86 -
 87
87 -
 88
88 -
 89
89 -
 90
90 -
91
-
92
-
93
-
94
-
95
-
96
-
97
-
98
-
99
-
100
-
101
-
102
-
103
-
104
-
105
-
106
-
107
-
108
-
109
-
110
-
111
-
112
-
113
-
114
-
115
-
116
-
117
-
118
-
119
-
120
-
121
-
122
-
123
-
124
-
125
-
126
-
127
-
128
 |
 |
