Marantz AV7005 AV7005 User Manual - English - Page 9
Install, Connect - audyssey speaker level
 |
View all Marantz AV7005 manuals
Add to My Manuals
Save this manual to your list of manuals |
Page 9 highlights
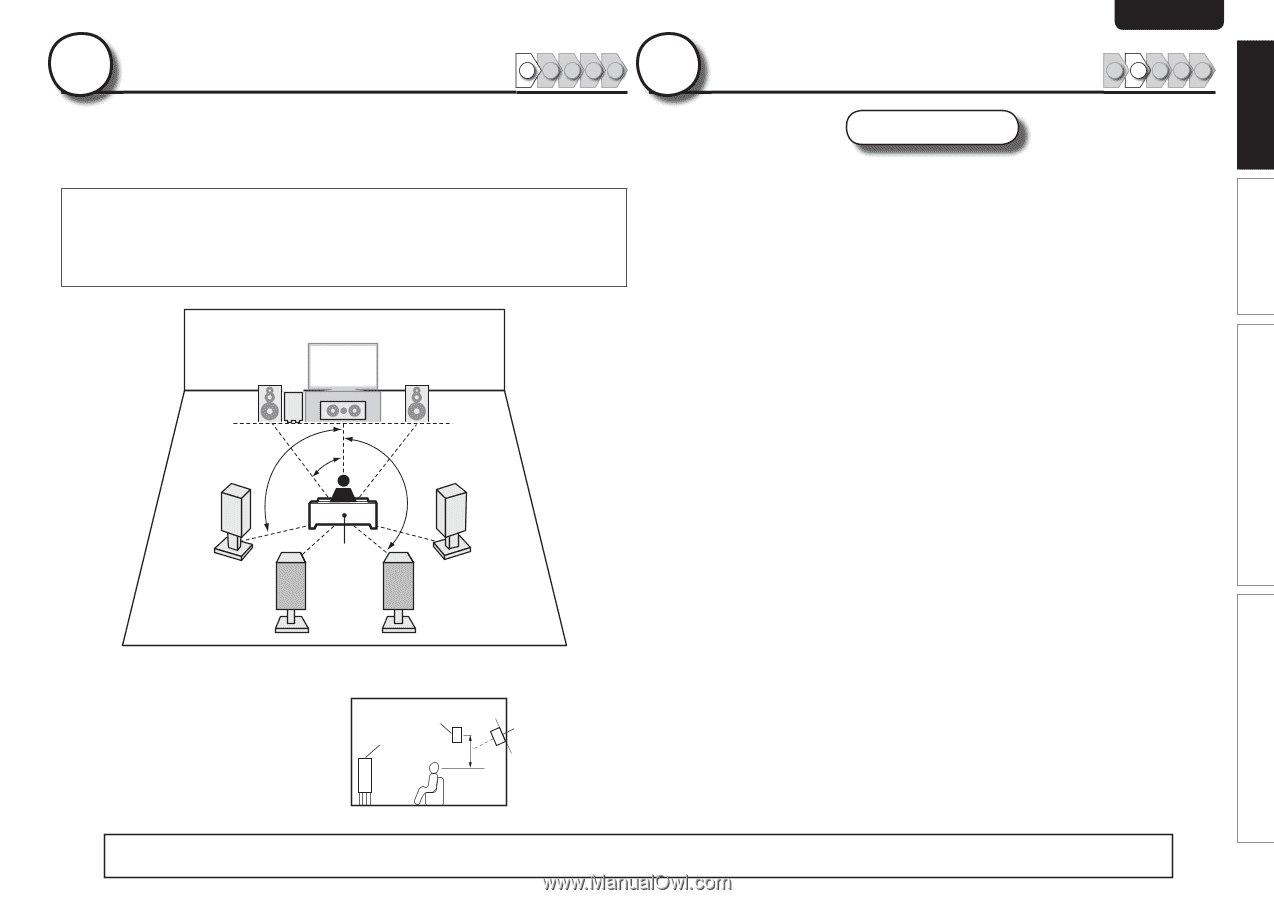
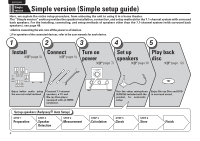
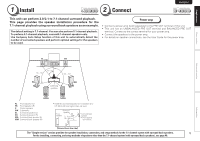
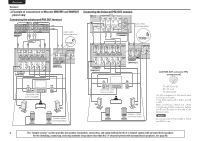
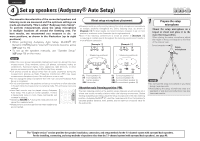
Simple version 1 Install SVENSKA NEDERLANDS 1 2345 ESPAÑOL ITALIANO 2 Connect FRANÇAIS DEUTSCH ENGLISH 1 2345 This unit can perform 2.0/2.1 to 7.1-channel surround playback. This page provides the speaker installation procedure for the 7.1-channel playback using surround back speakers as an example. The default setting is 7.1-channel. You can also perform 5.1-channel playback. To perform 5.1-channel playback, connect5.1-channel speakers only. Use Audyssey Auto Setup function of this unit to automatically detect the number of connected speakers and perform optimal settings for the speakers to be used. Power amp • Connect a power amp (sold separately) to the PRE OUT terminal of this unit. • This unit has an UNBALANCED PRE OUT terminal and BALANCED PRE OUT terminal. Connect to the correct terminal for your power amp. • Connect the speakers to the power amp. • For details on speaker connections, see the User Guide for the power amp. Basic version Advanced version FL SW FR C 90 - 110˚ 22 - 30˚ 135 - 150˚ SL SR Listening position SBL SBR FL Front speaker (L) FR Front speaker (R) C Center speaker SW Subwoofer SL Surround speaker (L) SR Surround speaker (R) SBL Surround back speaker (L) SBR Surround back speaker (R) • Install the surround speakers in a position 2 to 3 ft (60 to 90 cm) higher than ear level. Surround Front speaker speaker 2 - 3 ft / 60 - 90 cm Surround back speaker • Point slightly downwards GViewed from the sideH The "Simple version" section provides the speaker installation, connection, and setup methods for the 7.1-channel system with surround back speakers. 5 For the installing, connecting, and setup methods of speakers other than the 7.1-channel system (with surround back speakers), see page 48. Information
-
 1
1 -
2
-
3
-
 4
4 -
 5
5 -
 6
6 -
 7
7 -
 8
8 -
 9
9 -
 10
10 -
 11
11 -
 12
12 -
 13
13 -
 14
14 -
15
-
16
-
17
-
18
-
19
-
20
-
21
-
22
-
23
-
24
-
25
-
26
-
27
-
28
-
29
-
30
-
31
-
32
-
33
-
34
-
35
-
36
-
37
-
38
-
39
-
40
-
41
-
42
-
43
-
44
-
45
-
46
-
47
-
48
-
49
-
50
-
51
-
52
-
53
-
54
-
55
-
56
-
57
-
58
-
59
-
60
-
61
-
62
-
63
-
64
-
65
-
66
-
67
-
68
-
69
-
70
-
71
-
72
-
73
-
74
-
75
-
76
-
77
-
78
-
79
-
80
-
81
-
82
-
83
-
84
-
85
-
86
-
87
-
88
-
89
-
90
-
91
-
92
-
93
-
94
-
95
-
96
-
97
-
98
-
99
-
100
-
101
-
102
-
103
-
104
-
105
-
106
-
107
-
108
-
109
-
110
-
111
-
112
-
113
-
114
-
115
-
116
-
117
-
118
-
119
-
120
-
121
-
122
-
123
-
124
-
125
-
126
-
127
-
128
 |
 |