Maytag MAT14CSAWW Installation Instructions
Maytag MAT14CSAWW - Commercial Washer Manual
 |
View all Maytag MAT14CSAWW manuals
Add to My Manuals
Save this manual to your list of manuals |
Maytag MAT14CSAWW manual content summary:
- Maytag MAT14CSAWW | Installation Instructions - Page 1
120-volt, 60-Hz Models INSTRUCTIONS D'INSTALLATION DE LA LAVEUSE COMMERCIALE Modèles 120 V, 60 Hz Write down the model and serial numbers before installing washer. Both numbers are listed on the model/serial rating plate located under the lid. Model Serial Date of Purchase Prendre note des - Maytag MAT14CSAWW | Installation Instructions - Page 2
SAFETY 2 INSTALLATION REQUIREMENTS 3 Tools and Parts 3 Location Requirements 3 Drain System 4 Electrical Requirements 5 INSTALLATION INSTRUCTIONS 6 Remove Shipping Strap 6 Connect the Hoses 6 Level the Washer 7 Complete Installation 8 ELECTRONIC CONTROLS SETUP 10 WARRANTY 14 Table - Maytag MAT14CSAWW | Installation Instructions - Page 3
it will be exposed to the weather. Do not tamper with controls. Do not repair or replace any part of the washer or attempt any servicing unless specifically recommended in this manual or in published user-repair instructions that you understand and have the skills to carry out. machine, turn on all - Maytag MAT14CSAWW | Installation Instructions - Page 4
Recessed Area and Closet Installation Instructions This washer may be installed in a recessed area or closet. The installation spacing shown is in inches and is the minimum allowable. Additional spacing should be considered for ease of installation, servicing, and compliance with local codes and - Maytag MAT14CSAWW | Installation Instructions - Page 5
remove ground prong. Do not use an adapter. Do not use an extension cord. Failure to follow these instructions can result in death, fire, or electrical shock. IMPORTANT : The washer must be electrically grounded in accordance with local codes and ordinances or, in the absence of local codes, with - Maytag MAT14CSAWW | Installation Instructions - Page 6
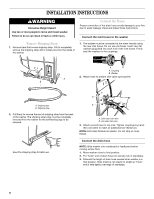
. Connect the Hoses Proper connection of the drain hose avoids damage to your floors due to water leakage. Read and follow these instructions. Connect the inlet hoses to the washer 1. The washer must be connected to the water faucets using the new inlet hoses. Do not use old hoses. Insert new flat - Maytag MAT14CSAWW | Installation Instructions - Page 7
shown. Repeat with other corner posts on other side of washer. 5. Measure and mark a point approximately 16" (406 mm) from the plug end of the shipping strap. Cut the shipping strap at this point. 2. Use the leveling legs and nuts from the parts package. Screw nut down to within 1/2"(13 mm) of - Maytag MAT14CSAWW | Installation Instructions - Page 8
washer base, the washer may vibrate. Electrical Shock Hazard Plug into a grounded 3 prong outlet. Do not remove ground prong. Do not use an adapter. Do not use an extension cord. Failure to follow these instructions to be sure all parts are now installed. If there is an extra part, go back through - Maytag MAT14CSAWW | Installation Instructions - Page 9
Tips WARNING Electrical Shock Hazard Disconnect power before servicing. Replace all parts and panels before operating. Failure to do so can result in death or electrical shock. Checklist for washer operation: Check the following if the washer is not operating properly: 1. Power supply cord is - Maytag MAT14CSAWW | Installation Instructions - Page 10
metal in the washer. Avoid touching electronic parts or terminal contacts; handle electronic control assembly by edges only. When repackaging failed electronic control assembly in anti-static bag, observe above instructions. Free Cycles This is established by setting the cycle price to zero. When - Maytag MAT14CSAWW | Installation Instructions - Page 11
a rate of instructions), the manual set-up mode can be entered by removing connector AA1 on the circuit board. IMPORTANT: The console must not be opened unless power is first removed from the washer. To access connector AA1: � Unplug washer code. 2. 0 0 SPECIAL PRICING OPTION This option is either - Maytag MAT14CSAWW | Installation Instructions - Page 12
, hour setting; select 0-23 hours by pressing the LOWER LEFT key pad. � Press the LOWER MIDDLE key pad once to advance to next code. 7. 0 0 SPECIAL PRICE START HOUR NOTE: Uses military time or 24 hr. clock. 7. 0 0 This is the start hour; 0-23 hours. Select START HOUR by pressing the LOWER LEFT - Maytag MAT14CSAWW | Installation Instructions - Page 13
Debit is self-selected when a Generation 2 card reader is installed in the washer. The Ed option cannot be manually selected or deselected. � Press the LOWER MIDDLE key pad once to advance to next code. PRICE SUPPRESSION OPTION This option causes the customer display to show 'ADD' or 'AVAILABLE - Maytag MAT14CSAWW | Installation Instructions - Page 14
to obtain service under this warranty. ITEMS MAYTAG WILL NOT PAY FOR 1. All other costs including labor, transportation, or custom duties. 2. Service calls to correct the installation of your commercial appliance, to instruct you how to use your commercial appliance, to replace or repair fuses, or - Maytag MAT14CSAWW | Installation Instructions - Page 15
. Ne pas réparer ou remplacer un composant quelconque de la laveuse, ni entreprendre une opération de service, si ce n'est spécifiquement recommandé dans ce manuel ou dans un manuel d'instructions de réparations destiné à l'utilisateur; il est alors essentiel que la personne concernée comprenne ces - Maytag MAT14CSAWW | Installation Instructions - Page 16
de mixage de la laveuse. Un plancher de niveau ayant une pente maximale de 25 mm (1") sous l'ensemble de la laveuse. Un plancher robuste pour supporter la laveuse dont le poids total (laveuse, eau et charge) est de 143 kg (315 lb). Une colonne montante d'au moins 300 mm (12") destin - Maytag MAT14CSAWW | Installation Instructions - Page 17
Instructions d'installation dans un encastrement ou un placard Cette laveuse peut être installée dans un encastrement ou un placard. Les dimensions d'installation illustrées sont en - Maytag MAT14CSAWW | Installation Instructions - Page 18
enlever la broche de liaison à la terre. Ne pas utiliser un adaptateur. Ne pas utiliser un câble de rallonge. Le non-respect de ces instructions peut causer un décès, un incendie ou un choc électrique. IMPORTANT : La laveuse doit être correctement reliée à la terre en conformité avec les codes et - Maytag MAT14CSAWW | Installation Instructions - Page 19
D'INSTALLATION AVERTISSEMENT Risque du poids excessif Utiliser deux ou plus de personnes pour déplacer et installer la laveuse. Le non-respect de cette instruction peut causer une blessure au dos ou d'autre blessure. Enlever la sangle d'expédition 1. Enlever le ruban adhésif qui recouvre la sangle - Maytag MAT14CSAWW | Installation Instructions - Page 20
Si le tuyau de vidange est trop long, couper l'extrémité droite pour le raccourcir. (Ne jamais couper l'extrémité recourbée du tuyau de vidange.) REMARQUE : Ne pas forcer une section excessive du tuyau de vidange à pénétrer dans le tuyau de rejet à l'égout, ceci pourrait provoquer un siphonnage. 4. - Maytag MAT14CSAWW | Installation Instructions - Page 21
enlever la broche de liaison à la terre. Ne pas utiliser un adaptateur. Ne pas utiliser un câble de rallonge. Le non-respect de ces instructions peut causer un décès, un incendie ou un choc électrique. 3. Si la laveuse n'est pas d'aplomb, régler la longueur de déploiement des pieds avant. Utiliser - Maytag MAT14CSAWW | Installation Instructions - Page 22
. t le fonctionnement ou l'entretien de la laveuse non traitées dans les Instructions d'installation. Le CLoernRsterdepeldal''cianeptréprpeailc,ètvciooenussaevateupcraelneznbceoeansuosxoinmadvmeaasntnet uudmreMéfaraoiyrsteadgleaemrsetomodiuèsvleeerett2d4e hséerueiernedsmepaalarrcljahoveue.r,u7sejo - Maytag MAT14CSAWW | Installation Instructions - Page 23
de l'introduction de pièces ou d'un débit, l'information affichée change et guide l'utilisateur pour le lancement d'un programme. PRICE 2.00 PROCÉDURES DE RÉGLAGE DES SYSTÈMES DE COMMANDE IMPORTANT : Lire la totalité des instructions avant l'utilisation. Pour le réglage des systèmes de commande, on - Maytag MAT14CSAWW | Installation Instructions - Page 24
ès installation du lecteur de carte de débit (conformément aux instructions du fabricant du lecteur de carte), pour accéder au mode change et guide l'utilisateur pour le lancement d'un programme. Sélection de l'heure de commencement pour cette tarification; 0-23 heures. Sélectionner PRICE START HOUR - Maytag MAT14CSAWW | Installation Instructions - Page 25
CPOaDrEamétrage pour mise enEmXPaLrICcAhTeION ModèOlePPTDIO:NInAséFrFeIrClHaAcGléEdDeUlaCpOorNteTEdN'aUccDèUs;CtoOuFrFnRerEet soulever pour enlever la porCteetdte'aocpctièosn.peut être SÉLECTIONNÉE ('ON') ou PAS SÉLECTIONNÉE ('OFF'). ModèPleasPsRél:eActpiornènséein(s'OtaFlFla')t.ion du lecteur de - Maytag MAT14CSAWW | Installation Instructions - Page 26
CODE EXPLICATION OPTION AFFICHAGE DU CONTENU DU COFFRE NOTES CODE OPTION PIÈCES/DÉBIT EXPLICATION Cette option peut être SÉLECTIONNÉE ('ON') ou PAS SÉLECTIONNÉE ('OFF'). Sélection du paiement par pièces et par carte de débit. Pas sélectionnée ('OFF'). Paiement par pièces sélectionné; - Maytag MAT14CSAWW | Installation Instructions - Page 27
conformément aux instructions jointes à ou fournies avec le produit, Maytag marque de Whirlpool Corporation (ci-après désignée "Maytag") paiera pour les Une preuve d'achat originale est requise pour bénéficier du service de garantie. MAYTAG NE PAIERA PAS POUR 1. Tous les autres frais, notamment - Maytag MAT14CSAWW | Installation Instructions - Page 28
© 2010 All rights reserved. Tous droits réservés. ® Registered Trademark/TM Trademark of Maytag Corporation or its related companies. Used under license by Maytag Limited in Canada. ® Marque déposée/TM Marque de commerce de Maytag Corporation ou ses compagnies affiliées. Emploi sous license par
-
 1
1 -
 2
2 -
 3
3 -
 4
4 -
 5
5 -
 6
6 -
 7
7 -
8
-
9
-
10
-
11
-
12
-
13
-
14
-
15
-
16
-
17
-
18
-
19
-
20
-
21
-
22
-
23
-
24
-
25
-
26
-
27
-
28
 |
 |

Write down the model and serial numbers before installing washer.
Both numbers are listed on the model/serial rating plate located
under the lid.
Model #
_______________________________
Serial #
_______________________________
Date of Purchase _______________________
Prendre note des numéros de modèle et de série avant d'installer
la laveuse.
Les deux numéros sont indiqués sur la plaque signalétique sous
le couvercle.
Numéro de modèle_______________________________
Numéro de série _________________________________
Date d’achat ____________________________________
W10135312B
www.maytagcommerciallaundry.com
INSTALLATION INSTRUCTIONS
COMMERCIAL WASHER
120-volt, 60-Hz Models
INSTRUCTIONS D’INSTALLATION DE LA
LAVEUSE COMMERCIALE
Modèles 120 V, 60 Hz