Maytag MEDB800VU Use and Care Manual
Maytag MEDB800VU - Bravos Steam Electric Dryer Manual
 |
UPC - 883049140513
View all Maytag MEDB800VU manuals
Add to My Manuals
Save this manual to your list of manuals |
Maytag MEDB800VU manual content summary:
- Maytag MEDB800VU | Use and Care Manual - Page 1
DRYER USE & CARE GUIDE SÉCHEUSE ÉLECTRIQUE BRAVOS® AVEC SYSTÈME DE SOIN DES TISSUS À LA VAPEUR GUIDE D'UTILISATION ET D'ENTRETIEN FOR QUESTIONS ABOUT FEATURES, OPERATION/PERFORMANCE, PARTS, ACCESSORIES OR SERVICE CALL: 1.800.688.9900 IN CANADA, CALL: 1.800.807.6777 VISIT OUR WEBSITE AT WWW.MAYTAG - Maytag MEDB800VU | Use and Care Manual - Page 2
Care 30 Changing the Drum Light ...31 TROUBLESHOOTING...31 Dryer Operation...31 Dryer Results...32 ASSISTANCE OR SERVICE...34 In the U.S.A...34 In Canada...34 ACCESSORIES ...34 WARRANTY ...35 TABLE DES MATIÈRES SÉCURITÉ DE LA SÉCHEUSE 36 INSTRUCTIONS D'INSTALLATION 38 Outillage et pièces ...38 - Maytag MEDB800VU | Use and Care Manual - Page 3
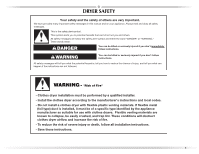
DRYER SAFETY Your safety and the safety of others are very important. We have provided many important safety messages in this manual and on your appliance don't immediately follow instructions. WARNING You can be killed or seriously injured if you don't follow instructions. All safety messages - Maytag MEDB800VU | Use and Care Manual - Page 4
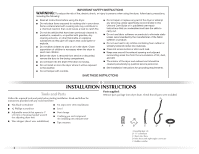
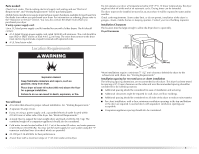
Do not install or store the dryer where it will be exposed to the weather. ■ Do not tamper with controls. ■ Do not repair or replace any part of the dryer or attempt any servicing unless specifically recommended in this Use and Care Guide or in published user-repair instructions that you understand - Maytag MEDB800VU | Use and Care Manual - Page 5
" and "Venting Requirements" before purchasing parts. Mobile home installations require metal exhaust system hardware available for purchase from the dealer from whom you purchased your dryer. For information on ordering, please refer to the "Assistance or Service" section. You may also contact the - Maytag MEDB800VU | Use and Care Manual - Page 6
Title 24, HUD Part 280) or Standard CAN/CSA-Z240 MH. Mobile home installations require: ■ Metal follow the instructions provided for it here. ■ This dryer is manufactured ready to install with supply connection must be used when the appliance is installed in a location where grounding through the - Maytag MEDB800VU | Use and Care Manual - Page 7
with a qualified electrician or service representative or personnel if you are in doubt as to whether the dryer is properly grounded. Do not modify the plug on the power supply cord: if it will not fit the outlet, have a proper outlet installed by a qualified electrician. SAVE THESE INSTRUCTIONS 7 - Maytag MEDB800VU | Use and Care Manual - Page 8
electrician or service representative or personnel if you are in doubt as to whether the dryer is properly grounded. Do not modify the plug provided with the dryer: if it will not fit the outlet, have a proper outlet installed by a qualified electrician. SAVE THESE INSTRUCTIONS 4-wire receptacle - Maytag MEDB800VU | Use and Care Manual - Page 9
location C. External ground conductor screw D. Center, silver-colored terminal block screw E. Neutral ground wire E F. Hole below terminal block F opening 3. Install strain relief. Fire Hazard Use 10 gauge solid copper wire. Use a UL listed strain relief. Disconnect power before making - Maytag MEDB800VU | Use and Care Manual - Page 10
the strain relief. The strain relief should have a tight fit with the dryer cabinet and be in a horizontal position. Do not further tighten strain relief block opening C. Strain relief threads 4. Now complete installation following instructions for your type of electrical connection: 4-wire ( - Maytag MEDB800VU | Use and Care Manual - Page 11
Neutral wire (white or center wire) E. ¾" (19 mm) UL listed strain relief 5. Tighten strain relief screws. 6. Insert tab of terminal block cover into slot of dryer rear panel. Secure cover with holddown screw. 7. You have completed your electrical connection. Now go to "Venting Requirements." 11 - Maytag MEDB800VU | Use and Care Manual - Page 12
mobile homes and where local codes do not permit the use of 3 wire connections. Direct wire cable must have 5 ft (1.52 m) of extra length so dryer can be moved if needed. Strip 5" (127 mm) of outer covering from end of cable, leaving bare ground wire at 5" (127 mm). Cut 11/2" (38 - Maytag MEDB800VU | Use and Care Manual - Page 13
screw of the terminal block. Tighten screw. A C B D E 5. Tighten strain relief screw. 6. Insert tab of terminal block cover into slot of dryer rear panel. Secure cover with holddown screw. 7. You have completed your electrical connection. Now go to "Venting Requirements." A. External ground - Maytag MEDB800VU | Use and Care Manual - Page 14
: Direct Wire Use where local codes permit connecting cabinet-ground conductor to neutral wire. Direct wire cable must have 5 ft (1.52 m) of extra length so dryer can be moved if needed. Strip 31/2" (89 mm) of outer covering from end of cable. Strip insulation back 1" (25 mm). If using 3-wire cable - Maytag MEDB800VU | Use and Care Manual - Page 15
instructions can result in death or fire. WARNING: To reduce the risk of fire, this dryer MUST BE EXHAUSTED OUTDOORS. IMPORTANT: Observe all governing codes and ordinances. The dryer vent. ■ Review Vent system chart. Modify existing vent system if necessary to achieve the best drying performance. - Maytag MEDB800VU | Use and Care Manual - Page 16
■ For best drying performance, rigid metal vents are recommended. ■ Rigid metal vent is recommended to avoid crushing and kinking. Flexible metal vent ■ Flexible metal vents are acceptable only if accessible for cleaning. ■ Flexible metal vent must be fully extended and supported when the dryer is - Maytag MEDB800VU | Use and Care Manual - Page 17
for purchase. Please see the "Assistance or Service" section to order. ■ Over-the-Top Installation: Part Number 4396028 ■ Periscope Installation (For use with dryer vent to wall vent mismatch): Part Number 4396037 - 0" (0 mm) to 18" (457.2 mm) mismatch Part Number 4396011 - 18" (457.2 mm) to 29 - Maytag MEDB800VU | Use and Care Manual - Page 18
achieve the best drying performance. Vent system chart NOTE: Performance of rear exhaust to either side of the dryer is equivalent 74 ft (22.6 m) 65 ft (19.8 m) 57 ft (17.4 m) Install Vent System 1. Install exhaust hood. Use caulking compound to seal exterior wall opening around exhaust hood. 2. - Maytag MEDB800VU | Use and Care Manual - Page 19
. 9. Attach angled end of long hose to fill valve at bottom of dryer back panel. Screw on coupling by hand until it is seated on fill on connector. 6. Attach straight end of long hose to "Y" connector. 7. Attach washer cold inlet hose to other end of "Y" connector. Screw on coupling by hand until - Maytag MEDB800VU | Use and Care Manual - Page 20
surface. Remove the door assembly 1. Open the dryer door. 2. Remove the bottom screw from each of the 2 hinges that attach the dryer door to the front panel of the dryer. Location of plastic plugs shown 6. Install 4 plastic plugs into screw holes in the dryer left where the hinges were removed in - Maytag MEDB800VU | Use and Care Manual - Page 21
plugs must be on the same side of the dryer door opening. Reinstall the door 1. Remove the 4 screws and 2 hinges from the dryer door. 2. Replace the 4 screws in the same holes. Screw locations 4. Install the 2 hinges to the front panel of the dryer using 4 screws. Use the non-slotted side to attach - Maytag MEDB800VU | Use and Care Manual - Page 22
has not tripped. ■ Dryer door is closed. This dryer automatically runs an installation diagnostic routine at the start of its first cycle. If you receive an "L2" code, there may be a problem with your home power supply keeping the dryer's heater from turning on. See "Troubleshooting." If you receive - Maytag MEDB800VU | Use and Care Manual - Page 23
, read the IMPORTANT SAFETY INSTRUCTIONS before operating this appliance. This manual covers several different models. Your dryer may not have all of the cycles and features described. Follow these basic steps to start your dryer. Please refer to specific sections of this manual for more detailed - Maytag MEDB800VU | Use and Care Manual - Page 24
Down depends on the load size and dryness level. Drying tips ■ Follow care label directions when they are available. ■ If desired, add a fabric softener sheet. Follow package instructions. ■ To reduce wrinkling, remove the load from the dryer as soon as tumbling stops. This is especially important - Maytag MEDB800VU | Use and Care Manual - Page 25
a guide to drying various loads. ■ Drying temperature and dryness level are preset when you choose a Sensor Dry Cycle Follow the progress of your dryer with the drying Status indicator lights. Wrinkle part of the cycle. Laundry cools for ease in handling. Dry The Dry light illuminates when the drying - Maytag MEDB800VU | Use and Care Manual - Page 26
cycle is best for touching up clothes that have been left in the dryer too long. In this cycle, a small amount of water is sprayed into the dryer drum after several minutes of tumbling with heat. The dryer will continue to tumble with heat followed by a brief cool down. The dry time and temperature - Maytag MEDB800VU | Use and Care Manual - Page 27
the Normal cycle. NOTE: If you do not select the Wrinkle Prevent Plus setting, the dryer stops after cool down. Damp Dry Signal Select the Damp Dry Signal to alert you that your clothes are approximately 80% dry. This is useful when you want to remove lightweight items in a mixed load to avoid - Maytag MEDB800VU | Use and Care Manual - Page 28
page of the manual or contact the dealer from whom you purchased your dryer. NOTE: The drying rack must be removed for normal tumbling. Do not use the automatic cycle with the drying rack. To use the drying rack 1. Open dryer door. A A. Front edge 2. Place drying rack inside dryer drum, positioning - Maytag MEDB800VU | Use and Care Manual - Page 29
flat on the drying rack. Stuffed toys or pillows Cotton or polyester fiber filled Timed Dry Low 60 Stuffed toys or pillows Foam rubber filled Timed Dry Air Fluff 90 (no heat) Sneakers or canvas shoes Timed Dry Air Fluff 90 (no heat) *Reset time to complete drying, if needed. DRYER CARE - Maytag MEDB800VU | Use and Care Manual - Page 30
dry lint screen with a clean towel. Replace screen in dryer. Cleaning the Dryer Care Install and store your dryer where it will not dryer base. 5. Use masking tape to secure dryer door. For direct-wired dryers: WARNING Electrical Shock Hazard Disconnect power before servicing. Replace all parts - Maytag MEDB800VU | Use and Care Manual - Page 31
appliance bulb only. Replace the cover and secure with the screw. 4. Plug in dryer or reconnect power. TROUBLESHOOTING First try the solutions suggested here or visit our website and reference FAQs (Frequently Asked Questions) to possibly avoid the cost of a service call... In U.S.A. www.maytag - Maytag MEDB800VU | Use and Care Manual - Page 32
problem with your home power supply keeping the dryer's heater from turning on. The dryer will drying times. See the Installation Instructions. ■ Is the dryer located in a room with temperature below 45ºF (7ºC)? Proper operation of dryer cycles requires temperatures above 45ºF (7ºC). ■ Is the dryer - Maytag MEDB800VU | Use and Care Manual - Page 33
dryer's water inlet valve. Check that the water supply is turned on. These cycles are best for smoothing out wrinkles and reducing odors from loads consisting of wrinkle-free cotton, cotton polyester blends, common knits, and synthetic garments. NOTE: Refer to garment care label instructions. Dry - Maytag MEDB800VU | Use and Care Manual - Page 34
our website www.maytag.ca. Our consultants provide assistance with: ■ Features and specifications on our full line of appliances. ■ Use and maintenance procedures. ■ Accessory and repair parts sales. ■ Referrals to local dealers, repair parts distributors, and service companies. Whirlpool Canada - Maytag MEDB800VU | Use and Care Manual - Page 35
to correct the installation of your major appliance, to instruct you on how to use your major appliance, to replace or repair house fuses, or to correct house wiring or plumbing. 2. Service calls to repair or replace appliance light bulbs, air filters or water filters. Consumable parts are excluded - Maytag MEDB800VU | Use and Care Manual - Page 36
: DANGER Risque possible de décès ou de blessure grave si vous ne suivez pas immédiatement les instructions. AVERTISSEMENT Risque possible de décès ou de blessure grave si vous ne suivez pas les instructions. Tous les messages de sécurité vous diront quel est le danger potentiel et vous disent - Maytag MEDB800VU | Use and Care Manual - Page 37
service ou la jeter, enlever la porte du compartiment de séchage. ■ Ne pas mettre la main dans la sécheuse si le tambour est en mouvement. ■ Ne pas installer une recommandation spécifique dans le guide d'utilisation et d'entretien, ou publiée dans les instructions de réparation par l'utilisateur que - Maytag MEDB800VU | Use and Care Manual - Page 38
installation. Lire et suivre les instructions fournies avec les outils indiqués ici. ■ Tournevis à lame plate ■ Pince à dénuder (pour installation "Assistance ou service". Vous pouvez écifications électriques". ■ Un plancher robuste capable de supporter un poids total (sécheuse et charge) de 200 - Maytag MEDB800VU | Use and Care Manual - Page 39
est recommandé pour réduire le transfert du bruit. ■ Si une porte de placard est installée, on doit prévoir des orifices d'entrée d'air en haut et en bas de la 4 alvéoles reliée à la terre. Le non-respect de cette instruction peut causer un décès ou un choc électrique. C'est à l'utilisateur qu - Maytag MEDB800VU | Use and Care Manual - Page 40
information, veuillez consulter les numéros de service qui se trouvent à la section "Assistance ou service". INSTRUCTIONS DE LIAISON À LA TERRE ■ Pour une un électricien qualifié d'installer une prise de courant appropriée. CONSERVEZ CES INSTRUCTIONS Exigences concernant l'évacuation AVERTISSEMENT - Maytag MEDB800VU | Use and Care Manual - Page 41
du marchand ou en téléphonant à Maytag Services. Pour plus de renseignements, voir la section "Assistance ou service". Conduit métallique rigide ■ Pour un de réduire la capacité d'évacuation et le rendement. ■ Ne pas installer le conduit métallique flexible dans les cavités fermées des murs, plafonds - Maytag MEDB800VU | Use and Care Manual - Page 42
: On peut acheter les trousses suivantes pour les installations où le dégagement est réduit. Veuillez consulter la section "Assistance ou service" de ce guide pour commander. ■ Installation au-dessus de la sécheuse : Pièce numéro 4396028 ■ Installation de périscope (pour l'utilisation en cas de non - Maytag MEDB800VU | Use and Care Manual - Page 43
éraire d'acheminement du conduit ■ Choisir l'itinéraire d'acheminement vers l'extérieur qui sera le plus direct et le plus rectiligne. ■ Planifier l'installation pour introduire le nombre minimal de coudes et de changements de direction. ■ Si des coudes ou des changements de direction sont utilis - Maytag MEDB800VU | Use and Care Manual - Page 44
des pieds de nivellement AVERTISSEMENT Risque du poids excessif Utiliser deux ou plus de personnes pour déplacer et installer la sécheuse. Le non-respect de cette instruction peut causer une blessure au dos ou d'autre blessure. 1. Pour protéger le plancher, utiliser une grande pièce de carton - Maytag MEDB800VU | Use and Care Manual - Page 45
10. Terminer le serrage des raccords - deux tiers de tour supplémentaires avec une pince. Si la sécheuse n'est pas d'aplomb, la relever à l'aide d'un bloc de bois. Utiliser une clé pour ajuster les pieds vers le haut ou vers le bas, et vérifier à nouveau si elle est d'aplomb. REMARQUE : Ne pas - Maytag MEDB800VU | Use and Care Manual - Page 46
les mêmes trous. Emplacement des chevilles de plastique Vis et emplacements des charnières 3. Retirer les quatre vis du côté opposé de la porte. 6. Installer 4 chevilles de plastique dans les trous des vis sur la gauche de la sécheuse après avoir retiré les charnières (Étape 4). Inversion de la - Maytag MEDB800VU | Use and Care Manual - Page 47
serrer les vis. Laisser les vis en retrait d'environ ¼" (5 mm). A A A. Installer d'abord ces vis. 6. Suspendre la porte : insérer les têtes de vis ée. Cette sécheuse met automatiquement en marche une procédure de diagnostic d'installation au début du premier programme. Si vous recevez un code L2, il - Maytag MEDB800VU | Use and Care Manual - Page 48
un produit inflammable (même après un lavage). Le non-respect de ces instructions peut causer un décès, une explosion ou un incendie. Risque d'incendie Aucune laveuse Voir "Nettoyage du filtre à charpie". REMARQUE : Votre sécheuse Maytag® est équipée d'une fonction "Auto Wake-Up" (réveil - Maytag MEDB800VU | Use and Care Manual - Page 49
4. Tourner le bouton au programme sélectionné. Les préréglages des programmes Sensor (détection), Timed (minuté), ou Steam (vapeur) s'allumeront. La durée du programme estimée en minutes (programme de détection) ou réelle (programme minuté) s'affichera. REMARQUE : Une durée par défaut est affichée - Maytag MEDB800VU | Use and Care Manual - Page 50
désiré, ajouter une feuille d'assouplissant de tissu. Suivre les instructions figurant sur l'emballage. ■ Pour réduire le froissement, enlever et le degré de séchage sont préréglés lorsqu'on choisit un programme Sensor Dry (séchage par détection). On peut sélectionner un degré de séchage différent, - Maytag MEDB800VU | Use and Care Manual - Page 51
de polyester. Réarranger la charge lorsque le signal de séchage humide est émis. Cette étape aidera les articles à mieux sécher. Heavy Duty (service intense) Utiliser ce programme pour un séchage à chaleur ordinaire des charges mixtes lourdes, des cotons et des jeans. Normal (normal) Utiliser ce - Maytag MEDB800VU | Use and Care Manual - Page 52
séchés en utilisant le séchage minuté réglé à basse température. Le séchage minuté peut être également utilisé avec la grille de séchage. Rapid Dry (séchage rapide) Utiliser ce programme pour le séchage de petites charges nécessitant une courte durée de séchage. Préréglages des programmes minut - Maytag MEDB800VU | Use and Care Manual - Page 53
du programme Normal. REMARQUE : Si vous ne sélectionnez pas le réglage Wrinkle Prevent Plus, la sécheuse s'arrête après le refroidissement. Damp Dry Signal (signal de séchage humide) Sélectionner le signal de séchage humide pour être averti lorsque les vêtements sont secs à environ 80 %. Ceci - Maytag MEDB800VU | Use and Care Manual - Page 54
modification affectera tous vos programmes de détection. Vos réglages de degré de séchage peuvent être ajustés pour s'adapter à différentes installations, conditions environnementales ou préférences personnelles. Il existe 3 réglages de séchage : 1 (degré de séchage préréglé en usine), 2 (vêtements - Maytag MEDB800VU | Use and Care Manual - Page 55
7. Vous devez sélectionner une durée en appuyant sur TIME ADJUST + (plus) ou - (moins). Régler de nouveau la durée pour compléter le séchage, si nécessaire. Consulter le tableau suivant. 8. Appuyer sur START/PAUSE (mise en marche/pause). Ce tableau montre des exemples d'articles qui peuvent être sé - Maytag MEDB800VU | Use and Care Manual - Page 56
. Lors du remplacement des tuyaux d'arrivée d'eau, inscrire la date du remplacement. Précautions à prendre avant les vacances, un entreposage ou un déménagement Installer et ranger votre sécheuse à l'abri du gel. L'eau qui peut rester dans les tuyaux risque d'abîmer la sécheuse en temps de gel. Si - Maytag MEDB800VU | Use and Care Manual - Page 57
base de la sécheuse. 6. Utiliser du ruban adhésif de masquage pour fixer la porte de la sécheuse. Réinstaller la sécheuse Suivre les "Instructions d'installation" pour installer, niveler et raccorder la sécheuse. 3. Tourner l'ampoule dans le sens antihoraire. Remplacer l'ampoule seulement par une - Maytag MEDB800VU | Use and Care Manual - Page 58
FAQ (Foire aux questions) pour éviter le coût d'un appel de service... www.maytag.ca Fonctionnement de la sécheuse La sécheuse ne fonctionne pas ■ Un ? La sécheuse peut vibrer si elle n'est pas correctement installée. Voir les Instructions d'installation. ■ Les vêtements sont-ils emmêlés ou en boule - Maytag MEDB800VU | Use and Care Manual - Page 59
pas trop long ou ne comporte pas trop de changements de direction. Un long conduit augmentera les durées de séchage. Voir les Instructions d'installation. ■ La sécheuse se trouve-t-elle dans une pièce où la température ambiante est inférieure à 45°F (7°C)? Le bon fonctionnement des programmes de - Maytag MEDB800VU | Use and Care Manual - Page 60
Temps de programme trop court AVERTISSEMENT Risque du poids excessif Utiliser deux ou plus de personnes pour déplacer et installer la sécheuse. Le non-respect de cette instruction peut causer une blessure au dos ou d'autre blessure. ■ Le programme automatique se termine-t-il trop tôt? La charge n' - Maytag MEDB800VU | Use and Care Manual - Page 61
service, consulter la section "Dépannage". Ce guide peut vous faire économiser le coût d'une visite de service. Si vous avez encore besoin d'aide, suivre les instructions la fabrication de chaque nouvel appareil MAYTAG®. Pour localiser des pièces gaz - ensemble d'installation Cordon d'alimentation, 3 - Maytag MEDB800VU | Use and Care Manual - Page 62
Notes 62 - Maytag MEDB800VU | Use and Care Manual - Page 63
dans une région éloignée où un service d'entretien Maytag autorisé n'est pas disponible. 10. La dépose et la réinstallation de votre gros appareil si celui-ci est installé dans un endroit inaccessible ou n'est pas installé conformément aux instructions d'installation fournies. 11. Les gros appareils - Maytag MEDB800VU | Use and Care Manual - Page 64
© 2008 All rights reserved. Tous droits réservés. ®Registered trademark/™ Trademark of Maytag Corporation or its related companies. Used under license by Maytag Limited in Canada ®Marque déposée/™Marque de commerce de Maytag Corporation ou de ses compagnies affiliées. Emploi sous licence par
-
 1
1 -
 2
2 -
 3
3 -
 4
4 -
 5
5 -
 6
6 -
 7
7 -
8
-
9
-
10
-
11
-
12
-
13
-
14
-
15
-
16
-
17
-
18
-
19
-
20
-
21
-
22
-
23
-
24
-
25
-
26
-
27
-
28
-
29
-
30
-
31
-
32
-
33
-
34
-
35
-
36
-
37
-
38
-
39
-
40
-
41
-
42
-
43
-
44
-
45
-
46
-
47
-
48
-
49
-
50
-
51
-
52
-
53
-
54
-
55
-
56
-
57
-
58
-
59
-
60
-
61
-
62
-
63
-
64
 |
 |

BRAVOS
®
STEAM FABRIC CARE
SYSTEM ELECTRIC DRYER
USE & CARE GUIDE
SÉCHEUSE ÉLECTRIQUE BRAVOS
®
AVEC SYSTÈME
DE SOIN DES TISSUS À LA VAPEUR
GUIDE D’UTILISATION ET D’ENTRETIEN
FOR QUESTIONS ABOUT FEATURES, OPERATION/PERFORMANCE, PARTS, ACCESSORIES OR SERVICE
CALL: 1.800.688.9900
IN CANADA, CALL: 1.800.807.6777
AU CANADA, POUR ASSISTANCE, INSTALLATION OU SERVICE, COMPOSEZ LE : 1.800.807.6777
VISIT OUR WEBSITE AT WWW.MAYTAG.COM
IN CANADA, WWW.MAYTAG.CA
OU VISITEZ NOTRE SITE INTERNET À
WWW.MAYTAG.CA
.
W10201176B