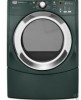
Maytag MEDE500VP Use and Care Guide
Maytag MEDE500VP - Performance Series Front Load Electric Dryer Manual
 |
UPC - 883049144184
View all Maytag MEDE500VP manuals
Add to My Manuals
Save this manual to your list of manuals |
Maytag MEDE500VP manual content summary:
- Maytag MEDE500VP | Use and Care Guide - Page 1
ELECTRIC DRYER USE & CARE GUIDE SÉCHEUSE ÉLECTRIQUE GUIDE D'UTILISATION ET D'ENTRETIEN FOR QUESTIONS ABOUT FEATURES, OPERATION/PERFORMANCE, PARTS, ACCESSORIES OR SERVICE CALL: 1.800.688.9900 IN CANADA, CALL: 1.800.807.6777 VISIT OUR WEBSITE AT WWW.MAYTAG.COM IN CANADA, WWW.MAYTAG.CA W10057351A SI - Maytag MEDE500VP | Use and Care Guide - Page 2
, STORAGE AND MOVING CARE 29 CHANGING THE DRUM LIGHT 29 TROUBLESHOOTING 30 DRYER OPERATION 30 DRYER RESULTS 31 ASSISTANCE OR SERVICE 33 IN THE U.S.A 33 IN CANADA 33 WARRANTY 34 2 ÍNDICE SÉCURITÉ DE LA SÉCHEUSE 35 INSTRUCTIONS D'INSTALLATION 37 Outillage et pièces 37 Piédestal facultatif - Maytag MEDE500VP | Use and Care Guide - Page 3
to the weather. ■ Do not tamper with controls. ■ Do not repair or replace any part of the dryer or attempt any servicing unless specifically recommended in this Use and Care Guide or in published user-repair instructions that you understand and have the skills to carry out. ■ Do not use fabric - Maytag MEDE500VP | Use and Care Guide - Page 4
Reversal Kit. To order, call the dealer from whom you purchased your dryer or refer to the "Assistance or Service" section. Ask for Part Number W10200372. Backguard If you are installing your PERFORMANCE SERIES washer and dryer and wish to avoid having loose items fall behind your machines, you may - Maytag MEDE500VP | Use and Care Guide - Page 5
, and water pressure of 20-100 psi (137.9-689.6 kPa). You may use the cold water supply from your washer using the "Y" connector provided. „ A sturdy floor to support the total dryer weight of 200 lbs (90.7 kg). The combined weight of a companion appliance should also be considered. „ A level floor - Maytag MEDE500VP | Use and Care Guide - Page 6
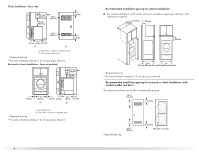
For side or bottom venting, 0" (0 cm) spacing is allowed. Recessed or closet installation - Dryer on pedestal 3"* (7.6 cm) 14" max.* (35.6 cm) 18" min.* (45.72 cm) spacing for recessed or closet installation, with stacked washer and dryer The dimensions shown are for the recommended spacing. 48 - Maytag MEDE500VP | Use and Care Guide - Page 7
Standard, Title 24 CFR, Part 3280 (formerly the Federal Standard for Mobile Home Construction and Safety, Title 24, HUD Part 280) or Standard CAN/CSA electrical connection you will be using and follow the instructions provided for it here. „ This dryer is manufactured ready to install with a 3-wire - Maytag MEDE500VP | Use and Care Guide - Page 8
m) long. Electrical Requirements - Canada Only GROUNDING INSTRUCTIONS ■ For a grounded, cord-connected dryer: This dryer must be grounded. In the event of malfunction Cord Replacement Part Number 9831317. For further information, please reference the service numbers located in the "Assistance or - Maytag MEDE500VP | Use and Care Guide - Page 9
Power Supply Cord Electrical Connection - U.S.A. Only Direct Wire WARNING WARNING Fire Hazard Use a new UL listed 30 amp power supply cord. Use a UL listed strain relief. Disconnect power before making electrical connections. Connect neutral wire (white or center wire) to center terminal (silver - Maytag MEDE500VP | Use and Care Guide - Page 10
the strain relief. The strain relief should have a tight fit with the dryer cabinet and be in a horizontal position. Do not further tighten strain relief opening C. Strain relief threads 4. Now complete installation following instructions for your type of electrical connection: 4-wire (recommended - Maytag MEDE500VP | Use and Care Guide - Page 11
or center wire) E. ¾" (1.9 cm) UL listed strain relief 5. Tighten strain relief screws. 6. Insert tab of terminal block cover into slot of dryer rear panel. Secure cover with hold- down screw. 7. You have completed your electrical connection. Now go to "Venting Requirements." 4-wire connection - Maytag MEDE500VP | Use and Care Guide - Page 12
right). Squeeze hooked ends together. Tighten screws. D 5. Tighten strain relief screw. 6. Insert tab of terminal block cover into slot of dryer rear panel. Secure cover with E hold-down screw. 7. You have completed your electrical connection. Now go to "Venting Requirements." A. External - Maytag MEDE500VP | Use and Care Guide - Page 13
wire Use where local codes permit connecting cabinet-ground conductor to neutral wire. Direct wire cable must have 5 ft (1.52 m) of extra length so dryer can be moved if needed. Strip 31/2" (8.9 cm) of outer covering from end of cable. Strip insulation back 1" (2.5 cm). If using 3-wire cable with - Maytag MEDE500VP | Use and Care Guide - Page 14
facing right). Squeeze hooked ends together. Tighten screws. 4. Tighten strain relief screw. 5. Insert tab of terminal block cover into slot of dryer rear panel. Secure cover with holddown screw. 6. You have completed your electrical connection. Now go to "Venting Requirements." A. External ground - Maytag MEDE500VP | Use and Care Guide - Page 15
or flexible heavy metal vent. „ Review vent system chart. Modify existing vent system if necessary to achieve the best drying performance. 4" 10.2 cm 4" (10.2 cm) heavy metal exhaust vent Vent products can be purchased from your dealer or by calling Maytag Services. For more information, see the - Maytag MEDE500VP | Use and Care Guide - Page 16
dryer from the rear of the dryer. Other installations are possible. B C D A E F G H A. Dryer H. Exhaust outlet Optional exhaust installations This dryer can be converted to exhaust out the may contact your local dealer to have the dryer converted Improper venting can cause moisture and - Maytag MEDE500VP | Use and Care Guide - Page 17
Refer to the manufacturer's instructions. A B A. Over-the Service" section to order. „ Over-the-Top Installation: Part Number 4396028 „ Periscope Installation (For use with dryer vent to wall vent mismatch): Part dryer. „ Reduce performance, resulting in longer drying times and increased energy - Maytag MEDE500VP | Use and Care Guide - Page 18
is made, remove the corner posts and cardboard. Connect Inlet Hose The dryer must be connected to the cold water faucet using the new inlet hoses water faucet off and remove washer inlet hose. 2. Remove old rubber washer from inlet hose and replace with new rubber washer provided. If space permits, - Maytag MEDE500VP | Use and Care Guide - Page 19
connector. 6. Attach straight end of long hose to "Y" connector. 7. Attach washer cold inlet hose to other end of "Y" connector. Screw on coupling by for leaks around "Y" connector, faucet and hoses. Level Dryer Check the levelness of the dryer. Check levelness first side to side, then front to - Maytag MEDE500VP | Use and Care Guide - Page 20
the buildup of lime scale may clog different parts of the water system, which will reduce product performance. Excessive scale buildup may lead to the need for certain part replacement or repair. 13. Select a Timed Dry heated cycle, and start the dryer. Do not select the Air Only Temperature setting - Maytag MEDE500VP | Use and Care Guide - Page 21
, or injury to persons, read the IMPORTANT SAFETY INSTRUCTIONS before operating this appliance. This manual covers several different models. Your dryer may not have all of the cycles and features described. The following is a guide to starting your dryer. Please refer to specific sections of this - Maytag MEDE500VP | Use and Care Guide - Page 22
to set the end of cycle signal. „ Press and hold START/PAUSE button until dryer starts (about 1 second). The Wrinkle Prevent and Cycle Signal features can be adjusted cycles. How Sensor Cycles Work The Sensi-CareTM drying system improves performance with Auto Moisture Sensing Plus, which advances the - Maytag MEDE500VP | Use and Care Guide - Page 23
Drying tips „ Follow care label directions when they are available. „ If desired, add a fabric softener sheet. Follow package instructions. „ Remove the load from the dryer (in the "Cycles" section) for a guide to drying various loads. „ Drying temperature and Sensor Cycles Dryness are preset when - Maytag MEDE500VP | Use and Care Guide - Page 24
dryer with the drying Status indicator lights. Cycles Select the drying cycle that matches the type of load you are drying. See Sensor Preset or Manual , do not interrupt cycle. NSF Protocol P154 Sanitization Performance of Residential clothes Dryers Heavy Duty Use this cycle to get High heat - Maytag MEDE500VP | Use and Care Guide - Page 25
short drying time. Manual Preset Cycle Settings Timed Cycles Load Type Temperature Time (Minutes) TIMED DRY High 40 Heavyweight items, bulky items, bedspreads, work clothes QUICK DRY Small loads High 25 Steam Cycles In these cycles, a small amount of water is sprayed into the dryer drum - Maytag MEDE500VP | Use and Care Guide - Page 26
in a mixed load. When the signal goes off, open the door to stop the dryer, rearrange the load inside the dryer, close the door and restart the dryer to finish the drying cycle. Rearranging the load will aid in the drying process. Press DAMP DRY SIGNAL to turn the alarm on or off. NOTE: The Damp - Maytag MEDE500VP | Use and Care Guide - Page 27
on ordering, please refer to the front page of the manual or contact the dealer from whom you purchased your dryer. To use the drying rack Do not remove the lint screen. 1. Open dryer door. A A. Front edge 2. Place drying rack inside dryer drum, positioning the back wire on the ledge of the - Maytag MEDE500VP | Use and Care Guide - Page 28
floor for a garage installation. Failure to do so can result in death, explosion, or fire. 4. Rinse screen with hot water. 5. Thoroughly dry lint screen with a clean towel. Replace screen in dryer. Cleaning the Lint Screen Every load cleaning The lint screen is located in the door opening of the - Maytag MEDE500VP | Use and Care Guide - Page 29
sure leveling legs are secure in dryer base. 6. Use masking tape to secure dryer door. Reinstalling the dryer Follow the "Installation Instructions" to locate, level and connect the dryer. Changing the Drum Light The dryer light automatically turns on inside the dryer drum when you open the door - Maytag MEDE500VP | Use and Care Guide - Page 30
TROUBLESHOOTING First try the solutions suggested here or visit our website and reference FAQs (Frequently Asked Questions) to possibly avoid the cost of a service call... In U.S.A. http://maytag.custhelp.com - In Canada www.maytag.ca Dryer Operation Dryer will not run „ Has a household fuse blown - Maytag MEDE500VP | Use and Care Guide - Page 31
cm) of airspace, and, for most installations, the rear of the dryer requires 5" (12.7 cm). See the Installation Instructions. „ Was the Air Dry temperature setting selected? Select the right temperature for the types of garments being dried. See "Optional Features." „ Is the load too large and heavy - Maytag MEDE500VP | Use and Care Guide - Page 32
the cycle? Select the Custom Refresh Cycle to tumble the load with water and heat to help smooth out wrinkles from a load left in the dryer. „ Was the dryer overloaded? Dry smaller loads that can tumble freely. Odors „ Have you recently been painting, staining or varnishing in the area where your - Maytag MEDE500VP | Use and Care Guide - Page 33
to local dealers, repair parts distributors and service companies. Maytag® appliances designated service technicians are trained to fulfill the product warranty and provide after-warranty service, anywhere in the United States. To locate the Maytag® appliances designated service company in your area - Maytag MEDE500VP | Use and Care Guide - Page 34
outside the 50 United States and Canada, contact your authorized Maytag dealer to determine if another warranty applies. If you need service, first see the "Troubleshooting" section of the Use & Care Guide. After checking "Troubleshooting," you may find additional help by checking the "Assistance - Maytag MEDE500VP | Use and Care Guide - Page 35
: DANGER Risque possible de décès ou de blessure grave si vous ne suivez pas immédiatement les instructions. AVERTISSEMENT Risque possible de décès ou de blessure grave si vous ne suivez pas les instructions. Tous les messages de sécurité vous diront quel est le danger potentiel et vous disent - Maytag MEDE500VP | Use and Care Guide - Page 36
la sécheuse est utilisée près d'eux. ■ Avant d'enlever la sécheuse du service ou la jeter, enlever la porte du compartiment de séchage. ■ Ne pas mettre d'une recommandation spécifique dans le guide d'utilisation et d'entretien, ou publiée dans les instructions de réparation par l'utilisateur que - Maytag MEDE500VP | Use and Care Guide - Page 37
ces nécessaires avant de commencer l'installation. Lire et suivre les instructions fournies avec les outils indiqués ici. „ Tournevis à lame votre sécheuse. Pour plus de renseignements, veuillez consulter la section "Assistance ou service". A B A. Piédestal facultatif (modèle de 10" (25,4 cm - Maytag MEDE500VP | Use and Care Guide - Page 38
service". Demander la pièce numéro W10200372. Dosseret Si l'on installe la laveuse et la sécheuse PERFORMANCE SERIES Le non-respect de ces instructions peut causer un décès, une Voir "Spécifications électriques". „ Un plancher robuste capable de supporter le poids total de 200 lb (90,7 kg) de la sé - Maytag MEDE500VP | Use and Care Guide - Page 39
„ Pour l'installation dans un placard avec porte, on doit prévoir des orifices d'entrée d'air en haut et en bas de la porte. Les portes à claire-voie offrant une surface équivalente de passage de l'air sont acceptables. „ Il faut aussi prendre en compte l'espace requis entre les appareils voisins. - Maytag MEDE500VP | Use and Care Guide - Page 40
décharge de la sécheuse. Risque de choc électrique Brancher sur une prise à 4 alvéoles reliée à la terre. Le non-respect de cette instruction peut causer un décès ou un choc électrique. C'est à l'utilisateur qu'incombe la responsabilité de „ Communiquer avec un électricien qualifié. „ S'assurer que - Maytag MEDE500VP | Use and Care Guide - Page 41
d'alimentation de rechange numéro de pièce 9831317. Pour plus d'information, veuillez consulter les numéros de service qui se trouvent à la section "Assistance ou service". INSTRUCTIONS DE LIAISON À LA TERRE ■ Pour une sécheuse reliée à la terre et connectée par un cordon : Cette sécheuse doit - Maytag MEDE500VP | Use and Care Guide - Page 42
(10,2 cm) On peut se procurer les produits d'évacuation auprès du marchand ou en téléphonant à Maytag Services. Pour plus de renseignements, voir la section "Assistance ou service". Conduit métallique rigide „ Pour un meilleur rendement de séchage, on recommande d'utiliser des conduits métalliques - Maytag MEDE500VP | Use and Care Guide - Page 43
installation. Deux installations à dégagement réduit sont illustrées. Voir les instructions du fabricant. A B A. Installation au-dessus de la sécheuse ( le dégagement est réduit. Veuillez consulter la section "Assistance ou service" pour passer une commande. „ Installation au-dessus de la sécheuse - Maytag MEDE500VP | Use and Care Guide - Page 44
déformer. „ Utiliser le moins possible de changements de direction à 90°. Déterminer la longueur du conduit et les coudes nécessaires pour la meilleure performance de séchage „ Utiliser le tableau des systèmes d'évacuation ci-dessous pour déterminer le type de matériel à utiliser pour le conduit et - Maytag MEDE500VP | Use and Care Guide - Page 45
pieds de nivellement AVERTISSEMENT Risque du poids excessif Utiliser deux ou plus de personnes pour déplacer et installer la sécheuse. Le non-respect de cette instruction peut causer une blessure au dos ou d'autre blessure. 1. Pour protéger le plancher, utiliser une grande pièce de carton de la bo - Maytag MEDE500VP | Use and Care Guide - Page 46
système d'eau de la sécheuse. Avec le temps, l'accumulation de tartre peut obstruer différentes parties du système d'eau, ce qui réduira la performance du produit. Une accumulation de tartre excessive peut nécessiter le changement ou la réparation de certaines pièces. 13. Régler la sécheuse pour un - Maytag MEDE500VP | Use and Care Guide - Page 47
, caoutchouc ou plastique doivent être séchés sur une corde à linge ou par le programme de séchage à l'air. Le non-respect de ces instructions peut causer un décès ou un incendie. 3. Appuyer sur le bouton POWER/CANCEL (mise sous tension/annulation) puis faire tourner le cadran pour sélectionner un - Maytag MEDE500VP | Use and Care Guide - Page 48
en choisissant More Dry (plus sec), Normal (normal) ou Less Dry (moins sec). La sélection de More Dry (plus sec), Normal (normal) ou Less Dry (moins sec) tection Le système de séchage Sensi-CareTM améliore la performance avec Auto Moisture Sensing Plus (détection automatique avancée de l'humidité), - Maytag MEDE500VP | Use and Care Guide - Page 49
une fois sur le bouton START/PAUSE pour arrêter la sécheuse et permettre à l'utilisateur de sélectionner un autre programme. Air Dry (séchage à air) Utiliser le réglage Air Dry (séchage à air) pour les articles qui doivent être séchés sans chaleur, tels que le caoutchouc, le plastique et les tissus - Maytag MEDE500VP | Use and Care Guide - Page 50
de tissus, si désiré. Suivre les instructions sur l'emballage. „ Retirer la charge de des programmes minutés (à la section "Programmes") pour un guide de séchage de charges diverses. „ Les températures ée, les vêtements cessent de culbuter et la partie Dry (sec) du témoin s'illumine. Wet (mouillé) - Maytag MEDE500VP | Use and Care Guide - Page 51
programme. Protocole NSF P154 Performance d'assainissement des sécheuses de vêtements pour les particuliers Heavy Duty (service intense) Utiliser ce (réglage de la durée) vers le haut ou vers le bas. Timed Dry (séchage minuté) Utiliser ce programme pour achever le séchage si des articles sont encore - Maytag MEDE500VP | Use and Care Guide - Page 52
Programmes Steam (vapeur) Dans ces programmes, une petite quantité d'eau est vaporisée dans le tambour de la sécheuse après quelques minutes de culbutage avec chaleur. La sécheuse continuera à culbuter avec une chaleur ordinaire pendant la durée du programme. Les programmes Steam (vapeur) - Maytag MEDE500VP | Use and Care Guide - Page 53
remettre la sécheuse en marche pour terminer le programme de séchage. Réarranger la charge aidera les articles à mieux sécher. Appuyer sur DAMP DRY SIGNAL (signal de séchage humide) pour activer ou désactiver l'alarme. REMARQUE : Le signal de séchage humide fonctionne uniquement avec les programmes - Maytag MEDE500VP | Use and Care Guide - Page 54
Air seulement). 6. Il faut sélectionner une durée de séchage en appuyant sur les boutons (- ou +) MANUAL DRY TIME (durée de séchage manuel). Régler de nouveau la durée au besoin pour compléter le sé un garage. Le non-respect de ces instructions peut causer un décès, une explosion ou un incendie. 54 - Maytag MEDE500VP | Use and Care Guide - Page 55
Nettoyage du filtre à charpie Nettoyage à chaque charge Le filtre à charpie se trouve dans la porte de la sécheuse. Un filtre obstrué de charpie peut augmenter le temps de séchage. Nettoyage 1. Enlever le filtre à charpie en le tirant directement vers le haut. Enlever la charpie du filtre en la - Maytag MEDE500VP | Use and Care Guide - Page 56
Hiverisation de la sécheuse 1. Débrancher la sécheuse ou déconnecter la source de courant électrique. 2. Fermer le robinet d'eau. 3. Déconnecter le tuyau d'arrivée d'eau du robinet et le vider. Réutilisation de la sécheuse 1. Vidanger les canalisations d'eau. Reconnecter le tuyau d'arrivée d'eau au - Maytag MEDE500VP | Use and Care Guide - Page 57
les références FAQ (Foire Aux Questions), ce qui vous évitera peut-être le coût d'une visite de service...www.whirlpool.ca Fonctionnement de la sécheuse peut vibrer si elle n'est pas correctement installée. Voir les Instructions d'installation. „ Les vêtements sont-ils emmêlés ou en boule? - Maytag MEDE500VP | Use and Care Guide - Page 58
sécheuse. Placer la sécheuse au moins 46 cm (18 po) au-dessus du plancher pour une installation dans un garage. Le non-respect de ces instructions peut causer un décès, une explosion ou un incendie. „ La sécheuse se trouve-t-elle dans une pièce où la température ambiante est inférieure à 45 - Maytag MEDE500VP | Use and Care Guide - Page 59
vous faire économiser le coût d'une visite de service. Si vous avez encore besoin d'aide, suivez les instructions ci-dessous. Lors d'un appel, veuillez connaître plus d'assistance, vous pouvez écrire à Maytag® en soumettant toute question ou problème à : Maytag Services, LLC ATTN: CAIR® Center P.O. - Maytag MEDE500VP | Use and Care Guide - Page 60
que l'usage unifamilial normal ou lorsque les instructions d'installation et/ou les instructions de l'opérateur ou de l'utilisateur fournies marchand Maytag autorisé pour déterminer si une autre garantie s'applique. Si vous avez besoin de service, voir d'abord la section "Dépannage" du Guide d' - Maytag MEDE500VP | Use and Care Guide - Page 61
© 2008 All rights reserved. Tous droits réservés. ®Registered trademark/™ Trademark of Maytag Corporation or its related companies. Used under license by Maytag Limited in Canada ®Marque déposée/™Marque de commerce of Maytag Corporation ou de ses compagnies affiliées. Emploi sous licence par
-
 1
1 -
 2
2 -
 3
3 -
 4
4 -
 5
5 -
 6
6 -
 7
7 -
8
-
9
-
10
-
11
-
12
-
13
-
14
-
15
-
16
-
17
-
18
-
19
-
20
-
21
-
22
-
23
-
24
-
25
-
26
-
27
-
28
-
29
-
30
-
31
-
32
-
33
-
34
-
35
-
36
-
37
-
38
-
39
-
40
-
41
-
42
-
43
-
44
-
45
-
46
-
47
-
48
-
49
-
50
-
51
-
52
-
53
-
54
-
55
-
56
-
57
-
58
-
59
-
60
-
61
 |
 |

ELECTRIC DRYER
USE & CARE GUIDE
SÉCHEUSE ÉLECTRIQUE
GUIDE D’UTILISATION ET D’ENTRETIEN
FOR QUESTIONS ABOUT FEATURES, OPERATION/PERFORMANCE,
PARTS, ACCESSORIES OR SERVICE CALL: 1.800.688.9900
IN CANADA, CALL: 1.800.807.6777
SI TIENE PREGUNTAS RESPECTO A LAS CARACTERÍSTICAS,
FUNCIONAMIENTO, RENDIMIENTO, PARTES, ACCESORIOS O
SERVICIO TÉCNICO, LLAME AL: 1.800.688.9900
EN CANADÁ, LLAME AL: 1.800.807.6777
AU CANADA, POUR ASSISTANCE, INSTALLATION OU SERVICE,
COMPOSEZ LE : 1.800.807.6777
VISIT OUR WEBSITE AT WWW.MAYTAG.COM
IN CANADA, WWW.MAYTAG.CA
VISITE NUESTRO SITIO WEB EN
WWW.MAYTAG.COM
EN CANADÁ, WWW.MAYTAG.CA
OU VISITEZ NOTRE SITE INTERNET À
WWW.MAYTAG.CA
W10057351A