Maytag MEDX550XW Owners Manual
Maytag MEDX550XW Manual
 |
View all Maytag MEDX550XW manuals
Add to My Manuals
Save this manual to your list of manuals |
Maytag MEDX550XW manual content summary:
- Maytag MEDX550XW | Owners Manual - Page 1
en español, visite www.maytag.com Table of Contents Table des matières DRYER SAFETY 2 CHECK YOUR VENT SYSTEM FOR GOOD AIR FLOW 4 CONTROL PANEL & FEATURES 5 CYCLE GUIDE 6 USING YOUR DRYER 7 DRYER CARE 9 TROUBLESHOOTING 11 WARRANTY 13 ASSISTANCE OR SERVICE BACK COVER SÉCURITÉ DE - Maytag MEDX550XW | Owners Manual - Page 2
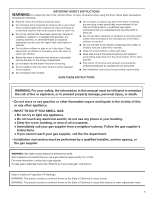
DRYER SAFETY Your safety and the safety of others are very important. We have provided many important safety messages in this manual and don't immediately follow instructions. WARNING You can be killed or seriously injured if you don't follow instructions. All safety messages will tell you what - Maytag MEDX550XW | Owners Manual - Page 3
this manual must • Do not try to light any appliance. • Do not touch any electrical switch; do not use any phone in your building. • Clear the instructions. • If you cannot reach your gas supplier, call the re department. - Installation and service must be performed by a quali ed installer, service - Maytag MEDX550XW | Owners Manual - Page 4
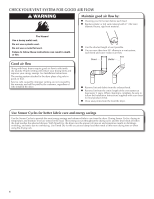
air flow Along with heat, dryers require good air flow to efficiently dry laundry. Proper venting will reduce your drying times and improve your energy savings. See Installation Instructions. The venting system attached to the dryer plays a big role in good air flow. Service calls caused by improper - Maytag MEDX550XW | Owners Manual - Page 5
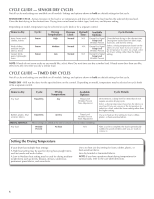
choices, 90 minutes for models with only one choice of heat-free, periodic tumbling at the end of a cycle. Press the WRINKLE PREVENT button to turn ON or OFF at any time before the cycle has ended. Timed Dry (for use with Timed Cycles only) Will run the dryer for the specified time on - Maytag MEDX550XW | Owners Manual - Page 6
GUIDE - TIMED DRY CYCLES Not all cycles and settings are available on all models. Settings and options shown in bold are default settings for that cycle. TIMED DRY - Will run the dryer end of certain cycles to reduce wrinkling. Wrinkle No heat N/A Prevent Cycle Details: Dries items to a damp - Maytag MEDX550XW | Owners Manual - Page 7
Items containing foam, rubber, or plastic must be dried on a clothesline or by using an Air Cycle. Failure to follow these instructions can result in death or fire. 2. Load the dryer Clean the lint screen before each load. Pull the lint screen straight up. Roll lint off the screen with your fingers - Maytag MEDX550XW | Owners Manual - Page 8
Guide models with only one choice of heat-free, periodic tumbling at the end of a cycle. Press the WRINKLE PREVENT button to turn ON or OFF at any time before the cycle has ended. n The WRINKLE PREVENT feature is preset to "OFF." If selected for other cycles, the WRINKLE PREVENT feature setting will - Maytag MEDX550XW | Owners Manual - Page 9
to your dryer and will not stain future loads of clothes. Dry these items inside out to avoid drum staining. Removing accumulated lint From Inside the Dryer Cabinet Lint should be removed every 2 years, or more often, depending on dryer usage. Cleaning should be done by a qualified servicer. From - Maytag MEDX550XW | Owners Manual - Page 10
preference. This change is retained and will affect all of your Sensor cycles, servicing. Replace all parts and panels before operating. Failure to do so can result in death or electrical shock. For direct-wired dryers: 1. Turn off power at fuse or breaker box. 2. Disconnect wiring. 3. Steam models - Maytag MEDX550XW | Owners Manual - Page 11
Instructions." When balled up, the load will bounce, causing the dryer to vibrate. Separate the load items and restart the dryer. No heat Household fuse is blown or circuit breaker has tripped. Supply line valve not open. The drum may be turning, but you may not have heat. Electric dryers - Maytag MEDX550XW | Owners Manual - Page 12
cycle used, or was a separate temperature control set on high? The new electric heating element may have an odor. The odor will be gone after the first cycle. Allow the Cool Down cycle to finish before removing laundry from dryer. All cycles are cooled slowly to reduced wrinkling and make it easier - Maytag MEDX550XW | Owners Manual - Page 13
and Canada, contact your authorized Maytag dealer to determine if another warranty applies. If you think you need repair service, first see the "Troubleshooting" section of the Use & Care Guide. If you are unable to resolve the problem after checking "Troubleshooting," additional help can be found - Maytag MEDX550XW | Owners Manual - Page 14
le danger potentiel et vous disent comment réduire le risque de blessure et ce qui peut se produire en cas de non-respect des instructions. Avertissements de la proposition 65 de l'État de Californie : AVERTISSEMENT : Ce produit contient un produit chimique connu par l'État de Californie pour être - Maytag MEDX550XW | Owners Manual - Page 15
la sécheuse est utilisée près d'eux. � Avant d'enlever la sécheuse du service ou la jeter, enlever la porte du compartiment de séchage. � Ne pas mettre d'une recommandation spécifique dans le guide d'utlilisation et d'entretien, ou publiée dans les instructions de réparation par l'utilisateur que - Maytag MEDX550XW | Owners Manual - Page 16
. Ne pas utiliser un conduit d'évacuation en plastique. Ne pas utiliser un conduit d'évacuation en feuille de métal. Le non-respect de ces instructions peut causer un décès ou un incendie. Circulation d'air adéquate Une sécheuse a besoin de chaleur et d'une circulation d'air adéquate pour sécher - Maytag MEDX550XW | Owners Manual - Page 17
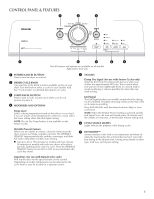
sélectionner les programmes disponibles sur la sécheuse. Tourner le bouton de programme pour sélectionner un programme correspondant à la charge de linge. Voir "Guide de programmes" pour des descriptions de programmes détaillées. 3 BOUTON START/PAUSE (mise en marche/pause) Appuyer sur ce bouton pour - Maytag MEDX550XW | Owners Manual - Page 18
lectionner Less Dry (moins sec) la prochaine fois que l'on sèche une charge semblable. GUIDE DE PROGRAMMES - PROGRAMMES DE SÉCHAGE MINUTÉ Certains programmes ne sont pas disponibles sur certains mod ératures de séchage pour diverses charges, consulter les instructions sur l'étiquette de soin. 18 - Maytag MEDX550XW | Owners Manual - Page 19
mousse, caoutchouc ou plastique doivent être séchés sur une corde à linge ou par le programme de séchage à l'air. Le non-respect de ces instructions peut causer un décès ou un incendie. 2. Charger la sécheuse Nettoyer le filtre à charpie avant chaque charge. Enlever le filtre à charpie en le tirant - Maytag MEDX550XW | Owners Manual - Page 20
ppuyer sur START/PAUSE (mise en marche/pause) pour démarrer le programme Sélectionner le programme souhaité pour la charge. Voir le "Guide de programmes" ou l'affichage pour plus d'informations sur chaque programme. 5. Sélectionner les modificateurs Appuyer sur le bouton START/PAUSE pour démarrer - Maytag MEDX550XW | Owners Manual - Page 21
ENTRETIEN DE LA SÉCHEUSE Nettoyer l'emplacement de la sécheuse Éviter de laisser autour de la sécheuse des éléments qui pourraient obstruer la circulation de l'air et empêcher le bon fonctionnement de la sécheuse. Ceci implique de dégager également les éventuelles piles de linge placées devant la sé - Maytag MEDX550XW | Owners Manual - Page 22
és à la base de la sécheuse. 6. Utiliser du ruban adhésif pour fixer la porte de la sécheuse. Réinstallation de la sécheuse Suivre les "Instructions d'installation" pour choisir l'emplacement, régler l'aplomb de la sécheuse et la raccorder. 22 Changement de la lampe du tambour (sur certain modèles - Maytag MEDX550XW | Owners Manual - Page 23
à l'avant de la sécheuse et, pour la plupart des installations, un espace de 5" (127 mm) est nécessaire à l'arrière de la sécheuse. Voir les "Instructions d'installation". S'assurer que la porte de la sécheuse est complètement fermée. Appuyer sans relâcher sur le bouton START/PAUSE jusqu'à ce que le - Maytag MEDX550XW | Owners Manual - Page 24
sécheuse a détecté un problème nécessitant une réparation. Faire un appel de service. La charge n'est peut-être pas en contact avec les bandes de détection. Régler et les vêtements synthétiques. REMARQUE : Se reporter aux instructions figurant sur l'étiquette de soin des vêtements. Les articles avec - Maytag MEDX550XW | Owners Manual - Page 25
gion éloignée où un service d'entretien Maytag autorisé n'est pas disponible. 9. La dépose et la réinstallation de votre gros appareil ménager si celui-ci est installé dans un endroit inaccessible ou n'est pas installé conformément aux instructions d'installation fournies par Maytag. 10. Les pièces - Maytag MEDX550XW | Owners Manual - Page 26
NOTES 26 - Maytag MEDX550XW | Owners Manual - Page 27
NOTES - Maytag MEDX550XW | Owners Manual - Page 28
, please check "Troubleshooting" or visit www.maytag.com/help. It may save you the cost of a service call. If you still need help, follow the instructions below. When calling, please know the purchase date and the complete model and serial number of your appliance. This information will help us to
-
 1
1 -
 2
2 -
 3
3 -
 4
4 -
 5
5 -
 6
6 -
 7
7 -
8
-
9
-
10
-
11
-
12
-
13
-
14
-
15
-
16
-
17
-
18
-
19
-
20
-
21
-
22
-
23
-
24
-
25
-
26
-
27
-
28
 |
 |
W10097013A
W10097016A-SP
ELECTRONIC DRYER
USE AND CARE GUIDE
Table of Contents
Table des matières
DRYER SAFETY
...............................................................
2
CHECK YOUR VENT SYSTEM
FOR GOOD AIR FLOW
..................................................
4
CONTROL PANEL & FEATURES
......................................
5
CYCLE GUIDE
.................................................................
6
USING YOUR DRYER
.....................................................
7
DRYER CARE
..........................................................................
9
TROUBLESHOOTING
.........................................................
11
WARRANTY
..........................................................................
13
ASSISTANCE OR SERVICE
................................
BACK COVER
SÉCURITÉ DE LA SÉCHEUSE
.........................................
14
VÉRIFICATION D’UNE CIRCULATION D’AIR
ADÉQUATE POUR LE SYSTÈME D’ÉVACUATION
........
16
TABLEAU DE COMMANDE ET CARACTÉRISTIQUES ...17
GUIDE DE PROGRAMMES
...........................................
18
UTILISATION DE LA SÉCHEUSE
...................................
19
ENTRETIEN DE LA SÉCHEUSE
...........................................
21
DÉPANNAGE.
.......................................................................
23
GARANTIE.
...........................................................................
25
ASSISTANCE OU SERVICE.
..............
COUVERTURE ARRIÈRE
SÉCHEUSE ÉLECTRONIQUE
GUIDE D’UTILISATION ET
D’ENTRETIEN
Para una versión de estas instrucciones en español, visite www.maytag.com