Maytag MEW5530DDS Owners Manual
Maytag MEW5530DDS - 30" Single Oven Manual
 |
UPC - 883049141411
View all Maytag MEW5530DDS manuals
Add to My Manuals
Save this manual to your list of manuals |
Maytag MEW5530DDS manual content summary:
- Maytag MEW5530DDS | Owners Manual - Page 1
Keep Warm Favorite Oven Racks Form No. A/01/08 Care & Cleaning 15-17 Self-Clean Oven Cleaning Procedures Part No. w10169640 Maintenance 18 Oven Light Oven Window Troubleshooting 19-20 Warranty & Service 21 Guide de l'utilisateur 22 Guía del Usuario 44 ©2006 Maytag Appliances Sales Co - Maytag MEW5530DDS | Owners Manual - Page 2
only for its intended purpose as described in this guide. To ensure proper and safe operation: Appliance must be properly installed and grounded by a qualified technician. Do not attempt to adjust, repair, service, or replace any part of your appliance unless it is specifically recommended in - Maytag MEW5530DDS | Owners Manual - Page 3
contaminated. • Do not allow aluminum foil or meat probe to contact heating element. • Always turn off all controls when cooking is completed. Utensil Safety • Follow the manufacturer's directions when using oven cooking bags. • This appliance has been tested for safe performance using conventional - Maytag MEW5530DDS | Owners Manual - Page 4
substances. Users of this appliance are hereby warned that when the oven is engaged in the self-clean cycle, there may be some low-level exposure : For microwave oven operation (select models) refer to the use and care guide packed in the microwave oven. Save These Instructions for Future Reference - Maytag MEW5530DDS | Owners Manual - Page 5
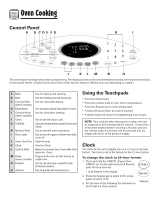
time of day, timer and oven functions. Control panel shown includes Convect and other model specific features. (Styling may vary depending on model.) A Bake B Broil C Convect Bake (select models) D Keep Warm E Convect Roast (select models) F Clean G CANCEL H Number Pads I Oven Light J Timer One/Two - Maytag MEW5530DDS | Owners Manual - Page 6
the clock display is canceled, after 15 minutes, the oven control will go into Standby Mode to save energy. The display will be blank and the oven light will not operate. To "wake up" the control from Standby Mode, press any touchpad. A double beep will sound. To restore the Clock display: Press and - Maytag MEW5530DDS | Owners Manual - Page 7
some baking time differences between a new oven and an old one. See "Adjusting the Oven Temperature" on page 12. Baking with Convection (select models) When convection baking, enter your normal baking temperature. The control will automatically reduce the set oven temperature by 25°. To set Convect - Maytag MEW5530DDS | Owners Manual - Page 8
Oven Cooking Roasting With Convection (select models) When convection roasting, enter your normal roasting time and temperature. The control will automatically prompt you to check the food for doneness at 75% of the set time. Notes: • When convection roasting, the cooking time must be set - Maytag MEW5530DDS | Owners Manual - Page 9
cook. The oven begins to heat at the selected time and cooks for the specified length of time. Delay time can be set from 10 minutes (00:10) to 11 hours, 59 minutes (11:59). To set a Delayed Cook & Hold cycle: 1. Press the Delay or Delay 1 pad (select models). In double wall oven models, press the - Maytag MEW5530DDS | Owners Manual - Page 10
to be slightly lighter if appliance is installed on a 208-volt circuit. • If more than 30 seconds elapse between pressing the Broil pad and the Autoset pad, the oven will not be set and the display will return to the previous display. • A cooling fan will automatically turn on during broiling. If it - Maytag MEW5530DDS | Owners Manual - Page 11
by 5°. The Keep Warm temperature can be set from 145° to 190°. The WARM icon and the temperature will be displayed while the function is active. Keep Warm Notes: • For optimal food quality, oven cooked foods should be kept warm for no longer than 1 to 2 hours. • To keep foods from drying, cover - Maytag MEW5530DDS | Owners Manual - Page 12
show the set temperature, rather than the actual oven cavity temperature. No preheat beep will sound. • The self-clean cycle and automatic door lock do not operate during the Sabbath Mode. • Pressing CANCEL pad will cancel a Bake cycle, however the control will stay in the Sabbath Mode. • If power - Maytag MEW5530DDS | Owners Manual - Page 13
will automatically reappear in the display. You do not need to readjust the oven temperature if there is a power failure or interruption. Temperature adjustment applies to Bake, Convect Bake and Convect Roast (select models cycle will be saved. • A beep will sound to indicate that the control has - Maytag MEW5530DDS | Owners Manual - Page 14
baking operations. It is used to help keep internal parts on the control panel cool. The fan will automatically turn off when parts have cooled. The fan may continue to operate after the oven has been turned off. This is normal. A convection fan (select models) is used to circulate hot air in the - Maytag MEW5530DDS | Owners Manual - Page 15
- select models): Use #1, #3o, #4. (See illustration on page 13.) Create-A-SpaceTM Half Rack (select models) Select wall oven models are equipped aluminum foil or place foil on the oven bottom. Baking results will be affected and damage may occur to the oven bottom. Notes: • The removable section - Maytag MEW5530DDS | Owners Manual - Page 16
are not wiped up before a self-clean cycle. To set Self-Clean: Notes: • Oven temperature must be below 400° F to program a clean cycle. • In double wall oven models, only one oven can be cleaned at a time. 1. Close the oven door. 2. Press the Clean pad. • The CLEAN icon flashes. • "SET" flashes in - Maytag MEW5530DDS | Owners Manual - Page 17
or if a broiler pan was left in the oven. Sounds As the oven heats, you may hear sounds of metal parts expanding and contracting. This is normal and will not damage the oven. Notes: • If the oven door is left open, "door" will flash in the display and a signal will beep until the door is closed and - Maytag MEW5530DDS | Owners Manual - Page 18
order call 1-800-688-9900 USA or 1-800-688-2002 Canada PART Broiler Pan and Insert Control Panel Door Handle, Oven Exterior (select models) Stainless Steel Oven Window & Door - Glass Oven Trim Metal Finishes Oven Interior Oven Racks PROCEDURE Never cover insert with aluminum foil as this prevents - Maytag MEW5530DDS | Owners Manual - Page 19
as they may scratch the glass. 2. Do not hit the glass with pots, pans, furniture, toys, or other objects. 3. Do not close the oven door until the oven racks are in place. Scratching, hitting, jarring or stressing the glass may weaken its structure causing an increased risk of breakage at a later - Maytag MEW5530DDS | Owners Manual - Page 20
bake unevenly. • Oven was not preheated. • The oven may be installed improperly. • Check the oven rack with a level. • Stagger pans, do not allow pans to touch each other or oven wall. • Check instructions for suggested placement of pans on oven rack. Oven door will not unlock. • Oven may not - Maytag MEW5530DDS | Owners Manual - Page 21
instructions for preheating, rack position and oven temperature. • Oven thermostat calibration may differ between old and new ovens. Follow recipe and use the directions in this guide before calling for service since the calibration on the previous oven may have drifted to a too high or too low - Maytag MEW5530DDS | Owners Manual - Page 22
and maintained according to instructions attached to or furnished with the product, Maytag brand of Whirlpool Corporation or Whirlpool Canada LP (hereafter "Maytag") will pay for factory specified parts and repair labor to correct defects in materials or workmanship. Service must be provided by - Maytag MEW5530DDS | Owners Manual - Page 23
® Four Encastré Guide d'utilisation et d'entretien Table des matières Sécurit 23-25 Cuisson 26-36 Cuisson courante Cuisson avec convection Cuisson Méthodes de nettoyage Entretien 40 Lampe du four Hublot du four Recherche des pannes ....... 41-42 Garantie et service 43 Guía del Usuario 44 - Maytag MEW5530DDS | Owners Manual - Page 24
Service à la clientèle 1-800-688-9900 É.-U. 1-800-688-2002 Canada (lundi au vendredi, 8 h à 20 h, heure de l'Est) Internet: http://www.maytag.com service après-vente. Sécurité INSTRUCTIONS DE SÉCURITÉ IMPORTANTES Les instructions de sécurité importantes et les paragraphes «avertissement» de ce guide - Maytag MEW5530DDS | Owners Manual - Page 25
des enfants seuls ou sans supervision lorsque l'appareil est en service ou encore chaud. Ne jamais laisser un enfant s'asseoir détérioration de l'appareil. Utiliser de la feuille d'aluminium uniquement selon les instructions de ce guide. Cuisson et sécurité • NE JAMAIS faire chauffer un récipient non - Maytag MEW5530DDS | Owners Manual - Page 26
sans risque de bris sous l'effet du choc thermique. Observer les instructions du fabricant lors de l'utilisation d'un ustensile en verre. Nettoyage et sur une surface chaude. • Nettoyer uniquement les pièces mentionnées dans ce guide. • Ne pas nettoyer le joint de porte; le joint joue un rôle - Maytag MEW5530DDS | Owners Manual - Page 27
bip retentit lorsque l'on appuie sur une touche. • Un double bip retentit en cas d'erreur de programmation. Remarque : Quatre température seront automatiquement entrées. Si plus de 30 secondes s'écoulent entre la pression sur une touche les instructions données dans la section Réglage de l'horloge. - Maytag MEW5530DDS | Owners Manual - Page 28
effacé et la lampe du four ne fonctionnera plus. Pour relancer le régulateur à partir du mode d'attente, appuyer sur l'une des touches. Un double bip se fera entendre. Réaffichage de l'heure : Appuyer sur les touches CANCEL et Clock et les maintenir ainsi pendant trois secondes. L'heure du jour - Maytag MEW5530DDS | Owners Manual - Page 29
Cuisson Cuisson courante au four Programmation de Bake : 1. Appuyer sur la touche Bake (Cuisson courante). • L'icône BAKE (CUISSON COURANTE) clignote. • 000 clignote à l'afficheur. 2. Sélectionner la température du four. Appuyer sur la touche Autoset pour 350° F (175° C) ou sur les touches numé - Maytag MEW5530DDS | Owners Manual - Page 30
) clignote à l'afficheur. Vérifier l'avancement de la cuisson à ce moment. La lampe du four reste allumée jusqu'à ce que l'on appuie sur la touche Oven Light (Lampe du four). Cuire plus longtemps au besoin. • Appuyer sur la touche Convect Roast pour rappeler la durée de cuisson restante. • Lorsque - Maytag MEW5530DDS | Owners Manual - Page 31
Cuisson Cuisson et maintien Lors de l'utilisation de l'option Cook & Hold (Cuisson et maintien), le four se met à chauffer immédiatement une fois que la commande a été programmée. Puis, le four cuit pendant la durée spécifiée. Lorsque cette durée s'est écoulée, le four maintient la nourriture au - Maytag MEW5530DDS | Owners Manual - Page 32
circuit de 208 volts. • Si plus de 30 secondes s'écoulent entre la pression sur la touche fonctionne pas, contacter un prestataire de service après-vente agrée. • Le gril doit être utilisée. Remarque : Ce tableau n'est qu'un guide de suggestions. Les durées peuvent varier selon l'aliment à cuire. - Maytag MEW5530DDS | Owners Manual - Page 33
Cuisson Maintien au chaud Pour maintenir au chaud des aliments cuits et chauds ou pour réchauffer pains et assiettes. Programmation du gril : 1. Appuyer sur la touche Keep Warm (Maintien au chaud). • L'icône WARM (CHAUD) clignote. • 000 clignote à l'afficheur. 2. Sélectionner la température de - Maytag MEW5530DDS | Owners Manual - Page 34
Cuisson Arrêt automatique/Mode sabbat Le four s'arrête automatiquement après 12 heures s'il a été accidentellement laissé en marche. Cette caractéristique de sécurité peut être arrêtée. Pour annuler l'arrêt 12 heures et faire fonctionner le four en continu pendant 72 heures: 1. Appuyer sur la - Maytag MEW5530DDS | Owners Manual - Page 35
cuisson et maintien comme favorite : 1. Programmer un cycle de cuisson et maintien comme il est décrit à la section Cuisson et maintien à la page 30. 2. Appuyer sur la touche Favorite et la maintenir ainsi pendant trois secondes. • Le cycle cuisson et maintien nouvellement programmé ou en cours de - Maytag MEW5530DDS | Owners Manual - Page 36
fois que l'on appuie sur Oven Light. Évent du four L'é doubles - chaque four s'accompagne d'une grille plate et d'une grille surbaissée. Extraction : 1. Tirer sur la grille jusqu'à la butée. 2. Soulever la grille à l'avant pour pouvoir l'extraire. Réinstallation : 1. Placer la grille sur les supports - Maytag MEW5530DDS | Owners Manual - Page 37
lèchefrite. • La section amovible de la grille peut être utilisée comme support ou grille de refroidissement. S'assurer que la grille a refroidi avant de retirer. • S'assurer que le four a refroidi avant de retirer ou de réinstaller la demi-grille. • Ne pas utiliser un ustensile qui dépasserait du - Maytag MEW5530DDS | Owners Manual - Page 38
pour programmer un cycle d'autonettoyage. • Dans le cas d'un four encastré double, les deux fours ne peuvent pas être en cycle d'autonettoyage en même ) paraît à l'afficheur. Si la porte n'est pas fermée dans les 30 secondes, l'opération d'autonettoyage est annulée et l'afficheur revient à l'heure du - Maytag MEW5530DDS | Owners Manual - Page 39
le cycle d'autonettoyage et qu'elles glissent mal sur leurs supports, les enduire, ainsi que les supports, d'une fine couche d'huile végétale. De fines refroidi. Si ce ventilateur ne fonctionne pas, contacter un prestataire de service après-vente agrée. • La porte du four se trouvera endommagée - Maytag MEW5530DDS | Owners Manual - Page 40
dans un lave-vaisselle. Tableau de commande • Pour utiliser la fonction « Control Lock » (Verrouillage des commandes) pour le nettoyage, voir page 27. plus très bien glisser. Si cela se produit, enduire les grilles et les supports intégrés dans les parois du four d'une fine couche d'huile végétale, - Maytag MEW5530DDS | Owners Manual - Page 41
Entretien Lampe du four ATTENTION • Avant de remplacer l'ampoule, DÉBRANCHER LE FOUR. • S'assurer que l'ampoule refroidit. • Ne pas toucher une ampoule chaude avec un linge humide, l'ampoule risque de se briser. Remplacement de l'ampoule du four : 1. Porter une manique sèche et dévisser très - Maytag MEW5530DDS | Owners Manual - Page 42
• Le four n'a pas été bien préchauffé. Les aliments ne cuisent pas uniformément. • Le four n'a pas été préchauffé. • Le four est peut-être mal installé. • Vérifier la grille du four avec un niveau. • Décaler les ustensiles, les éloigner les uns des autres ou les éloigner des parois du four. • Voir - Maytag MEW5530DDS | Owners Manual - Page 43
four. • Le réglage du thermostat des nouveaux fours peut différer de celui des anciens. Suivre les recettes et les instructions données dans ce guide avant de faire un appel de service. Il est possible que le réglage du four précédent se soit modifié à la hausse ou à la baisse. (Voir page - Maytag MEW5530DDS | Owners Manual - Page 44
dans une région éloignée où un service d'entretien Maytag autorisé n'est pas disponible. 10. La dépose et la réinstallation de votre gros appareil si celui-ci est installé dans un endroit inaccessible ou n'est pas installé conformément aux instructions d'installation fournies. 11. Les gros appareils - Maytag MEW5530DDS | Owners Manual - Page 45
® Horno Mural Guía de Uso y Cuidado Tabla de Materias Seguridad 45-47 Cocinando en el Horno ....... 48-59 Horneado Horneado por Convección 'Cook & Hold' (Cocinar y Mantener Caliente) 'Delay' (Diferir) 'Broiling' (Asar a la Parrilla) 'Keep Warm' (Mantener Caliente) 'Favorite' (Favorito) Parrillas - Maytag MEW5530DDS | Owners Manual - Page 46
Viernes, 8:00 a.m. a 8:00 p.m. Hora del Este) Internet: http://www.maytag.com En nuestro continuo afán de mejorar la calidad y rendimiento de nuestros electrodomé Se debe ejercer sentido común, precaución y cuidado cuando instale, realice mantenimiento o haga funcionar el artefacto. Siempre póngase - Maytag MEW5530DDS | Owners Manual - Page 47
éstico no es un juguete y que no deben jugar con los controles u otras piezas del artefacto. Instrucciones Generales ATENCION NUNCA use un electrodom NUNCA use papel de aluminio para cubrir las parrillas del horno ni el panel inferior del horno. El uso incorrecto puede resultar en un riesgo de - Maytag MEW5530DDS | Owners Manual - Page 48
carne toque el elemento calefactor. • Siempre apague todos los controles cuando haya terminado de cocinar. Seguridad sobre el Uso de Utensilios ni forros de horno de ningún tipo alrededor ni en ninguna parte del horno autolimpiante. Aviso y Advertencia Importante Sobre Seguridad La Propuesta 65 - Maytag MEW5530DDS | Owners Manual - Page 49
y además características específicas de otros modelos. (El estilo del panel de control varía según el modelo.) A 'Bake'(Hornear) Se usa para hornear temperatura, la función será automáticamente programada. Si transcurren más de 30 segundos después de haber oprimido una tecla de función y antes de - Maytag MEW5530DDS | Owners Manual - Page 50
del reloj, oprima la tecla 'Clock' para desplegar brevemente la hora del día. Cuando se cancela el despliegue del reloj, después de 15 minutos, el control del horno pasará a modo 'Standby' para ahorrar energía. El indicador visual quedará en blanco y la luz del horno no funcionará. Para "activar" el - Maytag MEW5530DDS | Owners Manual - Page 51
Horno" en la página 57. Horneado por Convección (modelos selectos) Cuando hornee por convección, programe la temperatura normal de horneado. El control reducirá automáticamente la temperatura programada en 25° F (15° C). Para programar Horneado por convección: 1. Oprima la tecla 'Convect Bake'. • El - Maytag MEW5530DDS | Owners Manual - Page 52
Cuando ase por convección, programe la temperatura normal de horneado. El control le advertirá automáticamente cuando haya transcurrido 75% del tiempo de ón. La luz del horno permanecerá encendida hasta que se oprima la tecla 'Oven Light'. Cocine por más tiempo si es necesario. • Oprima la tecla ' - Maytag MEW5530DDS | Owners Manual - Page 53
en el Horno Mantener Caliente (Cook & Hold) Cuando se usa la opción 'Cook & Hold', el horno comienza a calentar inmediatamente después de que el control ha sido programado. Luego, el horno cocina durante un período de tiempo especificado. Cuando ese tiempo expira, el horno mantendrá el alimento - Maytag MEW5530DDS | Owners Manual - Page 54
Cocinando en el Horno Mantener Caliente Diferido (Delay Cook & Hold) ATENCION No use horneado diferido para alimentos de corta duración tales como productos lácteos, cerdo, carne de ave o mariscos. Cuando usa 'Delay', el horno comienza a cocinar más tarde en el día. Programe la cantidad de tiempo - Maytag MEW5530DDS | Owners Manual - Page 55
asar a la parrilla aumentarán y el dorado será más claro si el electrodoméstico es instalado en un circuito de 208 voltios. • Si transcurren más de 30 segundos antes de oprimir las teclas 'Broil' y 'Autoset', el horno no se programará y el indicador volverá al despliegue anterior. • Un ventilador de - Maytag MEW5530DDS | Owners Manual - Page 56
Cocinando en el Horno Mantener caliente Para mantener calientes en forma segura alimentos calientes o para calentar panes y platos. Para programar 'Keep Warm': 1. Oprima la tecla 'Keep Warm'. • El ícono 'WARM' destella. • '000' destella en el indicador visual. 2. Seleccione la temperatura de 'Keep - Maytag MEW5530DDS | Owners Manual - Page 57
automático de la puerta no funcionará durante el Modo Sabático. • Si oprime la tecla 'CANCEL' se cancelará un ciclo 'Bake', sin embargo el control permanecerá en Modo Sabático. • Si falla la corriente eléctrica, cuando vuelva la energía el horno se activará en Modo Sabático con 72 - Maytag MEW5530DDS | Owners Manual - Page 58
. • El ciclo "Cook & Hold' recientemente programado o en progreso será guardado en memoria. • Se escuchará una señal sonora para indicar que el control ha aceptado el ajuste 'Favorites'. Para comenzar un ciclo programado como Favorito: 1. Oprima la tecla 'Favorite'. • Se desplegará el tiempo y la - Maytag MEW5530DDS | Owners Manual - Page 59
que se oprima la tecla 'Oven Light'. Respiradero del Horno El respiradero del horno está ubicado debajo del panel de control en su horno mural. Cuando sacar: 1. Tire hacia adelante hasta la posición de tope. 2. Levante la parte delantera de la parrilla y tire hacia afuera. Para volver a colocar: 1. - Maytag MEW5530DDS | Owners Manual - Page 60
de aluminio en el panel inferior del horno. Se afectarán los resultados del horneado y se puede dañar el panel inferior del horno. Media la parrilla todavía se puede dejar para colocar una cacerola. Notas: • La parte removible de la parrilla puede usarse como una parrilla de asar en la asadera de - Maytag MEW5530DDS | Owners Manual - Page 61
limpieza. 4. Limpie el exceso de grasa o derrames de la parte inferior del horno. Esto evita humo excesivo o llamaradas durante el se desplegará en el indicador visual. Si la puerta no es cerrada dentro de 30 segundos, la operación de autolimpieza será cancelada y el indicador volverá a desplegar la - Maytag MEW5530DDS | Owners Manual - Page 62
Cuidado y Limpieza 5. Oprima la tecla 'Autoset' para desplegar los ajustes de autolimpieza. 'HVy' (Suciedad intensa, 4 horas) 'MEd' (Suciedad mediana, 3 horas) 'LITE' (Suciedad leve, 2 horas) Al seleccionar el nivel de suciedad del horno se programa automáticamente el tiempo de limpieza. 6. Después - Maytag MEW5530DDS | Owners Manual - Page 63
, llame al 1-800-688-9900 USA or 1-800-688-2002 Canada. PIEZAS Asadera e Inserto PROCEDIMIENTO DE LIMPIEZA Nunca cubra el inserto con el inserto pueden ser lavados en el lavavajillas. Panel de Control • Para activar 'Control Lock' (Bloqueo de los controles) para la limpieza, ver Página 49. - Maytag MEW5530DDS | Owners Manual - Page 64
Mantenimiento Luz del Horno ATENCION • Antes de colocar el foco, DESCONECTE LA CORRIENTE ELECTRICA AL HORNO. • Asegúrese de que el foco esté frío. • No toque un foco caliente con un paño húmedo pues el foco puede quebrarse. Para cambiar la luz del horno: 1. Use un tomaollas seco y con mucho cuidado - Maytag MEW5530DDS | Owners Manual - Page 65
los problemas, verifique primero lo siguiente. SOLUCION • Revise si los controles del horno están debidamente ajustados. • Verifique si el horno está eliminar el humo y/o el olor. • Suciedad excesiva de alimentos en el panel inferior del horno. Use un ciclo de autolimpieza. El horno no activa el - Maytag MEW5530DDS | Owners Manual - Page 66
Localización y Solución de Averías PROBLEMA Los resultados del horneado son inferiores a los esperados. SOLUCION • Los utensilios que están siendo usados pueden no ser del tamaño o material recomendado para obtener los mejores resultados. • Puede que no haya suficiente espacio alrededor de los - Maytag MEW5530DDS | Owners Manual - Page 67
Notas - Maytag MEW5530DDS | Owners Manual - Page 68
Maytag de Whirlpool Corporation o Whirlpool Canada LP (en lo sucesivo denominado "Maytag obra y se le informe a Maytag en un lapso de 30 días a partir de la fecha Maytag para determinar si corresponde otra garantía. Si necesita servicio, consulte primero la sección "Solución de problemas" del Manual
-
 1
1 -
 2
2 -
 3
3 -
 4
4 -
 5
5 -
 6
6 -
 7
7 -
8
-
9
-
10
-
11
-
12
-
13
-
14
-
15
-
16
-
17
-
18
-
19
-
20
-
21
-
22
-
23
-
24
-
25
-
26
-
27
-
28
-
29
-
30
-
31
-
32
-
33
-
34
-
35
-
36
-
37
-
38
-
39
-
40
-
41
-
42
-
43
-
44
-
45
-
46
-
47
-
48
-
49
-
50
-
51
-
52
-
53
-
54
-
55
-
56
-
57
-
58
-
59
-
60
-
61
-
62
-
63
-
64
-
65
-
66
-
67
-
68
 |
 |
©2006 Maytag Appliances Sales Co.
Litho U.S.A .
Safety
..........................................
1-3
Oven Cooking
.........................
4-14
Baking
Convection
Cook & Hold
Delay
Broiling
Keep Warm
Favorite
Oven Racks
Care & Cleaning
...................
15-17
Self-Clean Oven
Cleaning Procedures
Table of Contents
Use & Care Guide
Wall Oven
®
Maintenance
...............................
18
Oven Light
Oven Window
Troubleshooting
...................
19-20
Warranty & Service
....................
21
Guide de l’utilisateur
.................
22
Guía del Usuario
.........................
44
Form No. A/01/08
Part No. w10169640
Reviewed by Stewart, Steven | Released