Maytag MEW5530DDS Installation Instructions
Maytag MEW5530DDS - 30" Single Oven Manual
 |
UPC - 883049141411
View all Maytag MEW5530DDS manuals
Add to My Manuals
Save this manual to your list of manuals |
Maytag MEW5530DDS manual content summary:
- Maytag MEW5530DDS | Installation Instructions - Page 1
INSTRUCTIONS 27" (68.6 CM) AND 30" (76.2 CM) ELECTRIC SINGLE AND DOUBLE BUILT-IN OVEN INSTRUCTIONS D'INSTALLATION FOUR ÉLECTRIQUE ENCASTRÉ DE 27" (68,6 CM) ET 30" (76,2 CM) - SIMPLE ET DOUBLE Table of Contents/Table des matières IBUILT-IN OVEN SAFETY 1 NSTALLATION REQUIREMENTS 2 Tools and Parts - Maytag MEW5530DDS | Installation Instructions - Page 2
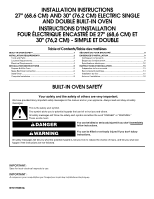
located on the top of the oven. Refer to undercounter installation instructions for cutout dimensions and approved oven cooktop combinations (separate sheet). Product Dimensions - Single Oven 27" (68.6 cm) and 30" (76.2 cm) Ovens A E B D C 27" (68.6 cm) models A. 25³⁄₈" (64.5 cm) max. recessed - Maytag MEW5530DDS | Installation Instructions - Page 3
cm) Single Oven Undercounter (with cooktop installed above) A B Product Dimensions - Double Oven 27" (68.6 cm) and 30" (76.2 cm) Ovens A E (59.7 cm) max. recessed depth E. 49⁵⁄₈" (126.1 cm) recessed height 27" (68.6 cm) models A. 27" (68.6 cm) min. cabinet width B. 1" (2.5 cm) top of cutout - Maytag MEW5530DDS | Installation Instructions - Page 4
Cabinet Dimensions - Double Oven Double Oven Installed in Cabinet A B F D E C 27" (68.6 cm) models A. 27" (68.6 cm) min. instructions provided for it here. ■ Oven must be connected to the proper electrical voltage and frequency as specified on the model/serial number rating plate. The model - Maytag MEW5530DDS | Installation Instructions - Page 5
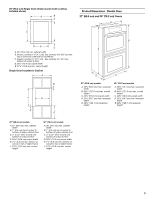
. The length of conduit provided is for serviceability of the oven. ■ A UL listed or CSA approved conduit INSTALLATION INSTRUCTIONS Prepare Built-In Oven 1. Decide on the final location for the oven. Locate existing wiring to avoid drilling into or severing wiring during installation. Remove Oven - Maytag MEW5530DDS | Installation Instructions - Page 6
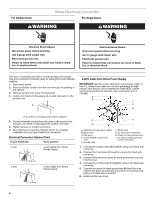
Double Ovens Make Electrical Connection For Single Ovens WARNING WARNING Electrical Shock Hazard Disconnect power before servicing. Use 8 gauge solid copper wire. Electrically ground oven. Failure to follow these instructions neutral, New Branch circuit installations (1996 NEC), mobile homes - Maytag MEW5530DDS | Installation Instructions - Page 7
together using a UL listed wire connector. 4. Install junction box cover. 2. Push oven completely into cabinet and center oven into cabinet cutout. 3. Securely fasten oven to cabinet using the # 8-14 x ¾" screws (4 for single oven, 8 for double oven) provided. Insert the screws through holes in - Maytag MEW5530DDS | Installation Instructions - Page 8
display. 14. If display panel does not light, please reference the "Assistance or Service" section of the Use and Care Guide or contact the dealer from whom you purchased your oven. Complete Installation 1. Check that all parts are now installed. If there is an extra part, go back through the steps - Maytag MEW5530DDS | Installation Instructions - Page 9
double. Installation sous un plan de travail (avec table de cuisson installée au-dessus) : Les fours homologués pour ce type d'installation comportent une étiquette d'homologation placée sur le dessus du four. Voir les instructions d'installation sous le plan de travail pour connaître les dimensions - Maytag MEW5530DDS | Installation Instructions - Page 10
d'encastrement max. E. 27¹⁄₂" (69,9 cm) de hauteur d'encastrement Dimensions du placard - Four simple Four simple sous le plan de travail de 27" (68,6 cm) d'ouverture E. 27⁷⁄₈" (70,8 cm) min. de hauteur d'ouverture Four simple installé dans un placard A B F D E C E D C A. 27" (68,6 cm - Maytag MEW5530DDS | Installation Instructions - Page 11
double Fours de 27" (68,6 cm) et 30" (76,2 cm) A Dimensions du placard - Four double Four double installé dans un placard A B B E D C Modèles de 27" " (127 cm) min. de hauteur d'ouverture Vue en coupe du placard - pour four double ou simple A B E C D A. 24" (61 cm) min. de profondeur de - Maytag MEW5530DDS | Installation Instructions - Page 12
un exemplaire de la norme des codes ci-dessus, contacter : Service KW sur Protection minimale plaque conseillée du circuit signalétique installer le four correctement, il faut établir le type de raccords électriques que l'on utilisera et suivre les instructions double A. Plaque signalétique 12 - Maytag MEW5530DDS | Installation Instructions - Page 13
Le non-respect de cette instruction peut causer A une blessure au dos ou d'autre blessure. 2. Pour éviter d'endommager le plancher, placer le four sur une feuille de carton avant l'installation. Lors des opérations enlever la porte. Conserver la porte du four à part sur une surface couverte. 13 - Maytag MEW5530DDS | Installation Instructions - Page 14
doubles Raccordement électrique Fours simples AVERTISSEMENT AVERTISSEMENT Risque de choc électrique Déconnecter la source de courant électrique avant l'entretien. Utiliser du fil en cuivre rigide de calibre 8. Relier le four à la terre. Le non-respect de ces instructions l'installation - Maytag MEW5530DDS | Installation Instructions - Page 15
du four AVERTISSEMENT Risque du poids excessif Utiliser deux ou plus de personnes pour déplacer et installer le four. Le non-respect de cette instruction peut causer une blessure au dos ou d'autre blessure. 1. À l'aide de 2 personnes ou plus, soulever et introduire partiellement le four - Maytag MEW5530DDS | Installation Instructions - Page 16
four simple, 8 pour un four double). Insérer les vis à . Pour l'installation, procéder selon les instructions suivantes. ■ service" du Guide d'utilisation et d'entretien ou contacter le marchand qui vous a vendu le four. Achever l'installation 1. Vérifier que toutes les pièces sont maintenant install
-
 1
1 -
 2
2 -
 3
3 -
 4
4 -
 5
5 -
 6
6 -
 7
7 -
8
-
9
-
10
-
11
-
12
-
13
-
14
-
15
-
16
 |
 |
INSTALLATION INSTRUCTIONS
27" (68.6 CM) AND 30" (76.2 CM) ELECTRIC SINGLE
AND DOUBLE BUILT-IN OVEN
INSTRUCTIONS D’INSTALLATION
FOUR ÉLECTRIQUE ENCASTRÉ DE 27" (68,6 CM) ET
30" (76,2 CM) - SIMPLE ET DOUBLE
BUILT-IN OVEN SAFET
Y
Table of Contents/Table des matières
IBUILT-IN OVEN SAFETY
...........................................................................
1
NSTALLATION REQUIREMENTS
..............................................................
2
Tools and Parts
.........................................................................................
2
Location Requirements
.............................................................................
2
Electrical Requirements
............................................................................
4
INSTALLATION INSTRUCTIONS
...............................................................
5
Prepare Built-In Oven
...............................................................................
5
Make Electrical Connection
......................................................................
6
Install Oven
...............................................................................................
7
Complete Installation
................................................................................
8
SÉCURITÉ DU FOUR ENCASTRÉ
.............................................................
9
EXIGENCES D’INSTALLATION
..................................................................
9
Outillage et composants
...........................................................................
9
Exigences d'emplacement
.......................................................................
9
Spécifications électriques
.......................................................................
12
INSTRUCTIONS D’INSTALLATION
.........................................................
13
Préparation du four encastré
..................................................................
13
Raccordement électrique
.......................................................................
14
Installation du four
..................................................................................
15
Achever l'installation
...............................................................................
16
IMPORTANT:
Save for local electrical inspector's use.
IMPORTANT :
À conserver pour consultation par l'inspecteur local des installations électriques.
W10176681A
You can be killed or seriously injured if you don't immediately
You
can be killed or seriously injured if you don't follow
All safety messages will tell you what the potential hazard is, tell you how to reduce the chance of injury, and tell you what can
happen if the instructions are not followed.
Your safety and the safety of others are very important.
We have provided many important safety messages in this manual and on your appliance. Always read and obey all safety
messages.
This is the safety alert symbol.
This symbol alerts you to potential hazards that can kill or hurt you and others.
All safety messages will follow the safety alert symbol and either the word “DANGER” or “WARNING.”
These words mean:
follow instructions.
instructions.
DANGER
WARNING